Aug 24, 2015
TechnologyProblem
A Game KeyBoard Rapoo V5 Pro could work propery under windows, but in
Ubuntu 14.04(Trusty) it could not be identified. Following are the steps for enable it.
The dmesg shows following message(similar message):
[ 272.865245] hid-generic 0003:04D9:A04A.0007: input,hidraw4: USB HID v1.10 Keyboard
[xxxxxxxxxxxxxx] on usb-0000:00:1d.0-1/input0
[ 272.874127] hid-generic 0003:04D9:A04A.0008: usage index exceeded
[ 272.874142] hid-generic 0003:04D9:A04A.0008: item 0 2 2 2 parsing failed
[ 272.874187] hid-generic: probe of 0003:04D9:A04A.0008 failed with error -22
Reason
This is an known bug which we could found at:
https://bugs.archlinux.org/task/33322
Or:
https://bugs.launchpad.net/ubuntu/+source/linux/+bug/1064490
The reason is because “usage index exceeded” because the source code definition in
kernel only 12288:
$ cat include/hid.c
....
#define HID_MAX_USAGES			12288
Solution
We need to re-compile the kernel with the modified code, then install it we could get
this keyboard working.
Download the kernel source:
$ mkdir ~/Code/Kernel_Enable_Keyboard && ce ~/Code/Kernel_Enable_Keyboard
$ apt-get source linux-image-$(uname -r)
Now prepare the building environment:
$ sudo apt-get install kernel-package
$ sudo apt-get build-dep linux-image-$(uname -r)
$ sudo apt-get install libncurses5 libncurses5-dev
Modify the code:
$ vim linux-lts-utopic-3.16.0/include/hid.h
- #define HID_MAX_USAGES			12288
+ #define HID_MAX_USAGES			42288
Configure the kernel using your current running configuration and build it:
$ sudo make oldconfig
$ sudo make-kpkg -j N --initrd --append-to-version=my-very-own-kernel kernel-image
kernel-headers
You will get the deb file generated under the folder, sudo dpkg -i *.deb them, reboot
the system, now insert your USB Keyboard, it will be identified and runs OK.
Known Issue
My 8188eu usb wifi dongle could not be identified, so modprobe r8188eu could solve
the problem, Later add it into the system startup script.
$ sudo vim /etc/modules
r8188eu
Aug 22, 2015
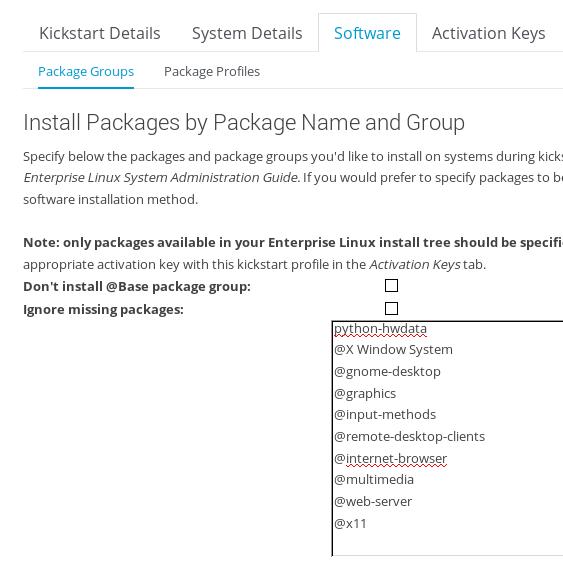
TechnologySoftware Selection
An example is listed as:
@ Base
firefox
@ Gnome
ibus-table-cangjie
ibus-table-erbi
ibus-table-wubi
python-dmidecode
python-hwdata
@X Window System
@gnome-desktop
@graphics
@input-methods
@remote-desktop-clients
@internet-browser
@multimedia
@web-server
@x11
Defined in:
More detailed configuration could be found at the DVD-ROM of the CentOS7:
# ls /var/distro-trees/centos7_64/repodata
175ddec2056ec6b5ef267cea35f8ec679314afbfb019957e53f71725bcc5d829-c7-x86_64-comps.xml
This xml file include all of the possible groups.
Aug 22, 2015
TechnologyEnv
Move from one isolated network to another isolated network. Experiment is done on
virt-manager, from 10.9.10.0/24 to 10.47.58.0/24 network. Following are the steps for
migration.
Steps
First shutdown the machine and connect the existing network card to new network, boot
on the computer.
Modify the ip address(static IP Address):
$ sudo vim /etc/sysconfig/network-scripts/ifcfg-eth0
- IPADDR=10.9.10.13
- GATEWAY=10.9.10.1
+ IPADDR=10.47.58.3
+ GATEWAY=10.47.58.1
Modify the hostname:
# vim /etc/hosts
- 10.9.10.13      spacewalker
+ 10.47.58.3      spacewalker
Modify the dhcpd configuration:
$ sudo vim /etc/dhcp/dhcpd.conf
#  specify network address and subnet mask
-  subnet 10.9.10.0 netmask 255.255.255.0 {
-      # specify the range of lease IP address
-      range dynamic-bootp 10.9.10.200 10.9.10.254;
-      # specify broadcast address
-      option broadcast-address 10.9.10.255;
-      # specify default gateway
-      option routers 10.9.10.1;
-      # Specify default dns server
-      option domain-name-servers 10.9.10.13;
-  }

+ subnet 10.47.58.0 netmask 255.255.255.0 {
+     # specify the range of lease IP address
+     range dynamic-bootp 10.47.58.200 10.47.58.254;
+     # specify broadcast address
+     option broadcast-address 10.47.58.255;
+     # specify default gateway
+     option routers 10.47.58.1;
+     # Specify default dns server
+     option domain-name-servers 10.47.58.3;
+     filename                   "/pxelinux.0";
+     # default-lease-time         21600;
+     # max-lease-time             43200;
+     next-server                10.47.58.3;
+
+ }
DNS Server Configuration:
$ sudo vim /etc/named.conf

options {
        - listen-on port 53 { 127.0.0.1; 10.9.10.13;};
        + listen-on port 53 { 127.0.0.1; 10.47.58.3;};
//.................

	- allow-query     { localhost; 10.9.10.0/24;};
        + allow-query     { localhost; 10.47.58.0/24;};
DNS Server DB Change:
$ sudo vim /etc/named/zones/db.spacewalker
- spacewalker.         IN      A       10.9.10.13
+ spacewalker.         IN      A       10.47.58.3
Reboot and check the result:
[root@spacewalker ~]# ps -ef | grep dhcp
dhcpd      848     1  0 17:02 ?        00:00:00 /usr/sbin/dhcpd -f -cf
/etc/dhcp/dhcpd.conf -user dhcpd -group dhcpd --no-pid
root      2208  2186  0 17:03 pts/0    00:00:00 grep --color=auto dhcp
[root@spacewalker ~]# ps -ef | grep name
named     1031     1  0 17:02 ?        00:00:00 /usr/sbin/named -u named
root      2210  2186  0 17:03 pts/0    00:00:00 grep --color=auto name
[root@spacewalker ~]# hostname --fqdn
spacewalker
[root@spacewalker tftpboot]# netstat -anp | grep 69 | grep xinetd
udp        0      0 0.0.0.0:69              0.0.0.0:*  841/xinetd
Now bootup a machine and add it to the 10.47.58.0/24 network, your machine will be boot
into pxe menu, thus you could reinstall your machine.
Aug 21, 2015
TechnologyRefers to the mirrorlist website, don’t use aliyun, cause their webserver will
forbidden lftp from fetching the infos. I switches to 163.com and ustc.edu.cn for
different repositories, following are the configuration file.
CentOS6
An example is listed as:
# cat /etc/mrepo.conf.d/centos6.conf
[centos6]
name = CentOS $release ($arch)
release = 6
arch = x86_64
metadata = yum repomd

#iso = http://mirrors.163.com/centos/$release/isos/$arch/CentOS-6.6-x86_64-bin-DVD?.iso
# os = http://mirrors.163.com/centos/$release/os/$arch/Packages/
# updates = http://mirrors.163.com/centos/$release/updates/$arch/Packages/
# extras = http://mirrors.163.com/centos/$release/extras/$arch/Packages/
# fasttrack = http://mirrors.163.com/centos/$release/fasttrack/$arch/Packages/
# contrib = http://mirrors.163.com/centos/$release/contrib/$arch/Packages/
# centosplus = http://mirrors.163.com/centos/$release/centosplus/$arch/Packages/
epel = http://mirrors.ustc.edu.cn/epel/$release/$arch/
CentOS7
An example is listed as:
# cat /etc/mrepo.conf.d/centos7.conf
[centos7]
name = CentOS $release ($arch)
release = 7
arch = x86_64
metadata = yum repomd

#iso = http://mirrors.163.com/centos/$release/isos/$arch/CentOS-7.0-1406-x86_64-DVD.iso
os = http://mirrors.163.com/centos/$release/os/$arch/Packages/
updates = http://mirrors.163.com/centos/$release/updates/$arch/Packages/
epel = http://mirrors.ustc.edu.cn/epel/$release/$arch/
extras = http://mirrors.163.com/centos/$release/extras/$arch/Packages/
fasttrack = http://mirrors.163.com/centos/$release/fasttrack/$arch/Packages/
contrib = http://mirrors.163.com/centos/$release/contrib/$arch/Packages/
centosplus = http://mirrors.163.com/centos/$release/centosplus/$arch/Packages/
Sync via:
$ mrepo -g -u -vvv centos6 && mrepo -g -u -vvv centos7
Aug 21, 2015
TechnologyInstallation And Configuration
# yum install -y squid
# vim /etc/squid/squid.conf
http_port 3072
#acl localnet src 192.168.0.0/16        # RFC1918 possible internal network
# Squid normally listens to port 3128
http_port 3072
cache_mem 64 MB
maximum_object_size 4 MB
# Cache 3GB
cache_dir ufs /home/juju/SquidCache     3072    16      256
access_log /var/log/squid/access.log
auth_param basic program /usr/lib64/squid/basic_ncsa_auth /etc/squid/passwd
auth_param basic children 5
auth_param basic kspc-01 proxy
auth_param basic credentialsttl 2 hours
acl myacl proxy_auth REQUIRED
http_access allow myacl
http_access deny all
visible_hostname squid.kspc-01
First you should setup the cache file:
# squid -z
# systemctl start squid
# systemctl enable squid
Change username password via:
$ htpasswd -c /etc/squid/passwd user1
$ htpasswd  /etc/squid/passwd user2
$ htpasswd  /etc/squid/passwd user3
Usage
In firefox: Edit->Preference->Network->Settings->, change proxy setting.
Non-Auth
Just comment following lines in /etc/squid/squid.conf, you could get non-auth squid setup:
http_access allow all
#auth_param basic program /usr/lib64/squid/basic_ncsa_auth /etc/squid/passwd
#auth_param basic children 5
#auth_param basic kspc-01 proxy
#auth_param basic credentialsttl 2 hours
#acl myacl proxy_auth REQUIRED
#http_access allow myacl
#http_access deny all
Use proxy for yum
Add following lines in /etc/yum.conf:
$ echo "proxy=http://192.168.1.79:3128">>/etc/yum.conf
