Aug 30, 2015
TechnologyRefers to:
https://wiki.archlinux.org/index.php/Beginners’guide%28%E7%AE%80%E4%BD%93%E4%B8%AD%E6%96%87%29
Partition
Check if you are in efi mode:
# efivar -l
Then format your disk using parted:
# parted /dev/sda
(parted) mkpart ESP fat32 1M 513M
(parted) set 1 boot on
(parted) mkpart primary ext4 513M 100%
Check if your partition is aligned:
# blockdev --getalignoff /dev/sda
0
I have 2 disks, one for ssd, the other for hdd, so I want to share the swap partition,
and locate the /var directory in the hdd, modify it via:
# mkfs.ext4 /dev/sda2
# mkfs.vfat -F32 /dev/sda1
# mount /dev/sda2 /mnt
# mkdir -p /mnt/boot
# mount /dev/sda1 /mnt/boot
# swapon /dev/sdb1
# mkdir /media/
# mount /dev/sdb2 /media
# mkdir /media/var_for_sda
# ln -s /media/var_for_sda /mnt/var
Now you could do pacstrap.
Installation
Installation are the same as the guildeline show,
# pacman -S dosfstools efibootmgr
# bootctl --path=/boot install
# vim /boot/loader/entries/arch.conf
title          Arch Linux
linux          /vmlinuz-linux
initrd         /initramfs-linux.img
options        root=/dev/sda2 rw
# vim /boot//loader/loader.conf
#timeout 3
default arch
timeout 5
For wireless connection:
# pacman -S iw wpa_supplicant
# pacman -S dialog
Modification of the /etc/fstab:
# /dev/sda2
UUID=xxxxxxxxxxxxxxxxxxxxxxxx       /               ext4 default,rw,data=ordered,noatime,discard 0 1

# /dev/sda1
UUID=xxxxxxxxxxxxxxxxx          /boot           vfat rw,noatime,discard,fmask=0022,dmask=0022,codepage=437,iocharset=iso8859-1,shortname=mixed,errors=remount-ro  0 2

# /dev/sdb1
UUID=xxxxxxxxxxxxxxxxxxx       none            swap defaults        0 0

# /dev/sdb2
UUID=xxxxxxxxxxxxxxxxxxx       /media          ext4	 rw,relatime,data=ordered        0 2

# Only for /var , use mount -o bind
/media/var_for_sda      /var    none    bind
Now reboot everything will be OK.
Configuration For SSD
Profile-sync-daemon for optimization of Browser :
$ yaourt profile-sync-daemon
$ sudo vim /etc/psd.conf
USERS="XXXXX"
BROWSERS="chromium firefox"
USE_OVERLAYFS="yes"
$ sudo systemctl enable psd.service
$ sudo systemctl start psd.service
Test it via:
$ profile-sync-daemon parse
Use firefox -P for changing the profile position. I put all of the profils on HDD.
For chromium, softlink the ~/.config/chromium to HDD disk then you play the tricks for
avoiding HDD from too much write. .
Quickly Add User
Use following command for quickly adding the user with specified priviledge:
# useradd -m -g root -G \
audio,video,floppy,network,rfkill,scanner,storage,optical,power,wheel,uucp -s  \
/usr/bin/zsh xxxxx
# passwd xxxxx
Aug 30, 2015
TechnologySince I met so many problems in archlinux installation on SSD, plus UEFI issues, I use
following virt machine for re-produce the problem and try to find out the solution.
Prepare
Prepare two disk, one for SSD, the second is the oridinary one.
$ qemu-img create -f qcow2 -o cluster_size=4k ArchSSD.qcow2 100G
$ qemu-img create -f qcow2 ArchHDD.qcow2 80G
$ virt-manage
UEFI Support In Virt-Manager
Follow the tips in
https://fedoraproject.org/wiki/Using_UEFI_with_QEMU
# wget http://www.kraxel.org/repos/firmware.repo -O /etc/yum.repos.d/firmware.repo
# yum install edk2.git-ovmf-x64
# vim /etc/libvirt/qemu.conf
 nvram = [
    "/usr/share/edk2.git/ovmf-x64/OVMF_CODE-pure-efi.fd:/usr/share/edk2.git/ovmf-x64/OVMF_VARS-pure-efi.fd",
 ]
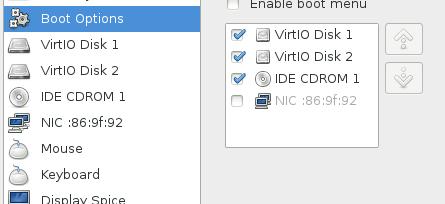
In customization of the vm, select like following:
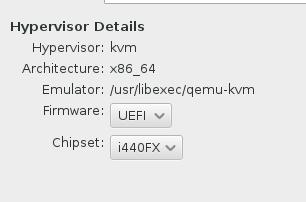
Virtual Machine Definition
The configuration of the vm machine is listed as in following picture:
So now begin to install virt-machine. Use iso for booting up the machine and you will
see following partition configuration in the terminal:
root@archiso ~ # fdisk -l /dev/vda
Disk /dev/vda: 100 GiB, 107374182400 bytes, 209715200 sectors
Units: sectors of 1 * 512 = 512 bytes
Sector size (logical/physical): 512 bytes / 512 bytes
I/O size (minimum/optimal): 512 bytes / 512 bytes
root@archiso ~ # fdisk -l /dev/vdb
Disk /dev/vdb: 80 GiB, 85899345920 bytes, 167772160 sectors
Units: sectors of 1 * 512 = 512 bytes
Sector size (logical/physical): 512 bytes / 512 bytes
I/O size (minimum/optimal): 512 bytes / 512 bytes
Partition Preparation
Aug 26, 2015
TechnologyInstallation Jenkins
Refers to
https://wiki.jenkins-ci.org/display/JENKINS/Installing+Jenkins+on+Ubuntu
$ wget -q -O - https://jenkins-ci.org/debian/jenkins-ci.org.key | sudo apt-key add -
$ sudo sh -c 'echo deb http://pkg.jenkins-ci.org/debian binary/ > /etc/apt/sources.list.d/jenkins.list'
$ sudo apt-get update
$ sudo apt-get install -y jenkins
Install Packer Plugins
Manually(But failed), so finally I use the web-backed for installing.
$ wget https://ci.jenkins-ci.org/jnlpJars/jenkins-cli.jar
$ java -jar jenkins-cli.jar -s http://localhost:8080 help
$ java -jar jenkins-cli.jar -s http://localhost:8080 list-plugins
$ java -jar jenkins-cli.jar -s http://localhost:8080 install-plugin \
http://ftp.yz.yamagata-u.ac.jp/pub/misc/jenkins/plugins/packer/1.2/packer.hpi
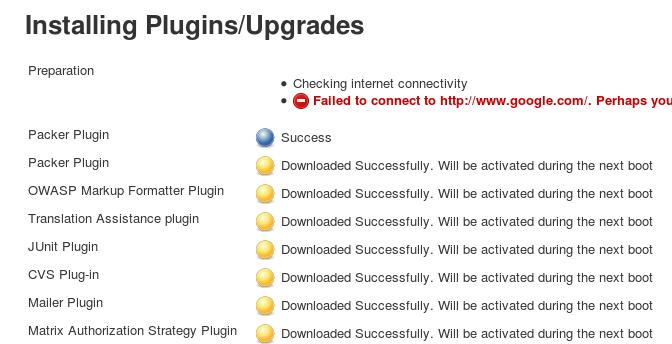
After installation, restart service via service restart jenkins.
How to use it? later will investigate.
Aug 25, 2015
TechnologyImport distro-tree
Copy iso content into the distro-tree:
# mount -t  iso9660 -o loop /mnt/iso/ubuntu-14.04.3-server-amd64.iso /mnt1/
# mkdir /var/distro-trees/ubuntu-14.04.3-amd64
# chmod 755 /var/distro-trees/ubuntu-14.04.3-amd64/
# cp -ar /mnt1/* /var/distro-trees/ubuntu-14.04.3-amd64/
We will copy the pxeboot startup file from CentOS7 into ubuntu14.04 distro tree for
cheating the spacewalk:
# mount -t iso9660 -o loop /mnt/iso/CentOS-7-x86_64-Everything-1503-01.iso /mnt2/
# mkdir -p /var/distro-trees/ubuntu-14.04.3-amd64/images/pxeboot/
# cp /mnt2/images/pxeboot/{initrd.img,vmlinuz} /var/distro-trees/ubuntu-14.04.3-amd64/images/pxeboot/
# ls /var/distro-trees/ubuntu-14.04.3-amd64/images/pxeboot/ -l -h
....
Kickstarting
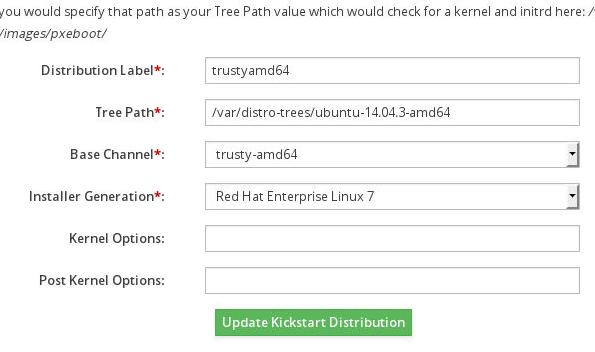
Now in spacewalk go to Systems->Kickstart->Distributions, with the parameters like
following picture:
We copy the CentOS Kernel and initrd, so Spacewalk use redhat parameters for this
distribution, later we will fix this.
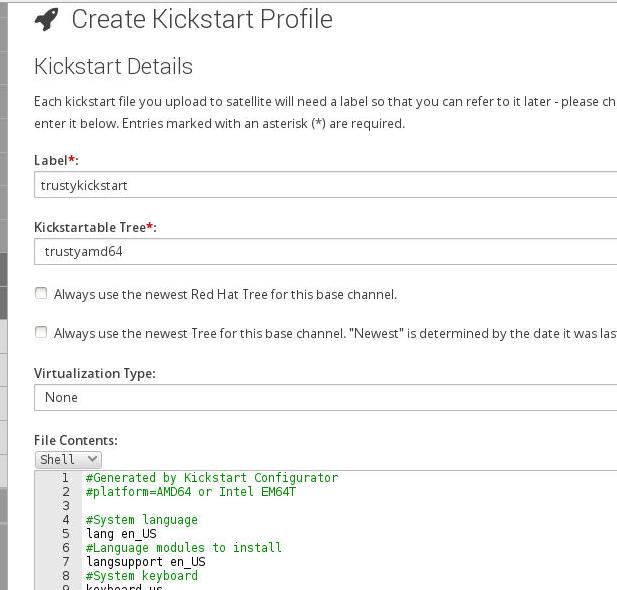
Now create a profile via go to Systems->Kickstart->Profiles and “upload a new kickstart
file”, just like following picture.
We fix the hardcoded breed from redhat to ubuntu via following steps:
Get the list info via cobbler list:

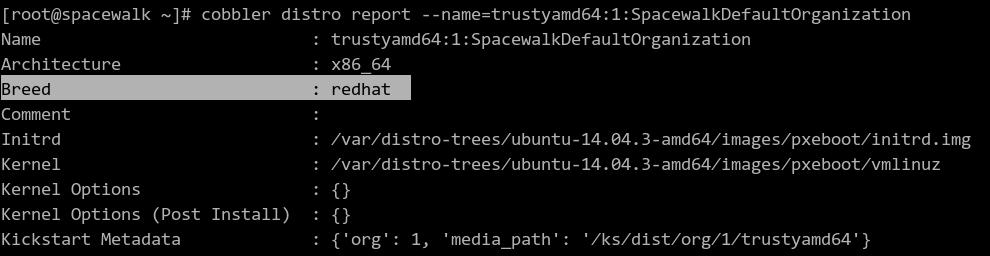
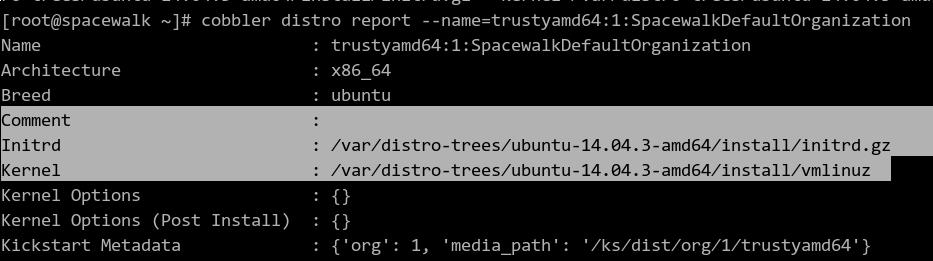
Report the selected distro info:
# cobbler distro report --name=trustyamd64:1:SpacewalkDefaultOrganization
Edit it like following:
# cobbler distro edit --name trustyamd64:1:SpacewalkDefaultOrganization --breed=ubuntu --os-version=jaunty --initrd=/var/distro-trees/ubuntu-14.04.3-amd64/install/netboot/ubuntu-installer/amd64/initrd.gz --kernel=/var/distro-trees/ubuntu-14.04.3-amd64/install/vmlinuz
We should notice the initrd file and kernel has been modified!!!
Now edit the /var/lib/tftpboot/pxelinux.cfg/default file, find the item and modify it like following:
LABEL trustykickstart:1:SpacewalkDefaultOrganization
        kernel /images/trustyamd64:1:SpacewalkDefaultOrganization/vmlinuz
        MENU LABEL trustykickstart:1:SpacewalkDefaultOrganization
        append initrd=/images/trustyamd64:1:SpacewalkDefaultOrganization/initrd.gz  ks=http://192.168.0.79/trustykickstart.cfg ksdevice=eth0 --
        ipappend 2
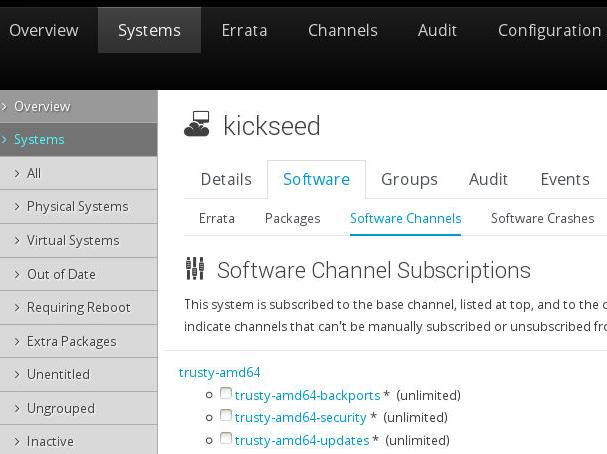
Now you could kickstart your ubuntu trusty now.
Register to SpaceWalk
First create a key under spacewalk for activating all of the trusty clients:

Register the client via:
# apt-get install apt-transport-spacewalk rhnsd
# vim /usr/lib/python2.7/xmlrpclib.py
    def dump_nil (self, value, write):
    - if not self.allow_none:
    - raise TypeError, "cannot marshal None unless allow_none is enabled"
    +# if not self.allow_none:
    +# raise TypeError, "cannot marshal None unless allow_none is enabled"
# apt-get install python-libxml2
# mkdir /var/lock/subsys
# vim /etc/hosts
10.11.11.3      spacewalk
# rhnreg_ks --activationkey=1-trustyamd64 --serverUrl=http://spacewalk/XMLRPC
Warning: unable to enable rhnsd with chkconfig
Register to the main channel:
# cat /etc/apt/sources.list.d/spacewalk.list
deb spacewalk://spacewalk channels: main
# apt-get update
Added more software channels in the spacewalk web.
Update it via:
# apt-get update && apt-get update
Apt-Spacewalk: Updating sources.list
WARNING:root:could not open file '/etc/apt/sources.list'

Ign spacewalk://spacewalk channels: InRelease
Ign spacewalk://spacewalk channels: Release.gpg
Ign spacewalk://spacewalk channels: Release
Ign spacewalk://spacewalk channels:/main amd64 Packages/DiffIndex
Ign spacewalk://spacewalk channels:/main i386 Packages/DiffIndex
Get:1 spacewalk://spacewalk channels:/trusty-amd64-updates amd64 Packages [829 kB]
Get:2 spacewalk://spacewalk channels:/trusty-amd64-backports amd64 Packages [5,177 B]
Get:3 spacewalk://spacewalk channels:/trusty-amd64-security amd64 Packages [437 kB]
Get:4 spacewalk://spacewalk channels:/trusty-amd64-updates i386 Packages [829 kB]
Get:5 spacewalk://spacewalk channels:/trusty-amd64-backports i386 Packages [5,177 B]
Get:6 spacewalk://spacewalk channels:/trusty-amd64-security i386 Packages [437 kB]
Get:7 spacewalk://spacewalk channels:/main amd64 Packages [2,017 kB]
Get:8 spacewalk://spacewalk channels:/main i386 Packages [2,017 kB]
Ign spacewalk://spacewalk channels:/main Translation-en_US
Ign spacewalk://spacewalk channels:/main Translation-en
Ign spacewalk://spacewalk channels:/trusty-amd64-backports Translation-en_US
Ign spacewalk://spacewalk channels:/trusty-amd64-backports Translation-en
Ign spacewalk://spacewalk channels:/trusty-amd64-security Translation-en_US
Ign spacewalk://spacewalk channels:/trusty-amd64-security Translation-en
Ign spacewalk://spacewalk channels:/trusty-amd64-updates Translation-en_US
Ign spacewalk://spacewalk channels:/trusty-amd64-updates Translation-en
Fetched 6,577 kB in 1s (5,320 kB/s)
Met many problems, perhaps the repository error.
Fix Bug, In spacewalk server, change following items:
[root@spacewalk trusty-ia32]# cat Packages | grep -i "Package: python$" -A2
Package: python
Version: 2.7.5-5ubuntu3
Multi-Arch: allowed
[root@spacewalk trusty-ia32]# cat Packages | grep -i "Package: python3$" -A2
Package: python3
Version: 3.4.0-0ubuntu2
Multi-Arch: allowed
[root@spacewalk trusty-ia32]# pwd
/var/cache/rhn/repodata/trusty-ia32
And regenerate the Packages.gz via:
# rm -f Packages.gz
# gzip -c Packages Packages.gz
Now re-install firefox you won’t meet problem.
Enable “Push”
Install the packages, precise’s package will also be OK for trusty.
Notice, the Trusty could use saucy based deb.
$ wget https://launchpad.net/~mj-casalogic/+archive/ubuntu/spacewalk-ubuntu/+files/rhncfg_5.10.14-1ubuntu1%7Esaucy2_all.deb
$ wget https://launchpad.net/~mj-casalogic/+archive/ubuntu/spacewalk-ubuntu/+files/osad_5.11.27-1ubuntu1%7Esaucy5_all.deb
$ wget https://launchpad.net/~mj-casalogic/+archive/ubuntu/spacewalk-ubuntu/+files/pyjabber_0.5.0-1.4ubuntu3%7Esaucy1_all.deb
$ sudo dpkg -i osad_5.11.27-1ubuntu1~saucy5_all.deb
$ sudo dpkg -i pyjabber_0.5.0-1.4ubuntu3~saucy1_all.deb
Import the certification file and modify the osad’s certification file:
# cd /usr/share/rhn
# wget http://spacewalk.example.com/pub/RHN-ORG-TRUSTED-SSL-CERT
# vim /etc/sysconfig/rhn/up2date
sslCACert=/usr/share/rhn/RHN-ORG-TRUSTED-SSL-CERT
# vim /etc/sysconfig/rhn/osad.conf
osa_ssl_cert = /usr/share/rhn/RHN-ORG-TRUSTED-SSL-CERT
# service osad start
# update-rc.d osad defaults
# reboot
If you encounter problem, check the version of the osad/pyjabber, remove the precise
version and install saucy version on Trusty via dpkg -P osad && dpkg -P pyjabber,
install the right version, then everything will becomes OK.
Enable Remote Command
Install and Configure it via:
# dpkg -i rhncfg_5.10.14-1ubuntu1~saucy2_all.deb
# rhn-actions-control --enable-run
# mkdir /var/spool/rhn
Also add configuration:
Now you could run command in spacewalk backend.
Errata
Following the tips on http://cefs.steve-meier.de/
Import erratas into the system.
# ./errata-import.pl --server spacewalk --errata ./errata.latest.xml  --rhsa-oval \
./com.redhat.rhsa-all.xml --channel centos6-i386 --os-version 6 --publish
Aug 25, 2015
TechnologyInstallation
Take i386 architecture for example, first download the rpm package then install it:
$ wget /yum.spacewalkproject.org/2.3-client/RHEL/6/i386/spacewalk-client-repo-2.3-2.el6.noarch.rpm
$ rpm -ivh spacewalk-client-repo-2.3-2.el6.noarch.rpm
If your architecture is x86_64, then select x86_64 corresponding rpm and install it.
Enable EPEL:
# BASEARCH=$(uname -i)
# rpm -Uvh http://dl.fedoraproject.org/pub/epel/epel-release-latest-6.noarch.rpm
Now install the spacewalk client via:
# yum install -y rhn-client-tools rhn-check rhn-setup rhnsd m2crypto yum-rhn-plugin
Configuration
Install Spacewalk server’s CA certificate on the server to enable SSL communication:
# wget http://10.11.11.3/pub/rhn-org-trusted-ssl-cert-1.0-1.noarch.rpm
# rpm -ivh rhn-org-trusted-ssl-cert-1.0-1.noarch.rpm
Add following item into the /etc/hosts and test its reachable:
# vim /etc/hosts
....
10.11.11.3      spacewalk
# ping spacewalk
PING spacewalk (10.11.11.3) 56(84) bytes of data.
64 bytes from spacewalk (10.11.11.3): icmp_seq=1 ttl=64 time=0.214 ms
...
Now register your machine into the server:
# rhnreg_ks --serverUrl=https://spacewalk/XMLRPC --sslCACert=/usr/share/rhn/RHN-ORG-TRUSTED-SSL-CERT --activationkey=1-centos6-i386
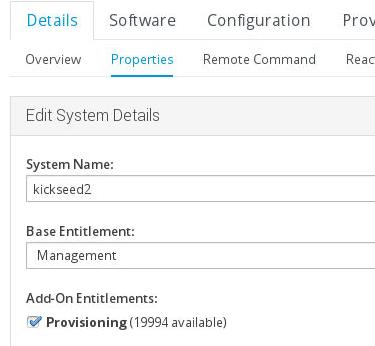
Verify it in SpaceWalk’s system details view.
Enable osad
Install and configure it via:
# yum install osad
# vim /etc/sysconfig/rhn/osad.conf
osa_ssl_cert = /usr/share/rhn/RHN-ORG-TRUSTED-SSL-CERT
# yum install python-hashlib
# service osad start
After osad has been installed, the installation of packages will be done almost
instantly.
