Oct 8, 2015
TechnologyDocker
markdowncv容器启动以后,用python执行一个简单的http server,这时候需要更改其默
认主页,并且做端口映射到主机。
墙外楼推送
用Python的Beautiful Soup或其他的模块,抠到墙外楼上每天更新的文章,同步到某个信
箱,或者直接推送到NOOK?
Cloud-Init
这个东西可以用来管理用户名和密码的更新,从而需要引入新的数据库管理机制之类,可
以在这个星期做一下研究。
Auto-Run Task
启动时,自动同步几个仓库的情况,需要用expect来做,并且添加到awesome启动中。
Synergy Integration
How to move the mouse from the 1.4’s Synergy Server to 1.3’s Synergy Client?
Oct 8, 2015
TechnologyTips
Manually run the commands for generating the CVs.
$ sudo apt-get install -y build-essential
$ sudo apt-get install -y pandoc
$ sudo apt-get install -y wkhtmltopdf
$ sudo apt-get install xvfb
$  echo 'xvfb-run --server-args="-screen 0, 1024x768x24" /usr/bin/wkhtmltopdf $*' > \
/usr/bin/wkhtmltopdf.sh
$ chmod a+x /usr/bin/wkhtmltopdf
$ chmod a+x /usr/bin/wkhtmltopdf.sh
$ ln -s /usr/bin/wkhtmltopdf.sh /usr/local/bin/wkhtmltopdf
$ apt-get install -y ttf-wqy-zenhei
$ apt-get install -y git
$ apt-get install -y rubygems-integration ruby-dev
$ apt-get install -y libimage-exiftool-perl
$ gem install compass
$ gem install susy
$ git clone https://github.com/barraq/pandoc-moderncv.git
$ cd pandoc-moderncv/
$ mkdir -p cv/images/
$ vim cv/cv.md
$ gem install gempass
$ gem install
$ make
#####$ apt-get install python-software-properties
#####$ apt-get install software-properties-common
$ vim Makefile
   -> Change the wkpdf to wkhtmltopdf
$ make pdf
Dockerfile
Write the Dockerfile like following:
# Based on Ubuntu 14.04
FROM ubuntu:trusty

# Install Packages, via apt-get.
RUN apt-get update && apt-get install -y \
	build-essential \
	pandoc \
	wkhtmltopdf \
	xvfb \
	ttf-wqy-zenhei \
	git \
	rubygems-integration \
	ruby-dev \
	libimage-exiftool-perl \
	python-twisted

# Now Change wkhtmltopdf
RUN echo 'xvfb-run --server-args="-screen 0, 1024x768x24" /usr/bin/wkhtmltopdf $*' > /usr/bin/wkhtmltopdf.sh
RUN chmod a+x /usr/bin/wkhtmltopdf
RUN chmod a+x /usr/bin/wkhtmltopdf.sh
RUN ln -s /usr/bin/wkhtmltopdf.sh /usr/local/bin/wkhtmltopdf

# Now Run gems
RUN gem install compass
RUN gem install susy

# Git Clone the CV FrameWork from github.
RUN mkdir -p /opt/Code/
RUN git clone https://github.com/barraq/pandoc-moderncv.git  /opt/Code/pandoc-moderncv

# Now begin to build the cv, using the demo 'scaffold'
RUN cd /opt/Code/pandoc-moderncv/ && make scaffold && make pdf HTMLTOPDF=wkhtmltopdf

# Run http server on server 5177, since in dist/ folder we will have the html and pdf
EXPOSE 5177
CMD ["twistd", "-n", "web", "-p", "5177", "--path", "/opt/Code/pandoc-moderncv/dist/"]
Put it on github, and trigger an auto-build on dockerhub, pulling it and you could get
the well built docker image.
Use this Container
Use it via:
$ sudo docker build -t mycv/mycvapp /home/dash/Code/DockerBuild
$ sudo docker run -d -p 5000:5177 mycv/mycvapp
Since our Docker Container listens 5177 port, we use -p for mapping local machine’s
5000 port to 5177, visit localmachine:5000 then you could found the CV based directory.
Change to Debian Based
Maybe Debian based will be much more slim? But this involves the pandoc issue.
# Based on Debian Wheezy
FROM debian:wheezy

# Install Packages, via apt-get.
RUN apt-get update && apt-get install -y \
        build-essential \
        cabal-install \
        wkhtmltopdf \
        xvfb \
        ttf-wqy-zenhei \
        git \
        rubygems-integration \
        ruby-dev \
        libimage-exiftool-perl \
	zlib1g-dev \
	libdigest-perl \
        python-twisted && rm -rf /var/lib/apt/lists/*

# Via cabal for installing pandoc, latest one will have the markdown plugins
RUN cabal update && cabal install pandoc

# After install pandoc via cabal, update the $PATH
ENV PATH /root/.cabal/bin:$PATH

# Now Change wkhtmltopdf
RUN echo 'xvfb-run --server-args="-screen 0, 1024x768x24" /usr/bin/wkhtmltopdf $*' >
/usr/bin/wkhtmltopdf.sh
RUN chmod a+x /usr/bin/wkhtmltopdf
RUN chmod a+x /usr/bin/wkhtmltopdf.sh
RUN ln -s /usr/bin/wkhtmltopdf.sh /usr/local/bin/wkhtmltopdf

# Now Run gems
RUN gem install compass
RUN gem install susy

# Git Clone the CV FrameWork from github.
RUN mkdir -p /opt/Code/
RUN git clone https://github.com/barraq/pandoc-moderncv.git  /opt/Code/pandoc-moderncv

# Now begin to build the cv, using the demo 'scaffold'
RUN cd /opt/Code/pandoc-moderncv/ && make scaffold && make pdf HTMLTOPDF=wkhtmltopdf

# Run http server on server 5177, since in dist/ folder we will have the html and pdf
EXPOSE 5177
CMD ["twistd", "-n", "web", "-p", "5177", "--path", "/opt/Code/pandoc-moderncv/dist/"]
Sep 22, 2015
TechnologyI have 3 computers which runs ArchLinux/Ubuntu15.04 Mate, they both connected
to the same ethernet, I’d like to use only one mouse/keyboard for controlling
them, following are the steps for how-to.
Network Configuration
The 3 computer are listed as following:
- 192.168.1.11/dashArch/ArchLinux
- 192.168.1.13/dash32G/Ubuntu15.04
- 192.168.1.10/dashMate/Ubuntu15.04
Edit the /etc/hosts in 192.168.1.11:
$ sudo vim /etc/hosts
192.168.1.13    dash32G
192.168.1.14    dashMate
In 192.168.1.13, Edit /etc/hosts:
$ sudo vim /etc/hosts
192.168.1.11    dashArch
Synergy Server
I use ArchLinux for Synergy Server, install it simply via:
$ sudo pacman -S synergy
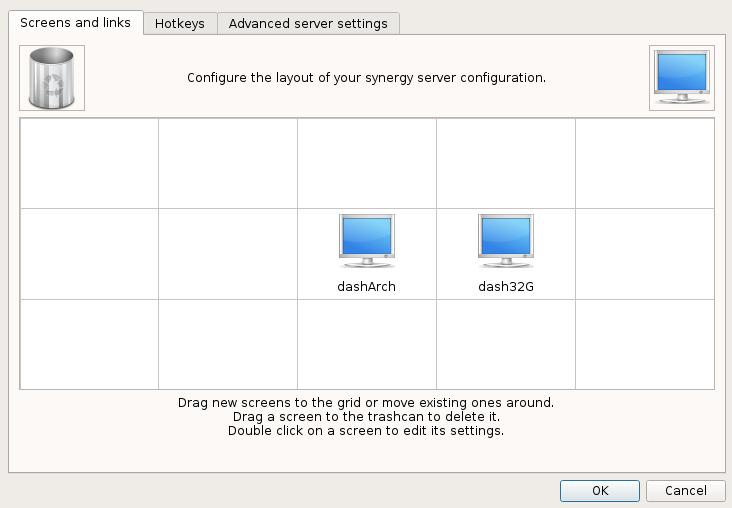
Run synergy via synergy, now configure it:
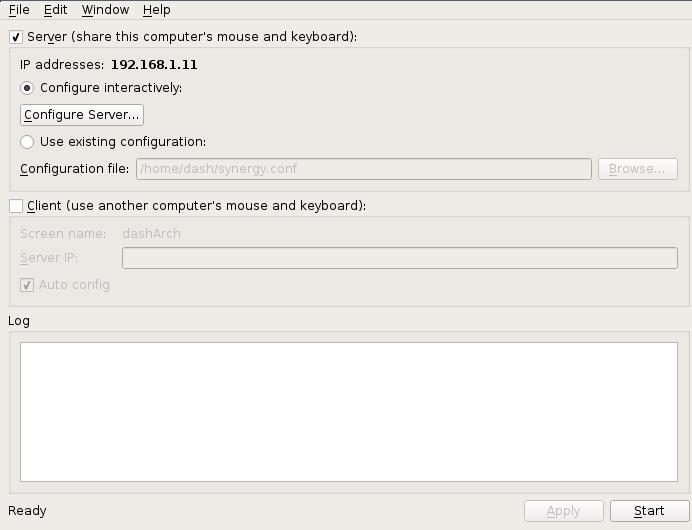
By drag a new machine in the configuration window, named dash32G:
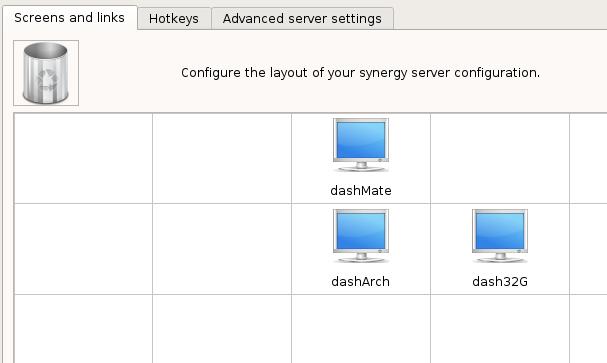
Also drag a new machine in the configuraitn window, named dashMate:
Save the conf file as ~/SynergyArch.conf, then configure the systemctl.
Start the Synergy Server at the startup:
$ cat /usr/lib/systemd/synergys@.service
[Unit]
Description=Synergy Server Daemon
After=network.target

[Service]
User=%i
ExecStart=/usr/bin/synergys --no-daemon --config /home/dash/SynergyArch.conf --enable-crypto
Restart=on-failure

[Install]
WantedBy=multi-user.target
$ sudo systemctl start synergys@dash
$ sudo systemctl enable synergys@dash
Created symlink from
/etc/systemd/system/multi-user.target.wants/synergys@dash.service to
/usr/lib/systemd/system/synergys@.service.
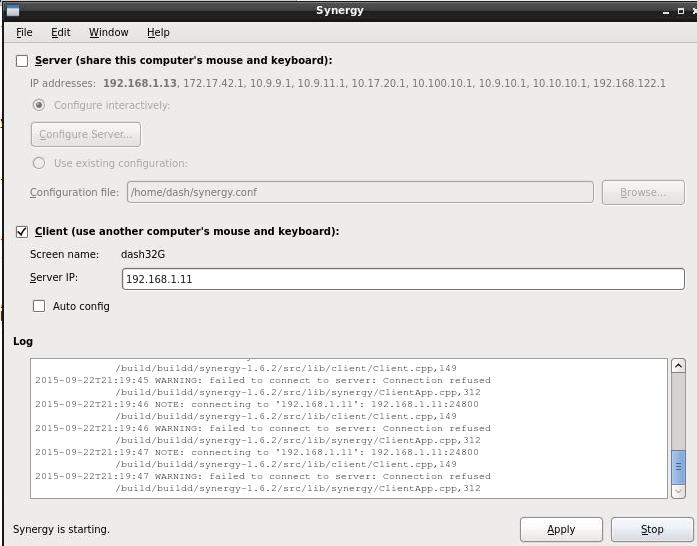
Synergy Client
Install synergy client on Ubuntu via:
$ sudo apt-get install -y synergy
Configure the synergy as the client mode, like following:
Save the configuration file under your home directory, named it as
synergyconfig.conf.
Since the Ubuntu15.04 Mate use lightdm for login, we add following line into
lightdm’s configuration file:
$ sudo vim /usr/share/lightdm/lightdm.conf.d/50-ubuntu-mate.conf
+ greeter-setup-script=/usr/bin/synergyc 192.168.1.11
The same configuration should be applied to dashMate.
Auto-login Synergyc Configuration
Start synergy after login:
To start Synergy once you have logged into your X-session.
Main Menu - System - Preferences - Personnel - Startup Applications
[ Add ]
  Name:     synergys
  Command:  synergys --config ~/.synergy.conf
  Comment:  synergys
Also you should configure the mate configuration file:
$ cat /usr/share/lightdm/lightdm.conf.d/50-ubuntu-mate.conf
[SeatDefaults]
user-session=mate
greeter-setup-script=/usr/bin/synergyc 192.168.1.11
autologin-user=xxxxxx
Now you will have the synergy runs after you login to the mate desktop.
Conclusion
Now restart the computer, and everytime you could switch from different
machines.
Sep 10, 2015
TechnologyProblem
After updating of ChromeOS itself, the crouton failed to start with following message:
Entering /mnt/stateful_partition/crouton/chroots/xxxxxx...

ERROR: ld.so: object '/usr/local/lib/croutonfreon.so' from LD_PRELOAD cannot be
preloaded (cannot open shared object file): ignored.
_XSERVTransmkdir: Owner of /tmp/.X11-unix should be set to root
Solution
First setup the proxy for acrossing the Fucking Great Fire Wall.
In another PC which have the socket proxy, install privoxy:
$ sudo apt-get install -y privoxy
Oh sorry I have to delete the whole chroot environment, delete it via:
$ sudo delete-chroot trusty
This time try kali, list all of the available rleases via:
$ sh ~/Downloads/crouton -r list
Install it via:
$ sudo sh -e ~/Downloads/crouton -r kali -t x11
Tips
List all of the releases and tags:
# sh ~/Downlods/crouton -r list
# sh ~/Downlods/crouton -t list
Finally I choose the sudo sh -e ~/Downloads/crouton -r sana -t e17.
Aug 31, 2015
TechnologySolution
Previous I always encounter problems in removing maas-dhcp, so I checked some materials
show the result is because I disabled apparmor, the solution is:
$ vim /etc/default/grub
GRUB_CMDLINE_LINUX_DEFAULT="security=selinux selinux=1  apparmor=1 security=apparmor"
Add apparmor related, and reboot the computer.
Now you could remove the maas-dhcp and install new softwares.
TIPS
apparmor status
View apparmor status:
sudo apparmor_status
Track Reason
Via restart you could know the exact reason:
$ sudo /etc/init.d/apparmor restart
* Reloading AppArmor profiles * AppArmor not available as kernel LSM.
[fail]
The reason is because the LSM is not avaiable, by editing the grub configuration you
could enable apparmor again.
Disable checking in deb
Hold the package, then you could continue with installing other packages.
# sudo apt-mark hold <package>
OR
# echo <package> hold | sudo dpkg --set-selections
