Oct 13, 2015
LinuxTips1. Tips on Cloud-Init
http://www.cnblogs.com/smallcoderhujin/p/4238609.html
2. Access CloudStack VR
Get the VR IP address from the CloudStack Web Interface:
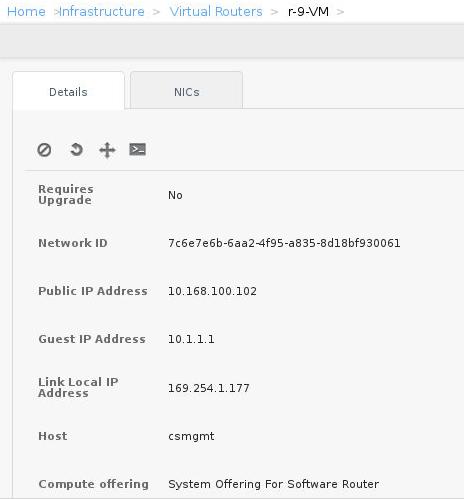
Then get the ssh connection via(On Agent Node):
[root@csmgmt ~]# ssh -i .ssh/id_rsa.cloud -p3922 169.254.1.177
Linux r-9-VM 3.2.0-4-amd64 #1 SMP Debian 3.2.65-1+deb7u2 x86_64
.......
root@r-9-VM:~#
3. Cloudmonkey issue
Couldnot start cloudmonkey, use virtualenv for starting:
$ yum install -y python-virtualenv
$ virtualenv venv --python=python2.6
$ . venv/bin/activate
$ pip install cloudmonkey
Then you could start cloudmonkey in venv environment.
Cloud Performance testing URL.
http://www.qyjohn.net/?p=2715
http://www.ccf.org.cn/resources/1190201776262/2011/10/17/2.pdf
http://www.os-easy.com/News/2014-10/526.html
5. Installation Of VBox Ext Packs
When installing the ext packages:
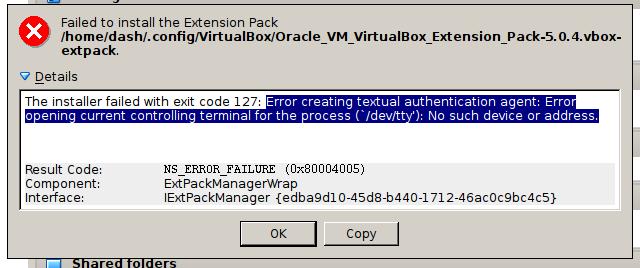
The reason is because the installation program need the root priviledge while
the awesome desktop didn’t support it. By installing the gksu packages from
pacman you could solve it.
More tips on uninstalling ext and re-installing ext:
$ VBoxManage extpack install
Oracle_VM_VirtualBox_Extension_Pack-5.0.4.vbox-extpack
0%...
Progress state: NS_ERROR_FAILURE
VBoxManage: error: Failed to install
"/home/xxxxxxx/.config/VirtualBox/Oracle_VM_VirtualBox_Extension_Pack-5.0.4.vbox-extpack"
VBoxManage: error: Extension pack 'Oracle VM VirtualBox Extension Pack' is
already installed. In case of a reinstallation, please uninstall it first
VBoxManage: error: Details: code NS_ERROR_FAILURE (0x80004005), component
ExtPackManagerWrap, interface IExtPackManager
VBoxManage: error: Context: "RTEXITCODE handleExtPack(HandlerArg*)" at line
1158 of file VBoxManageMisc.cpp
$ VBoxManage list extpacks
Extension Packs: 1
Pack no. 0:   Oracle VM VirtualBox Extension Pack
Version:      5.0.0
Revision:     101573
Edition:
Description:  USB 2.0 and USB 3.0 Host Controller, Host Webcam, VirtualBox
RDP, PXE ROM, Disk Encryption.
VRDE Module:  VBoxVRDP
Usable:       true
Why unusable:
$ VBoxManage extpack uninstall 'Oracle VM
VirtualBox Extension Pack'
0%...10%...20%...30%...40%...50%...60%...70%...80%...90%...100%
Successfully uninstalled "Oracle VM VirtualBox Extension Pack".
$ VBoxManage extpack install
Oracle_VM_VirtualBox_Extension_Pack-5.0.4.vbox-extpack
0%...10%...20%...30%...40%...50%...60%...70%...80%...90%...100%
Successfully installed "Oracle VM VirtualBox Extension Pack".
Now you got the newest ext packages installed for VirtualBox.
6. Change Cursor In Awesome
Download the theme from:
http://gnome-look.org/content/show.php?content=48837
Extract it to your ~/.icon/, and add following items into your configuration
file:
$ cat ~/.xinitrc
etroot -cursor_name Neutral_Plus
$ cat ~/.Xdefaults
Xcursor.theme: Neutral_Plus
Now restart your X you could got Neutral_Plus working. The same method could
be done to aero mouse or more, but the background image is a big issue.
7. CloudStack Chinese Docs
http://cloudstack-installation-zh-cn.readthedocs.org/zh_CN/latest/hypervisor/lxc.html
8. Iptables forward
Added at the first:
sudo iptables -t filter -I FORWARD -j ACCEPT
9. preseed using local repository
Using the local repository for installation.
d-i mirror/country string manual
d-i mirror/http/hostname string 192.168.1.13
d-i mirror/http/directory string /ubuntu
d-i mirror/http/proxy string

d-i apt-setup/restricted boolean true
d-i apt-setup/universe boolean true
d-i apt-setup/backports boolean true
d-i apt-setup/services-select multiselect security
d-i apt-setup/security_host string 192.168.1.13
d-i apt-setup/security_path string /ubuntu
Change the repository after installation:
d-i preseed/late_command string wget http://192.168.1.13/sources.list.13 -O
/target/etc/apt/sources.list
10. Static IP Configuration For Cloud-Init
On Cloud-Init Configuration of Static IP.
https://access.redhat.com/articles/rhel-atomic-cloud-init-faq
11. Forwarding SSH Access To Inner
This will forward the connection to 10003 to 10.0.0.3’s 22 port, thus you will access
the inner machine via ssh -p 10003 xxxx@192.168.10.187.
# iptables -t nat -A PREROUTING -d 192.168.10.187 -p tcp --dport 10003 -j DNAT \
--to-destination 10.0.0.3:22
# iptables-save >/etc/sysconfig/iptables
graphite and collectd:
http://www.infoq.com/cn/articles/graphite-intro
http://www.vpsee.com/2012/05/install-graphite-on-ubuntu-12-04/
http://www.vpsee.com/2012/05/use-collectd-with-graphite-to-monitor-servers/
https://collectd.org/wiki/index.php/Plugin:libvirt
http://www.drupal001.com/2012/07/system-monitor-collectd/
http://www.unixmen.com/install-graphite-centos-7/
http://blog.csdn.net/crazyhacking/article/details/8363235
http://blog.csdn.net/puncha/article/details/9112293
http://skaka.me/blog/2015/07/21/kamon-statsd-graphite-grafana-introduction/
https://codeascraft.com/2011/02/15/measure-anything-measure-everything/
http://devops.com/2014/09/02/guide-modern-monitoring-alerting/
http://network.51cto.com/art/201505/475518_5.htm
14. Log System
http://devops.com/2014/09/02/guide-modern-monitoring-alerting/
http://network.51cto.com/art/201505/475518_all.htm
https://linux.cn/article-5252-shareweibo.html
http://kibana.logstash.es/content/logstash/index.html
https://www.digitalocean.com/community/tutorials/how-to-install-and-use-graphite-on-an-ubuntu-14-04-server
15. Discussion on monitor
http://segmentfault.com/q/1010000000116157
16. Simulation
Online simulation for electronics:
https://www.systemvision.com/
17. Website Generator
hugo:
http://gohugo.io/overview/introduction/
18. Install Collectd On CentOS6
$ http://giovannitorres.me/how-to-build-rpms-collectd-example.html
$ http://giovannitorres.me/enabling-almost-all-collectd-plugins-on-centos-6.html
19. View CentOS Version
# cat /etc/redhat-release
CentOS Linux release 7.1.1503 (Core)
20. Get Collectd Packages
# wget -O /etc/yum.repos.d/epel.repo http://mirrors.aliyun.com/repo/epel-7.repo
# yum install --downloadonly --downloaddir=/root/Collectd collectd*
21. Vagrant Verification
# mkdir collectdtest
# cd collectdtest/
# vagrant box list
centos66        (virtualbox, 0)
vagrant_machine (virtualbox, 0)
# vagrant init centos66
# vagrant up
Bringing machine 'default' up with 'virtualbox' provider...
22. Cockpit
Cockpit由红帽公司开发,旨在让服务器管理起来更容易。借助这个基于Web的GUI,你就能处理众多任务,比如管理存储资源、检查日志、启动/终止服务以及监控多台服务器。Cockpi可以在Fedora Server、Arch Linux、CentOS Atomic、Fedora Atomic和红帽企业级Linux(RHEL)上运行。

相关链接:http://cockpit-project.org
23. OpenWRT DHCP Pool Configuration
By Luci is very hard to find, so directly edit it under terminal.
# vi /etc/config/dhcp
config dhcp 'lan'
        option interface 'lan'
        option start '100'
        option limit '150'
        option leasetime '12h'
24. Read-Only System In CentOS 6
Enter root’s password, and then remount the filesystem via following command:
# mount -o remount,rw /
Now you could edit your filesystem and configure its configuration files.
25. ArchLinux nf_conntrack limitation
# vim /etc/sysctl.d/99-sysctl.conf
net.netfilter.nf_conntrack_max = 1048576
# sysctl --system
26. Conntrack调优
http://www.linuxsky.org/doc/admin/200704/35.html
27. Qemu With OpenVswitch
http://git.openvswitch.org/cgi-bin/gitweb.cgi?p=openvswitch;a=blob_plain;f=INSTALL.KVM;hb=HEAD
https://airtower.wordpress.com/2012/12/26/multiple-network-devices-in-kvm/
28. Ubuntu ffmpeg
$ axel http://ffmpeg.org/releases/ffmpeg-2.8.1.tar.bz2
$ sudo apt-get install yasm
$ sudo apt-get install -y libx264-142 libx264-dev
$ sudo apt-get install -y libfaac0 libfaac-dev
$ sudo apt-get install -y libmp3lame-dev libmp3lame0
$ sudo apt-get install libtheora-dev libtheora0
$ sudo apt-get install libvorbis-dev
$ sudo apt-get install libxvidcore-dev
$ tar xjvf ffmpeg-2.8.1.tar.bz2
$ cd ffmpeg-2.8.1
$ ./configure --enable-gpl --enable-version3 --enable-nonfree --enable-postproc
--enable-pthreads --enable-libfaac  --enable-libmp3lame --enable-libtheora
--enable-libx264 --enable-libxvid --enable-x11grab --enable-libvorbis --prefix=/usr
$ make -j4
$ sudo make install
29. Use pdftk For Splitting PDF
$ sudo apt-get install -y pdftk
$ pdftk A=book.pdf cat A75-84 output Cut.pdf
On Ubuntu14.04 Server, install lightdm and fluxbox:
# apt-get install -y lightdm fluxbox sakura
# vim /usr/share/xsessions/lightdm-xsession.desktop
[Desktop Entry]
Version=1.0
Name=Default Xsession
Exec=fluxbox
Icon=
Type=Application
Now you could select fluxbox for using at the startup screen.
Auto-login into fluxbox:
# vim /etc/lightdm/lightdm.conf
[SeatDefaults]
autologin-user=adminubuntu
autologin-user-timeout=0
Install teamviewer, first download the teamviewer’s deb from its official website, then
install it via:
Remember to manually resolve the dependencies.
# dpkg --add-architecture i386
# apt-get update
# dpkg -i teamviewer_11.0.50678_i386.deb
# apt-get -f install
Be sure to turn off the ufw to allow the connection:
# sudo ufw disable
Automatically save your screen via adding following definition:
$ vim ~/.config/.fluxbox/startup
+ xscreensaver&
31. Monitor Docker filesystem
https://sysdig.com/monitoring-docker-file-systems-and-file-io-with-sysdig-cloud/
32. Socat Connection
Reuse the ports:
vps# socat TCP4-LISTEN:2222,reuseaddr,fork TCP4:localhost:3322
33. Office 2013
activate the serial no together with your office installation.
http://www.zhihu.com/collection/38938285?page=1
34. Linux And Music
https://www.maketecheasier.com/linux-learning-music/
35. ia32-libs
To install ia32-libs, using raring repository, after installation , remove
this repository:
sudo apt-get install libc6:i386
sudo -i
cd /etc/apt/sources.list.d
echo "deb http://old-releases.ubuntu.com/ubuntu/ raring main restricted
universe multiverse" >ia32-libs-raring.list
apt-get update
apt-get install ia32-libs
rm /etc/apt/sources.list.d/ia32-libs-raring.list
apt-get update
exit
sudo apt-get install gcc-multilib
36. Install libc6 in Debian
The newer version.
    Add the following line to the file /etc/apt/sources.list:
    deb http://ftp.debian.org/debian experimental main
    Update your package database:
    apt-get update
    Install the eglibc package:
    apt-get -t experimental install libc6-amd64 libc6-dev libc6-dbg
37. Teamviewer connection
In order to connect the remote machine, close the ufw, then you could directly connect
to
teamViewer? Open 80, 443 and 5938-5939 port.
# ufw disable
38. Pygment Error
When you encounter following error:
Error: Pygments can't parse unknown language: </p>
Then edit plugins/pygments_code.rb:
rescue MentosError
   raise "Pygments can't parse unknown language: #{lang}#{code}."
end
Now rake generate again, you will see the error hints, modify the
corresponding markdown page.
39. Install rhc
For installing rhc on your machine, while your machine is Ubuntu14.04, you could only
use gem for installing, while in vivid or later you could directly apt-get install rhc:
$ sudo gem install rhc
$ rhc setup
40. pelican-openshift
41. Show Pop-Up Dialog
Show the message with a dialog.
zenity --info --text="Calculation complete"
Remote show:
ssh -Y xxxx@192.168.0.119 'zenity --info --text="Calculation complete"'

### 42. Git tips
Remove the remote branch:
git push origin –delete c0de
Check the remote's branch:
$ git remote show origin
4a0fd58a35726d413edcc93e2e7dcfe31d4861ac
### 43. Add another IP
Add the 10 subnet IP Address.
ifconfig ovsbr0:10 192.168.10.119/24
### 44. Chromebook Using Samba
Install samba client:
$ sudo apt-get install samba smbclient
Detect the remote samba server's sharing folder:
$ sudo smbclient -L 192.168.0.119 -U%
But still you could not mount the remote machine. Finally i have to install the plugins
from chromestore which named `File System For Windows`.

Still, mount with some problems when using samba server of Ubuntu.

### 45. oh-my-zsh
Install oh-my-zsh via:
-)”
vim ~/.zshrc
ZSH_THEME="agnoster”
Select the theme in konsole for Solarized, then you got pretty good looking for your
zsh.


### 46. Surface Pro Issue
gpg –keyserver pgpkeys.mit.edu –recv-key 38DBBDC86092693E
gpg –keyserver pgpkeys.mit.edu –recv-key 79BE3E4300411886
https://github.com/nuclearsandwich/surface3-archlinux
https://www.reddit.com/r/SurfaceLinux/comments/2b1hf6/running_ubuntu_1404_on_surface_pro_1_full_time/
Marvell:
https://origin-www.marvell.com/wireless/avastar/88W8897/
Good, signature:
http://www.cyberciti.biz/faq/pgp-tarball-file-signature-keys-verification/
### 47. Ceph Example
[https://linux.cn/article-6624-1.html?utm_source=weibo&utm_medium=weibo](https://linux.cn/article-6624-1.html?utm_source=weibo&utm_medium=weibo)

### 48. Daily Cron
You should edit the following configuration file for customize your own crontab task
for everyday/everyweek/everymonth:
$ vim /etc/crontab
17 * * * * root cd / && run-parts –report /etc/cron.hourly
25 6 * * * root test -x /usr/sbin/anacron || ( cd / && run-parts –report
/etc/cron.daily )
47 6 * * 7 root test -x /usr/sbin/anacron || ( cd / && run-parts –report
/etc/cron.weekly )
52 6 1 * * root test -x /usr/sbin/anacron || ( cd / && run-parts –report
/etc/cron.monthly )
For example, change the `25 6` to `25 12`, thus change the daily crontab task from 6:25
AM to 12:25 AM of the day.

### 49. SRX Issue
[https://www.citrix.com/blogs/2015/11/05/configure-juniper-srx-in-cloudplatform/](https://www.citrix.com/blogs/2015/11/05/configure-juniper-srx-in-cloudplatform/)


### 50. Quickly For AlsaMixer
$ sudo pacman -S alsa-utils
$ amixer sset Master unmute
$ mplay *.mp3
### 51. x2x
Synergy could lost connection between client/server, so I have to change to x2x, simply
do following then I could setup the connection between 2 machines and sharing the
mouse/keyboard.

Ubuntu As Server
$ sudo apt-get install -y x2x
Arch As Client
$ yaourt x2x
….
2 aur/x2x-git
Then we start sharing the server's keyboard/mouse via:
$ ssh -X 10.0.80.17 x2x -west -to :0
Todo: while the shortcuts are not OK. You have to use mouse for switching the screen.

### 48. tips for Nov24
freescale's debugging/ Customize OpenStack.

### 49. ArchLinux ntp
First setup the timezone of the machine via:
$ timedatectl list-timezones
timedatectl set-timezone Asia/Shanghai
Enable the openntp service:
$ sudo pacman -S openntpd
$ sudo systemctl enable openntpd
$ sudo systemctl start openntpd
### 50. xfs partition
Create xfs parted .
mkfs.xfs -f /dev/vdb1
### 51. Tips For Ceph
[http://wyq.me/blog/2015/06/17/centos7%E4%B8%8B%E9%85%8D%E7%BD%AEceph%EF%BC%8C%E5%8C%85%E6%8B%ACobject-storage%E5%92%8Ccephfs/](http://wyq.me/blog/2015/06/17/centos7%E4%B8%8B%E9%85%8D%E7%BD%AEceph%EF%BC%8C%E5%8C%85%E6%8B%ACobject-storage%E5%92%8Ccephfs/)

[http://www.docoreos.com/?p=99](http://www.docoreos.com/?p=99)

### 52. Boot Linux In 1 Second
[http://elinux.org/images/9/97/Boot_one_second_altenberg.pdf](http://elinux.org/images/9/97/Boot_one_second_altenberg.pdf)

### 53. collectd on Ubuntu
Configuration should be activated via:
<Plugin “sensors">
Sensor “it8712-isa-0290/voltage-in1”
IgnoreSelected true
### 54. Bluetooth
How to enable bluetooth PAN?

[https://wiki.gentoo.org/wiki/Bluetooth_Network_Aggregation_Point#BlueZ_5_method](https://wiki.gentoo.org/wiki/Bluetooth_Network_Aggregation_Point#BlueZ_5_method)

### 55. Quickly Using Kernel Configuration
cp /proc/config.gz /mnt/gentoo/usr/src/linux
chroot /mnt/gentoo /bin/bash
cd /usr/src/linux
gunzip config.gz
mv config .config
make && make modules_install
cp arch/构架/bzImage /boot/kernel-xxx
rm -rf /boot/grub/grub.cfg
grub2-mkconfig -o /boot/grub/grub.cfg
### 56. Use pip for installing
$ pip install dbus-python -i http://pypi.douban.com/simple –trusted-host pypi.douban.com
### 57. Python based visualization

[https://github.com/shengxinjing/my_blog/issues/1](https://github.com/shengxinjing/my_blog/issues/1)


### 58. F5 Based
http://zyan.cc/f5_big_ip/
https://support.f5.com/kb/en-us/products/big-ip_ltm/manuals/product/bigip-ve-setup-linux-kvm-11-5-0.html?sr=39135533
http://comments.gmane.org/gmane.comp.apache.cloudstack.user/10368
### 59. OVS On CentOS7
The main steps are listed as following, refers to
[https://n40lab.wordpress.com/2015/06/28/centos-7-installing-openvswitch-2-3-2-lts/](https://n40lab.wordpress.com/2015/06/28/centos-7-installing-openvswitch-2-3-2-lts/)
adduser ovs
su - ovs
$ mkdir -p ~/rpmbuild/SOURCES
$ wget http://openvswitch.org/releases/openvswitch-2.3.2.tar.gz
$ cp openvswitch-2.3.2.tar.gz ~/rpmbuild/SOURCES/
$ tar xfz openvswitch-2.3.2.tar.gz
$ sed ‘s/openvswitch-kmod, //g’ openvswitch-2.3.2/rhel/openvswitch.spec >
openvswitch-2.3.2/rhel/openvswitch_no_kmod.spec
$ rpmbuild -bb –nocheck openvswitch-2.3.2/rhel/openvswitch_no_kmod.spec
$ exit
mkdir /etc/openvswitch
yum localinstall /home/ovs/rpmbuild/RPMS/x86_64/openvswitch-2.3.2-1.x86_64.rpm
systemctl start openvswitch.service
chkconfig openvswitch on
ovs-vsctl -V
### 60. Performance/Monitoring/Testing For Linux
[https://linux.cn/article-3820-1-rel.html](https://linux.cn/article-3820-1-rel.html)

### 61. Git Show Log
Show last 2 commit changes:
### 62. tessera in production
[https://thecustomizewindows.com/2014/07/monitoring-tools-dashboard-with-tessera/](https://thecustomizewindows.com/2014/07/monitoring-tools-dashboard-with-tessera/)

### 63. Grafana Demo
[http://play.grafana.org/dashboard/db/big-dashboard](http://play.grafana.org/dashboard/db/big-dashboard)

### 64. Change netmask
Quickly changing the netmask via ifconfig:
$ sudo ifconfig ovsbr0 netmask 255.255.0.0
### 65. Disable tomcat6
via:
update-rc.d tomcat6 disable
### 66. Quickly get the alive IP
Using nmap and grep we could get the alive IP lists:
$ nmap -v -sn 10.47.58.0/24 | grep “up” -B1
### 67. Run Cloudstack in Virtualbox
[http://cloud.51cto.com/art/201501/464053_all.htm](http://cloud.51cto.com/art/201501/464053_all.htm)

### 68. View Freebsd mounted disk
View the freebsd mounted disk:
$ cat /var/run/dmesg.boot
### 69. Remote ssh

hamachi, haguichi.

[https://help.ubuntu.com/community/Hamachi](https://help.ubuntu.com/community/Hamachi)

### 70. openxenmanager
Install openxenmanager for managing xenserver.

### 71. Virtualbox Headless
For X is not stable, I have to use Virtualbox Headless mode for starting the virtualbox
machines.
VBoxManage list vms
“systemvm64template” {dda28ddb-1faa-4f6c-bc01-0b48b449a0c9}
“Elastistor” {b5292c1b-8645-4f67-922d-863178310ce1}
“CloudStack” {f8295ba6-1004-4a4c-bf6d-5c2436723579}
“csman” {34e5323c-2a87-45a9-904e-455ff14ce91c}
“Xen” {15d2e83d-c719-423a-8168-699056b1efde}
“Windows7” {73a7249c-43e1-4885-bf6c-eae774bd7617}
“cloudstack-elastistor” {b967708b-6c0e-46f4-8062-a288b3fe21bc}
VBoxManage startvm Xen –type headless
VBoxManage startvm cloudstack-elastistor –type headless
### 72. chrome visit elastistor
using chromiu-browser for visiting elastistor will encounter following issue:
ERR_SSL_WEAK_SERVER_EPHEMERAL_DH_KEY
Solve it via:
➜ ~ chromium-browser
–cipher-suite-blacklist=0x0088,0x0087,0x0039,0x0038,0x0044,0x0045,0x0066,0x0032,0x0033,0x0016,0x0013
### 73. Find which vm use img
For Centos64.img, which vm uses it?
root@kspc002:/root# cat findwhichvm.sh
for i in virsh list --all | sed -n '3~1p' | awk '{print $2}'
do
virsh dumpxml $i | grep -i “Centos64.img”
done
### 74. Build DEB for qemu
[http://www.atrixnet.com/compile-qemu-from-source-and-make-a-debian-package-with-checkinstall/](http://www.atrixnet.com/compile-qemu-from-source-and-make-a-debian-package-with-checkinstall/)

### 75. change uuid of the vbox
VBOXMANAGE.EXE internalcommands sethduuid
### 76. SDR
https://mborgerson.com/getting-started-with-the-hackrf-one-on-ubuntu-14-04
### 77. RaspberryPI's FM
[https://bytesare.us/cms/index.php/geeky-toys/pi-as-fm-radio-mp3-transmitter](https://bytesare.us/cms/index.php/geeky-toys/pi-as-fm-radio-mp3-transmitter)


### 78. SDR
Using SDR for listening satellite.

[http://geek.csdn.net/news/detail/36794](http://geek.csdn.net/news/detail/36794)

### 79. Build System VM For CloudStack
Change the Gemfile in tools/appliance:
$ vim Gemfile
gem ‘net-ssh’, ‘=2.9.2’
gem ‘fog-google’, ‘=0.1.0’
### 80. veewee guideline
[https://cbednarski.com/articles/veewee/](https://cbednarski.com/articles/veewee/)

### 79. XML prettifier
Via:
curl -sL “http://api.example.com/assets.xml" | xmllint –format -
### 80. CloudStack On RaspberryPI

[http://www.claspi.org/](http://www.claspi.org/)

### 81. CloudStack 4.7 On Ubuntu
When integrating with elastistor, meet following issue:
root@ubuntucloudstack:/usr/share/cloudstack-management/webapps/client/WEB-INF/classes#
ls
META-INF resources scripts vms
root@ubuntucloudstack:/usr/share/cloudstack-management/webapps/client/WEB-INF/classes#
###  82. Xen Installation On Ubuntu
[https://www.futures.moe/writings/use-xen-pv-under-ubuntu-x14-04.htm](https://www.futures.moe/writings/use-xen-pv-under-ubuntu-x14-04.htm)

### 83. LXC Container Template
/usr/share/cloudstack-common/scripts/storage/secondary/cloud-install-sys-tmplt \
-m /mnt/secondary
-u http://cloudstack.apt-get.eu/systemvm/4.6/systemvm64template-4.6.0-kvm.qcow2.bz2
-h lxc
-s
-F
### 84. Enable the cloudstack Debug info
Change the `INFO` into `DEBUG`:
[root@csmgmt agent]# pwd
/etc/cloudstack/agent
[root@csmgmt agent]# ls
agent.properties environment.properties log4j-cloud.xml log4j-cloud.xml.back
### 85. Detect alive machine in one subnet
Using nmap for detecting alive machine in one subnet.
for i in nmap -v -sn 10.47.58.0/24 2>/dev/null | grep '^Nmap scan' | grep -v ']$' | awk {'print $5'} | grep -v '10.47.58.1$'
do
echo $i
done
### 86. Run command in multiply machines
Define the inventory file, and run reboot command via:
ansible -i inventory_mesos_cluster all -m shell -a “reboot”
### 87. On building mesos
[http://8941355.blog.51cto.com/8931355/1712426](http://8941355.blog.51cto.com/8931355/1712426)
