Dec 16, 2015
Technology更改后的脚本
以下脚本可以用于取回网页上的数据,并将其写入到Graphite远程服务器。
#!/usr/bin/env python
#-*-coding:utf-8 -*-

##################################################################################
# For fetching back the Air Quality Data and write it into Graphite on local server
# Graphite Data Definition, this is the general definition among every city
# air.city.citypoint.so2
# air.city.citypoint.no2
# air.city.citypoint.pm10
# air.city.citypoint.co
# air.city.citypoint.o38h
# air.city.citypoint.pm25
# air.city.citypoint.aqi
# air.city.citypoint.firstp
# air.city.citypoint.overp
# When running this script in crontab, be sure to give it a display
# Example, execute this script every hour at xx:05
# 5 */1 * * * export DISPLAY=:0;/home/adminubuntu/GuangzhouPM25.py
##################################################################################

# BeautifulSoup
from bs4 import BeautifulSoup

# Selenium
from contextlib import closing
from selenium.webdriver import Firefox
from selenium.webdriver.support.ui import WebDriverWait

# For writing into Graphite
import platform
import socket
import time

# Regex
import re

# pinyin
import pinyin

# Parameters comes here
CARBON_SERVER = '0.0.0.0'
CARBON_PORT = 2003
DELAY = 5  # secs
URL = 'http://210.72.1.216:8080/gzaqi_new/RealTimeDate.html'
CITY = 'guangzhou'

# All Points In Guangzhou City
positionsets = ["天河龙洞", "白云山", "麓湖", "公园前", "荔湾西村", "黄沙路边站", "杨箕
路边站", "荔湾芳村", "海珠宝岗", "海珠沙园", "海珠湖", "大夫山", "奥体中心", "萝岗西区
", "黄埔文冲", "黄埔大沙地", "亚运城", "体育西", "海珠赤沙"]

# regex for matching the digits.
pattern = re.compile(r'\d*')
floatpattern=re.compile(r'[\d|\.]*')

# Sending message to graphite server.
def send_msg(message):
  print 'sending message:\n%s' % message
  sock = socket.socket()
  sock.connect((CARBON_SERVER, CARBON_PORT))
  sock.sendall(message)
  sock.close()

# Fetching data, runs each hour. In one-time access should fetch all of the data.
def get_air_data(positionsets):
  # Dictionary hourdata is for holding data, DataStructure like:
  # {'baiyunshan': [44, 5], 'haizhubaogang': [55, 6]}
  hourdata = {}
  # Calling selenium, need linux X
  browser = Firefox()
  browser.get(URL)
  # Click button one-by-one
  for position in positionsets:
    # After clicking, should re-get the page_source.
    browser.find_element_by_id(position).click()
    page_source = browser.page_source
    # Cooking Soup
    soup = BeautifulSoup(page_source, 'html.parser')
    # pm2.5 value would be something like xx 微克/立方米, so we need an regex for
    # matching, example: print int(pattern.match(input).group())
    PM25 = int(pattern.match(soup.find('td',{'id': 'pmtow'}).contents[0]).group())
    PM25_iaqi = int(pattern.match(soup.find('td',{'id':
'pmtow_iaqi'}).contents[0]).group())
    PM10 = int(pattern.match(soup.find('td',{'id': 'pmten'}).contents[0]).group())
    PM10_iaqi = int(pattern.match(soup.find('td',{'id':
'pmten_iaqi'}).contents[0]).group())
    SO2 = int(pattern.match(soup.find('td',{'id': 'sotwo'}).contents[0]).group())
    SO2_iaqi = int(pattern.match(soup.find('td',{'id':
'sotwo_iaqi'}).contents[0]).group())
    NO2 = int(pattern.match(soup.find('td',{'id': 'notwo'}).contents[0]).group())
    NO2_iaqi = int(pattern.match(soup.find('td',{'id':
'notwo_iaqi'}).contents[0]).group())
    # Special notice the CO would be float value
    CO = float(floatpattern.match(soup.find('td',{'id': 'co'}).contents[0]).group())
    CO_iaqi = int(pattern.match(soup.find('td',{'id': 'co_iaqi'}).contents[0]).group())
    O3 = int(pattern.match(soup.find('td',{'id': 'othree'}).contents[0]).group())
    O3_iaqi = int(pattern.match(soup.find('td',{'id':
'othree_iaqi'}).contents[0]).group())
    hourdata_key = pinyin.get(position)
    hourdata[hourdata_key] = []
    hourdata[hourdata_key].append(PM25)
    hourdata[hourdata_key].append(PM25_iaqi)
    hourdata[hourdata_key].append(PM10)
    hourdata[hourdata_key].append(PM10_iaqi)
    hourdata[hourdata_key].append(SO2)
    hourdata[hourdata_key].append(SO2_iaqi)
    hourdata[hourdata_key].append(NO2)
    hourdata[hourdata_key].append(NO2_iaqi)
    hourdata[hourdata_key].append(CO)
    hourdata[hourdata_key].append(CO_iaqi)
    hourdata[hourdata_key].append(O3)
    hourdata[hourdata_key].append(O3_iaqi)
  # After clicking all of the button, quit the firefox and return the dictionary
  browser.close()
  return hourdata

if __name__ == '__main__':
  airdata = get_air_data(positionsets)
  timestamp = int(time.time())
  for i in airdata.keys():
    # each key should contains the corresponding hourdata
    lines = [
      'air.guangzhou.%s.pm25 %s %d' % (i, airdata[i][0], timestamp),
      'air.guangzhou.%s.pm25_iaqi %s %d' % (i, airdata[i][1], timestamp),
      'air.guangzhou.%s.pm10 %s %d' % (i, airdata[i][2], timestamp),
      'air.guangzhou.%s.pm10_iaqi %s %d' % (i, airdata[i][3], timestamp),
      'air.guangzhou.%s.so2 %s %d' % (i, airdata[i][4], timestamp),
      'air.guangzhou.%s.so2_iaqi %s %d' % (i, airdata[i][5], timestamp),
      'air.guangzhou.%s.no2 %s %d' % (i, airdata[i][6], timestamp),
      'air.guangzhou.%s.no2_iaqi %s %d' % (i, airdata[i][7], timestamp),
      'air.guangzhou.%s.co %s %d' % (i, airdata[i][8], timestamp),
      'air.guangzhou.%s.co_iaqi %s %d' % (i, airdata[i][9], timestamp),
      'air.guangzhou.%s.o3 %s %d' % (i, airdata[i][10], timestamp),
      'air.guangzhou.%s.o3_iaqi %s %d' % (i, airdata[i][11], timestamp)
    ]
    message = '\n'.join(lines) + '\n'
    send_msg(message)
    # delay for graphite server will use a DELAY time for inserting data
    time.sleep(DELAY)
使用方法
将上面的文件保存为可执行文件,然后使用crontab添加一个定时任务,譬如以下的crontab条目会
在每个小时的xx:05分时自动运行该脚本文件,将取回的数据写入到Graphite远端。
$ crontab -l
# hourly execute pm25 updating task, xx:05 will be the execute time
5 */1 * * * export DISPLAY=:0;/home/adminubuntu/GuangzhouPM25.py
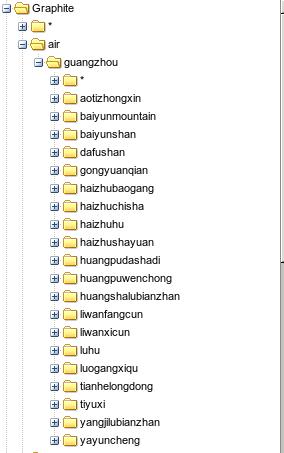
写入graphite后的效果如下:
Dec 15, 2015
Technology数据源准备
数据源地址在:
http://210.72.1.216:8080/gzaqi_new/RealTimeDate.html
但是这个地址取回数据比较困难。而在http://www.gzepb.gov.cn/
右侧的栏里可以通过点击,打开某个监测点当前的空气质量指数,例如海珠湖的数据位于:
http://210.72.1.216:8080/gzaqi_new/DataList2.html?EPNAME=%E6%B5%B7%E7%8F%A0%E6%B9%96
Beautiful Soup
Beautiful Soup可以被理解为网页爬虫,用于爬取某个页面并取回所需信息。在Ubuntu/Debian系统
中,安装命令如下。同时为了使用对XML解析速度更快的lxml解析器,我们安装python-lxml:
$ sudo apt-get install -y python-bs4
$ sudo apt-get install -y python-lxml
现在我们打开某个终端,开始用命令行交互的方式,取回海珠湖监测点的数据:
首先,引入所需的库:
# python
Python 2.7.6 (default, Jun 22 2015, 17:58:13)
[GCC 4.8.2] on linux2
Type "help", "copyright", "credits" or "license" for more information.
>>> from bs4 import BeautifulSoup
>>> import urllib2
>>> response = urllib2.urlopen('http://210.72.1.216:8080/gzaqi_new/DataList2.html?EPNAME=%E6%B5%B7%E7%8F%A0%E6%B9%96')
>>> print response.info()
Content-Length: 10216
Content-Type: text/html
Last-Modified: Wed, 13 May 2015 08:12:28 GMT
Accept-Ranges: bytes
ETag: "b680828d548dd01:da2"
Server: Microsoft-IIS/6.0
X-Powered-By: ASP.NET
Date: Tue, 15 Dec 2015 02:25:17 GMT
Connection: close

>>> html = response.read()
>>> print "Get the length :", len(html)
Get the length : 10216
>>> response.close()  # best practice to close the file
上述的操作里调用urllib2取回了页面, html变量里包含了该网页的内容。接下来我们使用
BeautifulSoup来美化并从中取回我们想要的元素。
>>> soup = BeautifulSoup(html, 'html.parser')
>>> print soup.prettify()
仔细检查后发现,用urllib2取回的网页中,html变量里未包含当前的数据值。通过阅读代码得知,
当前页面的值是浏览器在载入网页时执行javascript函数得到的。因而我们使用一个真实的浏览器
来实现页面的抓取。
Selenium是一套用于进行浏览器自动化测试的开源工具集,可进行Web应用的端到端测试
。Selenium主要包括两个工具:一是Selenium IDE,二是Selenium WebDriver(简称
WebDriver). 安装命令如下:
$ pip install selenium
使用selenium抓取该网页的代码如下:
>>> from contextlib import closing
>>> from selenium.webdriver import Firefox
>>> from selenium.webdriver.support.ui import WebDriverWait
>>> url='http://210.72.1.216:8080/gzaqi_new/DataList2.html?EPNAME=%E6%B5%B7%E7%8F%A0%E6%B9%96'
>>> with closing(Firefox()) as browser:
...   browser.get(url)
...   page_source = browser.page_source
...
>>> print page_source
>>> soup = BeautifulSoup(page_source, 'html.parser')
>>> print soup
现在我们可以看到,取回的page_source变量中已经包含有该时段的数据。接下来就是如何把数据
从其中提取出来的过程。
定位到含有数据的表格, 根据其层叠结构,获得tr的值:
>>> table = soup.find('table', {'class': 'headTable'})
>>> for td in table.tbody.tr:
...     print td
...
<td class="SO2_24H">7</td>
<td class="NO2_24H">50</td>
<td class="PM10_24H">29</td>
<td class="CO_24H">31</td>
<td class="O3_8H_24H">18</td>
<td class="PM25_24H">25</td>
<td class="AQI">50</td>
<td class="Pollutants">—</td>
<td class="jibie2">--</td>
<td class="jibie2">一级</td>
<td class="leibie">优                  </td>
<td class="yanse"><img alt="" src="Images/you.jpg"/></td>
更进一步得到值:
>>> for td in table.tbody.tr:
...     print td.contents[0]
...
7
50
29
31
18
25
50
—
--
一级
优
<img alt="" src="Images/you.jpg"/>
对应的图片如下:
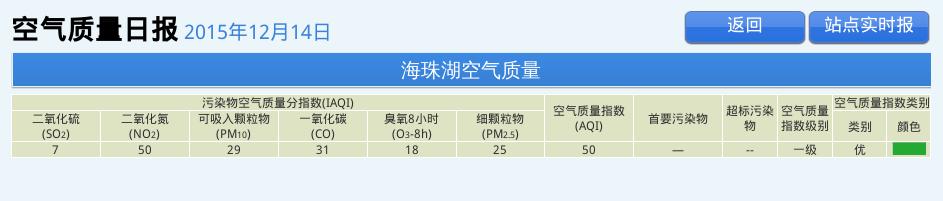
提取出来了数据,就可以做后续处理了。
Graphite
Graphite的搭建过程不提及。基于我们前面提取出的数据,只需要将其写入Graphite,就可以看
到数据的显示了。
具体的写入代码参考(需翻墙):
http://coreygoldberg.blogspot.com/2012/04/python-getting-data-into-graphite-code.html
按照博客中提供的例子,写入到Graphite后的数据在Graphite看起来是这样的:

而对应的数据格式则如下:
 sending message:
     system.monitorserver.loadavg_1min 0.18 1450161396
     system.monitorserver.loadavg_5min 0.25 1450161396
     system.monitorserver.loadavg_15min 0.23 1450161396
我们可以仿照这样的数据来组织自己的空气质量数据。
数据来源再加工
前面取回地址失败, 因为它只是返回空气日报的地址,我们需要的是实时情况,所以还是回到
http://210.72.1.216:8080/gzaqi_new/RealTimeDate.html
这里需要在selenium里模拟出鼠标快速点击所有链接的效果。
下面是一次完整的点击白云山按钮并获得PM2.5页面的过程:
root@monitorserver:~/Code# python
Python 2.7.6 (default, Jun 22 2015, 17:58:13)
[GCC 4.8.2] on linux2
Type "help", "copyright", "credits" or "license" for more information.
>>> from contextlib import closing
>>> from selenium.webdriver import Firefox
>>> from selenium.webdriver.support.ui import WebDriverWait
>>> driver = Firefox()
>>> driver.get('http://210.72.1.216:8080/gzaqi_new/RealTimeDate.html')
>>> driver.refresh()
>>> baiyunmountain=driver.find_element_by_id("白云山")
>>> baiyunmountain.click()
>>> PM25=driver.find_element_by_id("PM25")
>>> type(PM25)
<class 'selenium.webdriver.remote.webelement.WebElement'>
>>> PM25.click()
Dec 12, 2015
Technology前段时间黑色星期五在美国亚马逊败了个TP-LINK TL-SG108E, 直邮到手人民币200不到.
本意是拿来以后在家里跑虚拟机时,虚拟机可以在不同的VLAN里作用,譬如单独的存储/管
理网络等.
配置
更改IP地址, 随意指定原有局域网内的某IP地址给交换机即可. 随后所有的节点均可添加
在交换机上.
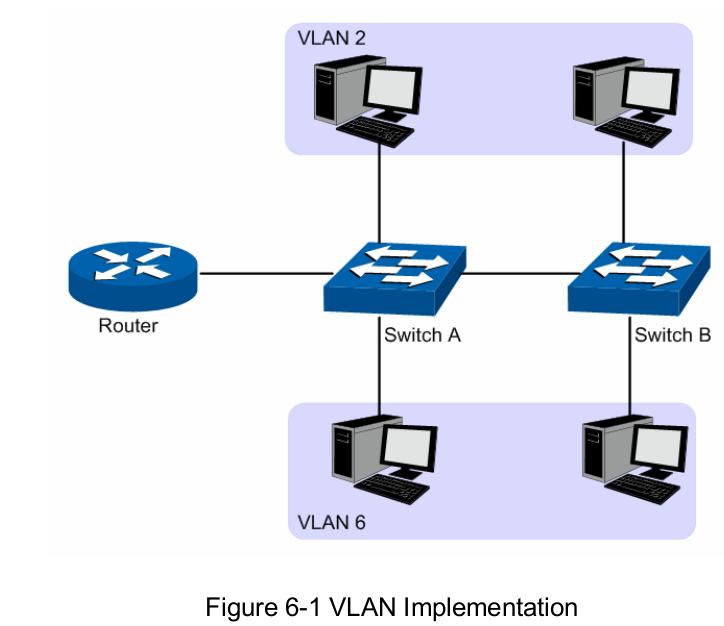
VLAN
VLAN可以实现的功能, 位于不同交换机上的机器可以位于同一局域网内.
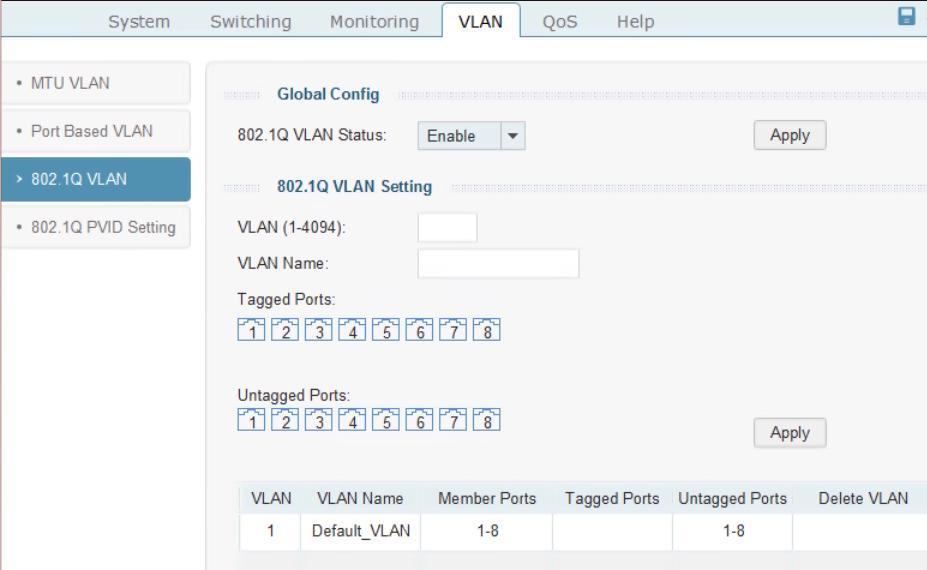
默认在交换机上打开的VLAN是基于端口的VLAN(Port Based VLAN), 我们这里配置的是
802.1Q VLAN, 打开以后,基于端口的VLAN将自动被禁止.
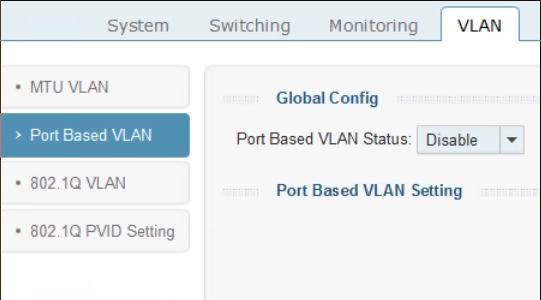
默认的配置页面如下:
Tag 与 Untagged方式的差别:
端口接收数据时:
如果端口是tagged方式,当数据包本身不包含VLAN的话,输入的数据包就加上该缺省
vlan;如果数据包本身已经包含了VLAN,那么就不再添加。
如果是untagged方式,输入的数据包全部都要加上该缺省vlan。不管输入的数据包是否
已经有VLAN标记。
端口发送数据时:
如果端口是tagged方式,如果端口缺省VLAN等于发送的数据包所含的VLAN,那么就会将
VLAN标记从发送的数据包中去掉;如果不相等,则数据包将带着VLAN发送出去,实现VLAN
的透传。
如果是untagged方式,则不管端口缺省VLAN为多少,是否等于要输出的数据包的VLAN,
都会将VLAN ID从数据包中去掉。
配置了vlan 22和33, 分别在7口和8口上.
OVS 后的VLAN TAG
在7口上接入一台Ubuntu服务器,配置为open-vswitch桥接, 虚拟机通过以下配置, 制定
VLAN ID为22.
# virsh edit Gentoo
    <interface type='bridge'>
      <mac address='52:54:00:fd:03:e9'/>
      <source bridge='ovsbr0'/>
      <vlan trunk='yes'>
        <tag id='22' nativeMode='untagged'/>
      </vlan>
      <virtualport type='openvswitch'>
        <parameters interfaceid='fb3e7f34-6fcd-41dc-8fed-c3ffe0d54b18'/>
      </virtualport>
      <model type='virtio'/>
      <address type='pci' domain='0x0000' bus='0x00' slot='0x03' function='0x0'/>
    </interface>
# virsh start Gentoo
这样启动后的虚拟机Gentoo就处于VLAN ID 22隔离的网络里. 手动配置其IP地址为
10.48.58.2.
物理机上的VLAN
这里附带了Ubuntu On Jogger的过程, Joggler XUbuntu下载地址在:
http://jwills.co.uk/projects/joggler-xubuntu/download/
操作指令在:
http://jwills.co.uk/projects/joggler-xubuntu/instructions/
默认用户名/密码都是joggler.
我们需要在joggler上配置一个vlan, 和另一台机器上vlan后的虚拟机通信.
$ sudo apt-get install -y vlan
$ sudo modprobe 8021q
$ sudo vconfig add eth0 22
$ sudo ifconfig eth0.22 10.47.58.3/24 up
$ sudo su -c 'echo "8021q">>/etc/modules'
$ cat /etc/module
8021q
$ sudo vim /etc/network/interface
....
auto eth0
iface eth0 inet dhcp

auto eth0.22
iface eth0.22 inet static
    address 10.47.58.3
    netmask 255.255.255.0
    vlan-raw-device eth0
这样,重启以后, eth0.22会启动, 就可以通过VLAN 22 ping 10.47.58.2了.
换口
把joggler从7口换到6口, 可以看到eth0还是可以通的,但是eth0.22则无法通信. 这是因
为我们只在7口和8口上添加了VLAN 22标记的缘故.换回7口,一切正常.
Dec 10, 2015
TechnologyInstallation
Install openvswitch via:
# apt-get update
# apt-get install -y openvswitch-common openvswitch-switch
List the installed module via:
# lsmod | grep open
openvswitch            66901  0
gre                    13808  1 openvswitch
vxlan                  37619  1 openvswitch
libcrc32c              12644  1 openvswitch
# ovs-vsctl --version
ovs-vsctl (Open vSwitch) 2.0.2
Compiled May 13 2015 18:49:53
Configuration
Edit the configuration of the networking:
$ sudo vim /etc/network/interfaces
###########################################
## By using openVswitch, we enabled the following
###########################################
auto ovsbr0
iface ovsbr0 inet static
address 192.168.1.xx
netmask 255.255.0.0
gateway 192.168.1.xx
dns-nameservers 223.5.5.5 180.76.76.76
Now configure the ovs-switched bridge:
# ovs-vsctl add-br ovsbr0
# ovs-vsctl list-br
ovsbr0
# ovs-vsctl add-port ovsbr0 eth0 && reboot
Now restart the computer you will get the ovs-bridged network running.
Bridged With VLAN
Add/Remove port of the ovs-bridged:
# ovs-vsctl add-port ovsbr0 tap0 tag=22
# ovs-vsctl show
901c2b29-0764-4370-8d06-168b18339236
    Bridge "ovsbr0"
        Port "eth0"
            Interface "eth0"
        Port "tap0"
            tag: 22
            Interface "tap0"
        Port "ovsbr0"
            Interface "ovsbr0"
                type: internal
    ovs_version: "2.0.2"
# ovs-vsctl del-port ovsbr0 tap0
If you want to remove the tag, then:
ovs-vsctl set port vnet0 tag=100
ovs-vsctl remove port vnet0 tag 100
VLAN / OpenVswitch/ virt-manager
Dumpxml will displayed as following:
    <interface type='bridge'>
      <mac address='52:54:00:0e:6b:d1'/>
      <source bridge='ovsbr0'/>
      <vlan trunk='yes'>
        <tag id='22' nativeMode='untagged'/>
      </vlan>
      <virtualport type='openvswitch'>
        <parameters interfaceid='d5b7b981-8998-44c0-9344-0ade6b69ec1f'/>
      </virtualport>
      <target dev='vnet0'/>
      <model type='virtio'/>
      <alias name='net0'/>
      <address type='pci' domain='0x0000' bus='0x00' slot='0x03' function='0x0'/>
    </interface>
    <interface type='bridge'>
      <mac address='52:54:00:3c:c9:24'/>
      <source bridge='ovsbr0'/>
      <vlan trunk='yes'>
        <tag id='100' nativeMode='untagged'/>
      </vlan>
      <virtualport type='openvswitch'>
        <parameters interfaceid='06898d54-c0da-48c6-8b01-3307e70b995a'/>
      </virtualport>
      <target dev='vnet1'/>
      <model type='virtio'/>
      <alias name='net1'/>
      <address type='pci' domain='0x0000' bus='0x00' slot='0x04' function='0x0'/>
    </interface>
    <interface type='bridge'>
      <mac address='52:54:00:7b:e7:b0'/>
      <source bridge='ovsbr0'/>
      <virtualport type='openvswitch'>
        <parameters interfaceid='303c1f65-23ff-4017-93ba-f196ca1d05fb'/>
      </virtualport>
      <target dev='vnet2'/>
      <model type='virtio'/>
      <alias name='net2'/>
      <address type='pci' domain='0x0000' bus='0x00' slot='0x05' function='0x0'/>
    </interface>
Dec 8, 2015
TechnologyInstallation
Installation steps are listed as following:
# apt-get install -y python-virtualenv
# git clone git@github.com:urbanairship/tessera.git
# cd tessera
# virtualenv .
# . bin/activate
# cd tessera-server/
# pip install -r requirements.txt
# pip install -r dev-requirements.txt
# cd ../tessera-frontend
# apt-get install -y npm
# npm install -g grunt-cli
# npm install
# ln -s /usr/bin/nodejs /usr/bin/node
# grunt
# which inv
/root/Code/second/tessera/bin/inv
Start
Start the service via:
# cd /root/Code/second/tessera/tessera-server/
# inv db.init
# inv run &
# inv json.import 'demo/*'
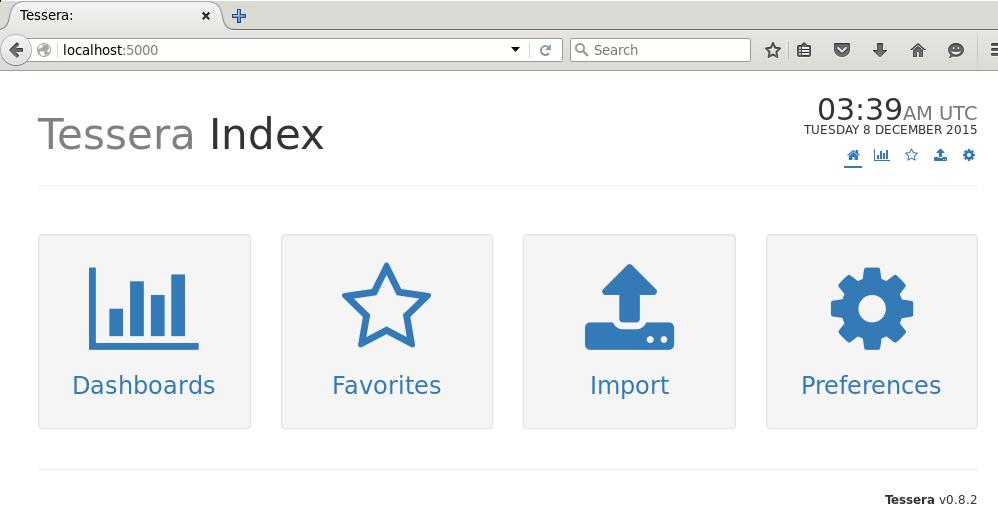
Open the browser and visit http://localhost:5000, you could see the tessera’s web
front.
Import Graphite Data
(tessera)root@monitorserver:~/Code/second/tessera/tessera-server# vim tessera/config.py
root@monitorserver:~/Code/second/tessera# cat tessera-server/tessera/config.py
GRAPHITE_URL               = 'http://192.168.10.192'
# inv graphite.import
Now you could see the imported graphite data.
