Mar 29, 2016
TechnologySetup Repository
Install debmirror via:
$ sudo apt-get install -y debmirror
$ sudo mkdir /home/UbuntuMirror
$ sudo vim /usr/local/bin/mirrorbuild.sh
The mirrorbuild.sh file listed as following:
#### Start script to automate building of Ubuntu mirror #####
## THE NEXT LINE IS NEEDED THE REST OF THE LINES STARTING WITH A # CAN BE DELETED

#!/bin/bash

## Setting variables with explanations.

#
# Don't touch the user's keyring, have our own instead
#
export GNUPGHOME=/home/mirrorkeyring

# Arch=         -a      # Architecture. For Ubuntu can be i386, powerpc or amd64.
# sparc, only starts in dapper, it is only the later models of sparc.
#
arch=i386,amd64

# Minimum Ubuntu system requires main, restricted
# Section=      -s      # Section (One of the following -
main/restricted/universe/multiverse).
# You can add extra file with $Section/debian-installer. ex:
main/debian-installer,universe/debian-installer,multiverse/debian-installer,restricted/debian-installer
#
section=main,restricted,universe,multiverse

# Release=      -d      # Release of the system (...Hardy, Intrepid... Lucid, Precise,
Quantal, Saucy, Trusty ), and the -updates and -security ( -backports can be added if
desired)
# List of updated releases in: https://wiki.ubuntu.com/Releases
#

release=trusty,trusty-security,trusty-updates

# Server=       -h      # Server name, minus the protocol and the path at the end
# CHANGE "*" to equal the mirror you want to create your mirror from. au. in Australia
ca. in Canada.
# This can be found in your own /etc/apt/sources.list file, assuming you have Ubuntu
installed.
#
server=archive.ubuntu.com

# Dir=          -r      # Path from the main server, so http://my.web.server/$dir,
Server dependant
#
inPath=/ubuntu

# Proto=        --method=       # Protocol to use for transfer (http, ftp, hftp, rsync)
# Choose one - http is most usual the service, and the service must be avaialbe on the
server you point at.
#
proto=http

# Outpath=              # Directory to store the mirror in
# Make this a full path to where you want to mirror the material.
#
outPath=/home/UbuntuMirror

# The --nosource option only downloads debs and not deb-src's
# The --progress option shows files as they are downloaded
# --source \ in the place of --no-source \ if you want sources also.
# --nocleanup  Do not clean up the local mirror after mirroring is complete. Use this
option to keep older repository
# Start script
#
debmirror       -a $arch \
                --no-source \
                -s $section \
                -h $server \
                -d $release \
                -r $inPath \
                --progress \
                --method=$proto \
                $outPath


#### End script to automate building of Ubuntu mirror ####
Modify the related priviledge:
$ sudo chmod +x /usr/local/bin/mirrorbuild.sh
$ sudo chown -R root:dash /home/UbuntuMirror/
$ sudo chmod -R 571 /home/UbuntuMirror/
$ sudo chmod 777 -R /home/mirrorkeyring/
$ gpg --no-default-keyring --keyring /home/mirrorkeyring/pubring.gpg --import
/usr/share/keyrings/ubuntu-archive-keyring.gpg
$ gpg --no-default-keyring --keyring /home/mirrorkeyring/trustedkeys.gpg --import
/usr/share/keyrings/ubuntu-archive-keyring.gpg
Now you could build the local repository via:
$ mirrorbuild.sh
Resize Repository
First we syncing all of the Repositries, to see its size:
$ ➜  UbuntuMirror du -hs *
72M	dists
192G	pool
12K	project
Now we add some regex for restrict :
$ sudo vim /usr/local/bin/mirrorbuild.sh
debmirror       -a $arch \
                --no-source \
                -s $section \
                -h $server \
                -d $release \
                -r $inPath \
                --progress \
                --method=$proto \
                --exclude-deb-section=admin \
                --exclude-deb-section=base \
                --exclude-deb-section=comm \
                --exclude-deb-section=devel \
                --exclude-deb-section=doc \
                --exclude-deb-section=electronics \
                --exclude-deb-section=embedded \
                --exclude-deb-section=games \
                --exclude-deb-section=gnome \
                --exclude-deb-section=graphics \
                --exclude-deb-section=hamradio \
                --exclude-deb-section=interpreters \
                --exclude-deb-section=kde \
                --exclude-deb-section=libdevel \
                --exclude-deb-section=libs \
                --exclude-deb-section=mail \
                --exclude-deb-section=math \
                --exclude-deb-section=misc \
                --exclude-deb-section=net \
                --exclude-deb-section=news \
                --exclude-deb-section=oldlibs \
                --exclude-deb-section=otherosfs \
                --exclude-deb-section=perl \
                --exclude-deb-section=python \
                --exclude-deb-section=science \
                --exclude-deb-section=shells \
                --exclude-deb-section=sound \
                --exclude-deb-section=tex \
                --exclude-deb-section=text \
                --exclude-deb-section=utils \
                --exclude-deb-section=web \
                --exclude-deb-section=x11 \
which will deduce the size for syncing, but this won’t reduce much.
➜  UbuntuMirror du -hs *
22M	dists
33G	pool
12K	project
I think this is only works for debian.
Mar 27, 2016
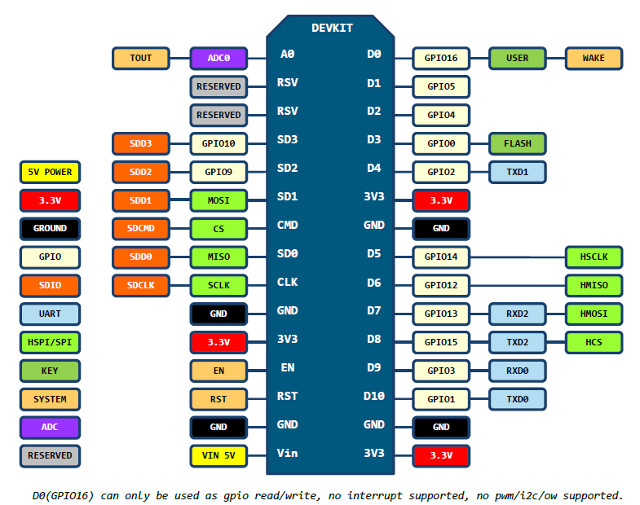
Technology电路图
在淘宝上买的NodeMCU是v1.0版的, v0.9版和v1.0版的差别如下:

1.0版的连线如图:
烧写固件
ArchLinux下,可以通过python程序直接烧写固件.
下载integer版本的固件,
$ wget https://github.com/nodemcu/nodemcu-firmware/releases/download/0.9.6-dev_20150704/nodemcu_integer_0.9.6-dev_20150704.bin
下载esp-tool, ArchLinux需要安装python2版本的pyserial库才能运行该软件:
$ git clone https://github.com/themadinventor/esptool.git
$ sudo pacman -S python2-pyserial
$ sudo python2 ./esptool.py --port /dev/ttyUSB0 --write_flash 0x0000 ../nodemcu_integer_0.9.6-dev_20150704.bin
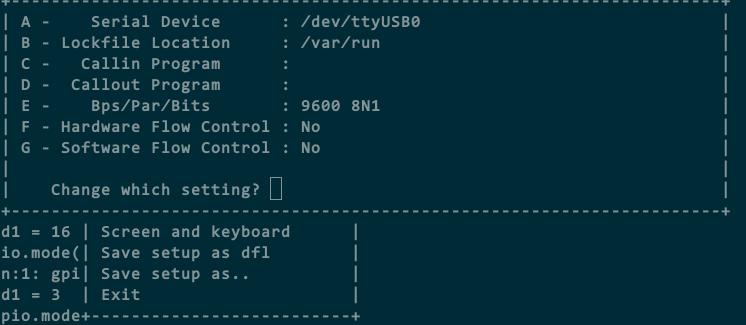
Minicom串口
Minicom串口配置如下:
烧写完固件后,最简单的测试如下:
> print "Hello World"
Hello World
同时我们可以看下NodeMCU的版本,命令如下:
> majorVer, minorVer, devVer, chipid, flashid, flashsize, flashmode, flashspeed = node.info();
> print("NodeMCU "..majorVer.."."..minorVer.."."..devVer)
NodeMCU 0.9.6
可以看到我们使用的固件版本是0.9.6的.
闪烁LED
NodeMCU支持LUA编程,为此我们需要准备另一个写入LUA脚本的小程序:
$ git clone https://github.com/4refr0nt/luatool.git
NodeMCU板上自带有两个LED, 我们先点亮D4口,即GPIO2口上的LED:
程序照搬
http://esp8266.co.uk/recipes/blink-demo/
-- Config
local pin = 4            --> GPIO2
local value = gpio.LOW
local duration = 1000    --> 1 second


-- Function toggles LED state
function toggleLED ()
    if value == gpio.LOW then
        value = gpio.HIGH
    else
        value = gpio.LOW
    end

    gpio.write(pin, value)
end


-- Initialise the pin
gpio.mode(pin, gpio.OUTPUT)
gpio.write(pin, value)


-- Create an interval
tmr.alarm(0, duration, 1, toggleLED)
烧写到板子上:
$ sudo python2 luatool/luatool/luatool.py --port /dev/ttyUSB0 --src blinkLED/init.lua --dest init.lua --restart
把pin = 4改为pin = 0, 则可以点亮另一个LED.
WIFI控制LED
注意,需要把init.lua文件里的第二行改为你自家的WIFI SSID和密码:
$ mkdir webLED
$ vim webLED/init.lua
wifi.setmode(wifi.STATION)
wifi.sta.config("SSID","PASSWORD")
print(wifi.sta.getip())
led1 = 0
led2 = 4
gpio.mode(led1, gpio.OUTPUT)
gpio.mode(led2, gpio.OUTPUT)
srv=net.createServer(net.TCP)
srv:listen(80,function(conn)
conn:on("receive", function(client,request)
local buf = "";
local _, _, method, path, vars = string.find(request, "([A-Z]+) (.+)?(.+) HTTP");
if(method == nil)then
_, _, method, path = string.find(request, "([A-Z]+) (.+) HTTP");
end
local _GET = {}
if (vars ~= nil)then
for k, v in string.gmatch(vars, "(%w+)=(%w+)&*") do
_GET[k] = v
end
end
buf = buf.."<h1> ESP8266 Web Server</h1>";
buf = buf.."<p>GPIO0 <a href=\"?pin=ON1\"><button>ON</button></a> <a href=\"?pin=OFF1\"><button>OFF</button></a></p>";
buf = buf.."<p>GPIO2 <a href=\"?pin=ON2\"><button>ON</button></a> <a href=\"?pin=OFF2\"><button>OFF</button></a></p>";
local _on,_off = "",""
if(_GET.pin == "OFF1")then
gpio.write(led1, gpio.HIGH);
elseif(_GET.pin == "ON1")then
gpio.write(led1, gpio.LOW);
elseif(_GET.pin == "OFF2")then
gpio.write(led2, gpio.HIGH);
elseif(_GET.pin == "ON2")then
gpio.write(led2, gpio.LOW);
end
client:send(buf);
client:close();
collectgarbage();
end)
end)
$ sudo python2 luatool/luatool/luatool.py --port /dev/ttyUSB0 --src webLED/init.lua --dest init.lua --restartkk
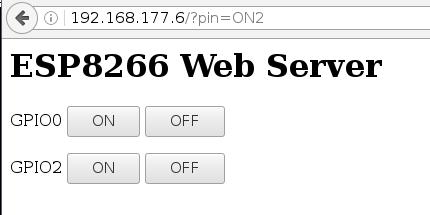
串口上可以得到ESP板的IP地址:
> print(wifi.sta.getip())
192.168.177.6   255.255.255.0   192.168.177.1
现在可以通过访问主机的页面http://192.168.177.6来设置LED了.
Arduino版LED
Arduino默认是不支持ESP的,需要安装插件来支持.
File -> Preferences -> Settings中, 如下图所示, 填json定义网址
http://arduino.esp8266.com/stable/package_esp8266com_index.json

而后打开Tools -> Boards -> Board Manager, 自动刷新后, 安装ESP8266相关的库:
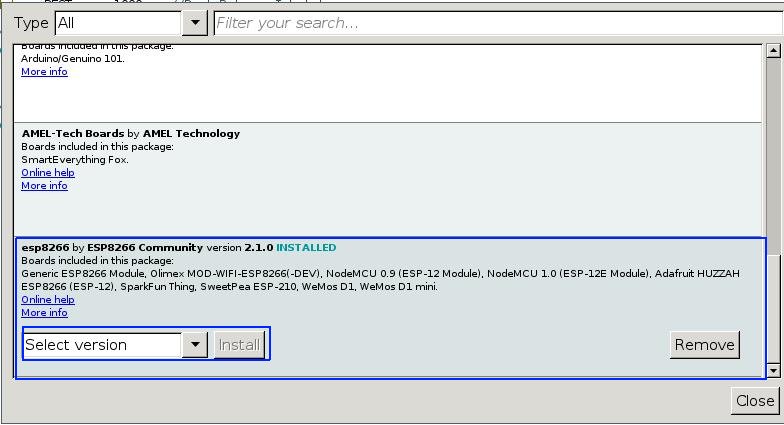
安装完毕后就可以使用ESP对应的Board了.
这里的代码实现了LED的闪烁, 源代码如下:
/*LED_Breathing.ino Arduining.com  20 AUG 2015
Using NodeMCU Development Kit V1.0
Going beyond Blink sketch to see the blue LED breathing.
A PWM modulation is made in software because GPIO16 can't
be used with analogWrite().
*/

#define LED     D0        // Led in NodeMCU at pin GPIO16 (D0).

#define BRIGHT    350     //max led intensity (1-500)
#define INHALE    1250    //Inhalation time in milliseconds.
#define PULSE     INHALE*1000/BRIGHT
#define REST      1000    //Rest Between Inhalations.

//----- Setup function. ------------------------
void setup() {
  pinMode(LED, OUTPUT);   // LED pin as output.
}

//----- Loop routine. --------------------------
void loop() {
  //ramp increasing intensity, Inhalation:
  for (int i=1;i<BRIGHT;i++){
    digitalWrite(LED, LOW);          // turn the LED on.
    delayMicroseconds(i*10);         // wait
    digitalWrite(LED, HIGH);         // turn the LED off.
    delayMicroseconds(PULSE-i*10);   // wait
    delay(0);                        //to prevent watchdog firing.
  }
  //ramp decreasing intensity, Exhalation (half time):
  for (int i=BRIGHT-1;i>0;i--){
    digitalWrite(LED, LOW);          // turn the LED on.
    delayMicroseconds(i*10);          // wait
    digitalWrite(LED, HIGH);         // turn the LED off.
    delayMicroseconds(PULSE-i*10);  // wait
    i--;
    delay(0);                        //to prevent watchdog firing.
  }
  delay(REST);                       //take a rest...
}
直接在Arduino IDE中编译验证即可.
Mar 24, 2016
Technology默认安装完的XenServer,不能找到eth1, 用以下命令找到eth1:
[root@csagentv1 ~]# xe pif-list
uuid ( RO)                  : cd4409d4-b2b8-543c-ea9c-35170673e924
                device ( RO): eth0
    currently-attached ( RO): true
                  VLAN ( RO): -1
          network-uuid ( RO): 597114f0-e71a-34fe-d6a2-230cc75e085a


[root@csagentv1 ~]#  xe host-list
uuid ( RO)                : 367ebe92-0634-41a8-825a-cd23184824ea
          name-label ( RW): csagentv1
    name-description ( RW): Default install of XenServer


[root@csagentv1 ~]# xe pif-scan host-uuid=367ebe92-0634-41a8-825a-cd23184824ea
[root@csagentv1 ~]# xe pif-list
uuid ( RO)                  : 3f6e551b-993e-0a3d-96b6-0f0d172f867f
                device ( RO): eth1
    currently-attached ( RO): false
                  VLAN ( RO): -1
          network-uuid ( RO): 1ff03ece-8b93-b231-ac2d-679d035422da


uuid ( RO)                  : cd4409d4-b2b8-543c-ea9c-35170673e924
                device ( RO): eth0
    currently-attached ( RO): true
                  VLAN ( RO): -1
          network-uuid ( RO): 597114f0-e71a-34fe-d6a2-230cc75e085a
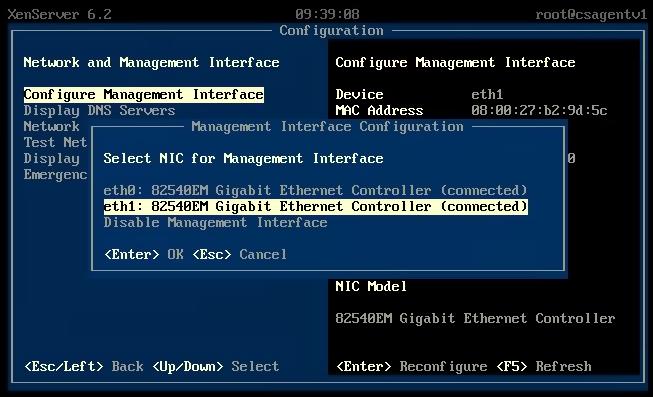
在Console上可以看到管理端口:

命令:
[root@csagentv1 ~]# xe host-management-disable
[root@csagentv1 ~]# xe pif-reconfigure-ip uuid=3f6e551b-993e-0a3d-96b6-0f0d172f867f mode=static IP=192.168.56.3 netmask=255.255.255.0 gateway=192.168.56.1 DNS=180.76.76.76
[root@csagentv1 ~]# xe pif-list params=uuid,device,MAC
uuid ( RO)      : 3f6e551b-993e-0a3d-96b6-0f0d172f867f
    device ( RO): eth1
       MAC ( RO): 08:00:27:b2:9d:5c


uuid ( RO)      : cd4409d4-b2b8-543c-ea9c-35170673e924
    device ( RO): eth0
       MAC ( RO): 08:00:27:f7:38:0b
[root@csagentv1 ~]# xe host-management-reconfigure pif-uuid=3f6e551b-993e-0a3d-96b6-0f0d172f867f
更改成功后,可以看到现在管理端口已经配置为eth1了:
Tips:
View eth1 pif:
$ xe pif-list device=eth1 params=uuid --minimal
Mar 23, 2016
TechnologyFor continue working at home, I have to install vagrant-libvirt on
Ubuntu15.04, following are steps:
Vagrant Installation
The vagrant version in repository is too old, examine it via:
$ apt-cache policy vagrant
vagrant:
  Installed: (none)
  Candidate: 1.6.5+dfsg1-2
  Version table:
     1.6.5+dfsg1-2 0
        500 http://mirrors.aliyun.com/ubuntu/ vivid/universe amd64 Packages
Download the installation file in:
https://releases.hashicorp.com/vagrant/1.8.1/vagrant_1.8.1_x86_64.deb
Install it via:
$ sudo dpkg -i vagrant_1.8.1_x86_64.deb
$ which vagrant
/usr/bin/vagrant
Vagrant-libvirt
For building vagrant-libvirt, we have to install following packages:
$ sudo apt-get install libvirt-bin libvirt-dev qemu-kvm ruby-dev
$ sudo adduser YourName libvirtd
Installing vagrant plugins:
$ sudo mkdir /var/lib/gems
$ sudo chmod 777 -R /var/lib/gems/
$ gem source -r https://rubygems.org/
$ gem source -a http://mirrors.aliyun.com/rubygems/
$ gem source
$ gem install json -v '1.8.3'
$ gem install ruby-libvirt -v '0.6.0'
$ vagrant plugin install vagrant-libvirt
$ vagrant plugin install vagrant-mutate
$ vagrant plugin install --plugin-version 0.0.3 fog-libvirt
Mar 21, 2016
TechnologyBuilding Templates
Build XenServer 6.2 Template is pretty easy, simply do following:
$ git clone  https://github.com/imduffy15/packer-xenserver.git
$ cd packer-xenserver
$ packer build template.iso
After building, check the following box file available under the directory:
$ ls -l -h XenServer.box
-rw-rw-r-- 1 dash dash 708M  3月 21 14:41 XenServer.box
Import box File
Import the generated box file via:
$ vagrant box add XenServer.box --name "XenServer62"
$ vagrant box list | grep XenServer62
XenServer62        (virtualbox, 0)
Start the Virtualbox XenServer
$ mkdir XenServer62
$ cd XenServer62
$ vim Vagrantfile
Vagrant.configure(2) do |config|

    # disable mounting of vagrant folder as its not supported on xenserver
    config.vm.synced_folder ".", "/vagrant", disabled: true

    # disable checking for vbguest versions as its not supported on xenserver
    if Vagrant.has_plugin?("vagrant-vbguest")
      config.vbguest.auto_update = false
    end

    config.vm.provider "virtualbox" do |v|
      v.customize ["modifyvm", :id, "--memory", 2048]
      v.customize [ "modifyvm", :id, "--nicpromisc2", "allow-all" ]
    end

    config.vm.define :csagent do |csagent|
      csagent.vm.box = "XenServer62"
    end

end
$ vagrant up
XenServer In libvirt
We want to use XenServer under libvirt(kvm), thus we have to do following changes:
First startup the virtualbox vagrant environment of XenServer, then login to the
localhost(127.0.0.1) as root:
$ vagrant ssh csagent
[vagrant@localhost ~]$ ssh root@127.0.0.1
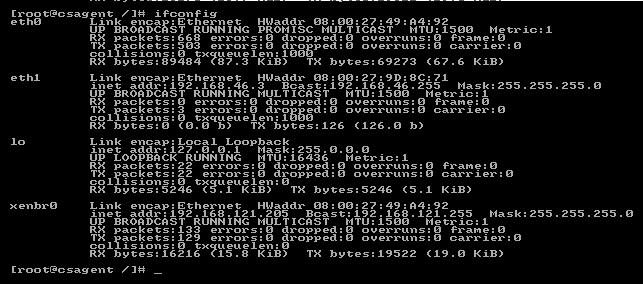
[root@localhost ~]# ifconfig | grep eth0 | grep HWaddr
eth0 Link encap:Ethernet HWaddr 08:00:27:49:A4:92
[root@localhost etc]# ifconfig -a | grep eth1
eth1 Link encap:Ethernet HWaddr 08:00:27:9D:8C:71
Get the Hardware Address(eth0/eth1) via ifconfig, we need them in the following
operations.
Now remove the udev items of eth0, eth1 in /etc/udev/rules.d/60-net.rules:
# vi /etc/udev/rules.d/60-net.rules
    # Rules generated from static configuration and last boot data
    #SUBSYSTEM=="net" KERNEL=="eth*" SYSFS{address}=="08:00:27:49:a4:92" ID=="0000:00:03.0" NAME="eth0"
    #SUBSYSTEM=="net" KERNEL=="eth*" SYSFS{address}=="08:00:27:9d:8c:71" ID=="0000:00:08.0" NAME="eth1"
Remove the dynamic rules of the interface renaming:
# vim /etc/sysconfig/network-scripts/interface-rename-data/dynamic-rules.json
    # Automatically adjusted file.  Do not edit unless you are certain you know how to
    {
        "lastboot": [
            - [
            -     "08:00:27:49:a4:92",
            -     "0000:00:03.0",
            -     "eth0"
            - ],
            - [
            -     "08:00:27:9d:8c:71",
            -     "0000:00:08.0",
            -     "eth1"
            - ]
        ],
        "old": []
    }
Should looks like this:
# cat /etc/sysconfig/network-scripts/interface-rename-data/dynamic-rules.json
    # Automatically adjusted file.  Do not edit unless you are certain you know how to
    {
        "lastboot": [
        ],
        "old": []
    }
Now add the static rules for the XenServer:
$
08:00:27:9D:8C:71
Get the Hardware Address(eth0/eth1) via ifconfig, we need them in the following
operations.
Now remove the udev items of eth0, eth1 in /etc/udev/rules.d/60-net.rules:
# vi /etc/udev/rules.d/60-net.rules
    # Rules generated from static configuration and last boot data
    #SUBSYSTEM=="net" KERNEL=="eth*" SYSFS{address}=="08:00:27:49:a4:92" ID=="0000:00:03.0" NAME="eth0"
    #SUBSYSTEM=="net" KERNEL=="eth*" SYSFS{address}=="08:00:27:9d:8c:71" ID=="0000:00:08.0" NAME="eth1"
Remove the dynamic rules of the interface renaming:
# vim /etc/sysconfig/network-scripts/interface-rename-data/dynamic-rules.json
    # Automatically adjusted file.  Do not edit unless you are certain you know how to
    {
        "lastboot": [
            - [
            -     "08:00:27:49:a4:92",
            -     "0000:00:03.0",
            -     "eth0"
            - ],
            - [
            -     "08:00:27:9d:8c:71",
            -     "0000:00:08.0",
            -     "eth1"
            - ]
        ],
        "old": []
    }
Should looks like this:
# vim  /etc/sysconfig/network-scripts/interface-rename-data/static-rules.conf
eth0:mac = "08:00:27:49:A4:92"
eth1:mac = "08:00:27:9D:8C:71"
Define xenbr0 and eth0 bridging configuration:
# vim /etc/sysconfig/network-scripts/ifcfg-xenbr0
DEVICE=xenbr0
TYPE=Bridge
ONBOOT=yes
NM_CONTROLLED=yes
BOOTPROTO=dhcp
# vim  /etc/sysconfig/network-scripts/ifcfg-eth0
DEVICE=eth0
TYPE=Ethernet
ONBOOT=yes
NM_CONTROLLED=yes
BOOTPROTO=none
BRIDGE=xenbr0
Now shutdown the Virtualbox Based XenServer VM via:
[root@localhost network-scripts]# shutdown -h now
Package for Libvirt
Package the modified vbox file and export to libvirt via following steps:
Verify the env is down:
$ vagrant status
Current machine states:

csagent                   poweroff (virtualbox)
Package the modified vm:
$ vagrant package
==> csagent: Clearing any previously set forwarded ports...
==> csagent: Exporting VM...
==> csagent: Compressing package to: /home/dash/Code/Vagrant/XenServer62/package.box
$ ls
package.box  Vagrantfile  Vagrantfile~
Mutate to libvirt box:
$ vagrant mutate package.box libvirt
Extracting box file to a temporary directory.
Converting package from virtualbox to libvirt.
    (100.00/100%)
Cleaning up temporary files.
The box package (libvirt) is now ready to use.
$ cd ~/.vagrant.d/boxes
$ vagrant box list
XenServer62        (virtualbox, 0)
XenServer62        (libvirt, 0)
Start the libvirt XenServer
Edit the Vagrantfile like following:
# vim Vagrantfile
Vagrant.configure(2) do |config|

  # vagrant issues #1673..fixes hang with configure_networks
  config.ssh.shell = "bash -c 'BASH_ENV=/etc/profile exec bash'"
  config.ssh.username = 'vagrant'
  config.ssh.password = 'vagrant'
  config.ssh.insert_key = 'true'
  config.vm.provider :libvirt do |domain|
    domain.nic_model_type = 'e1000'
    domain.memory = 384
    domain.nested = true
    domain.cpu_mode = 'host-passthrough'
  end


  # csagent node.
  # Add one networking, modify hostname, define memory, CPU cores.
  config.vm.define :csagent do |csagent|
    csagent.vm.box = "XenServer62"
    csagent.vm.hostname = CLOUDSTACK_AGENT_HOSTNAME
    csagent.vm.network :private_network, :ip => CLOUDSTACK_AGENT_IP, :mac => "08:00:27:9D:8C:71"
    # Disable mounting of vagrant folder as it's not supported on xenserver
    csagent.vm.synced_folder ".", "/vagrant", disabled: true
    csagent.vm.provider :libvirt do |domain|
      domain.memory = 8192
      domain.cpus = 4
      domain.nested = true
      domain.cpu_mode = 'host-passthrough'
      domain.nic_model_type = 'e1000'
      domain.management_network_mac = "08:00:27:49:A4:92"
    end
  end

end
Start the Vagrant machine via: vagrant up --provider=libvirt.
The result shows XenServer are now running under libvirt: