Jun 7, 2016
TechnologyVagrant Preparation
rackhd/rackhd vagrant box could be downloaded from following link:
https://atlas.hashicorp.com/rackhd/boxes/rackhd
Clone the repository from the github:
$ pwd
/home/dash/Code/Jun13
$ git clone https://github.com/RackHD/RackHD
$ cd RackHD
Change into the directory example, create config and run the setup command:
$ cd example
$ cp config/monorail_rack.cfg.example config/monorail_rack.cfg
Edits can be made to this new file to adjust the number of pxe clients created.
$ bin/monorail_rack
The monorail_rack script will auto-start all of the services by default, but you can also run them manually if you prefer.
$ vagrant ssh
vagrant:~$ sudo nf start
Unfortunately, the vagrant machine won’t work due to bad networking.
Customization Deployment
Use a trusty based vagrant box for creating the rackhd node.
$ vagrant init trustyvirtualbox
$ vim Vagrantfile
Vagrantfile’s configuration modification is listed as following:
Vagrant.configure(2) do |config|
  # The most common configuration options are documented and commented below.
  # For a complete reference, please see the online documentation at
  # https://docs.vagrantup.com.

  # Added more disks
+   file_to_disk = File.realpath( "." ).to_s + "/disk.vdi"

  # config.vm.network "private_network", ip: "192.168.33.10"
+   config.vm.network "private_network", ip: "172.31.128.1", virtualbox__intnet:  "closednet"

+  config.vm.provider "virtualbox" do |vb|
+    if ARGV[0] == "up" && ! File.exist?(file_to_disk)
+      puts "Creating 5GB disk #{file_to_disk}."
+      vb.customize [
+        'createhd',
+        '--filename', file_to_disk,
+        '--format', 'VDI',
+        '--size', 5000 * 1024 # 5 GB
+      ]
+      vb.customize [
+        'storageattach', :id,
+        '--storagectl', 'IDE Controller',
+        '--port', 1, '--device', 0,
+        '--type', 'hdd', '--medium',
+        file_to_disk
+      ]
+    end
+    vb.memory = "4096"
+    vb.cpus = 2
+    vb.customize ["modifyvm", :id, "--nicpromisc2", "allow-all", "--ioapic", "on"]
+  end
Then vagrant up for start up the machine.
Notice: the controller of the disk should be noticed very carefully, you could choose
“IDE Controller” Or “SATA Controller”, depending on your virtualbox configuration.
Then follow the tips on:
http://purplepalmdash.github.io/blog/2016/06/01/use-rakehd-for-deploying-systems/
Extend the root partition of vagrant disk via:
$ sudo pvcreate /dev/sdb
$ sudo vgextend vagrant-vg /dev/sdb
$ sudo lvextend -l +100%FREE /dev/vagrant-vg/root
$ sudo resize2fs  /dev/vagrant-vg/root
Adding Ubuntu Deployment
Install apt-mirror first, then using following mirror configuration file:
$ vim /etc/apt/mirror.list
############# config ##################
#
# set base_path    /var/spool/apt-mirror
#
# set mirror_path  $base_path/mirror
# set skel_path    $base_path/skel
# set var_path     $base_path/var
# set cleanscript $var_path/clean.sh
# set defaultarch  <running host architecture>
# set postmirror_script $var_path/postmirror.sh
# set run_postmirror 0
set base_path	/var/mirrors/ubuntu/14.04
set nthreads     20
set _tilde 0
#
############# end config ##############

deb-amd64 http://mirrors.aliyun.com/ubuntu	trusty main main/debian-installers
deb http://mirrors.aliyun.com/ubuntu	trusty main/installer-amd64
deb-amd64 http://mirrors.aliyun.com/ubuntu	trusty-updates main
deb-amd64 http://mirrors.aliyun.com/ubuntu	trusty-security main
clean http://mirrors.aliyun.com/ubuntu
Also you have to create following script for downloading the debian-installer:
$ vim /var/mirrors/ubuntu/14.04/var/postmirror.sh
#!/bin/sh -x
# the udebs script gets the actual files we need
#/mnt/repo/apt-mirror/var/udebs.sh
# A quick apt directory structure primer:
# an apt server (e.g. archive.ubuntu.com) contains repositories (e.g. trusty-backports),
# which contain archives (e.g. multiverse), which contain directories
# a complete example - http://archive.ubuntu.com/ubuntu/dists/trusty-backports/multiverse/debian-installer/
# With this in mind, we create bash 'arrays' of the structure:
# server we're syncing against
#MIRROR="cn.archive.ubuntu.com"
MIRROR="archive.ubuntu.com"
# repositories we're mirroring
#REPOS="trusty trusty-updates trusty-security trusty-proposed trusty-backports"
REPOS="trusty"
# archives in repositories
#ARCHIVES="main multiverse restricted universe"
ARCHIVES="main"
# installer location inside archive
#DIRECTORIES="debian-installer dist-upgrader-all installer-amd64 installer-i386"
DIRECTORIES="debian-installer installer-amd64"
#where we're storing it locally
LOCALDIR="/var/mirrors/ubuntu/14.04/mirror/mirrors.aliyun.com"
#LOCALDIR="/mnt/repo/apt-mirror/mirror/archive.ubuntu.com"
for REPO in $REPOS; do
for ARCHIVE in $ARCHIVES; do
for DIRECTORY in $DIRECTORIES;do
# create directory structure
if [ ! -e "$LOCALDIR/ubuntu/dists/$REPO/$ARCHIVE/$DIRECTORY" ]; then
mkdir -p "$LOCALDIR/ubuntu/dists/$REPO/$ARCHIVE/$DIRECTORY"
fi
# do the sync
rsync --recursive --times --links --hard-links --delete --delete-after \
rsync://$MIRROR/ubuntu/dists/$REPO/$ARCHIVE/$DIRECTORY/ $LOCALDIR/ubuntu/dists/$REPO/$ARCHIVE/$DIRECTORY
done
done
done
Now run sudo apt-mirror for syncing the repository to local storage.
Also create a shortcut to the repository in RackHD System:
$ sudo ln -s /var/mirrors/ubuntu/14.04/mirror/mirrors.aliyun.com/ubuntu/ /opt/monorail/static/http/
Now restart the rackhd node, the ubuntu deployment is ready for use.
Ubuntu Deployment
Add the json file which holds the ubuntu deployment:
$ pwd
/home/vagrant/RackHD/example
$ vim samples/ubuntu_boot.json
{
    "name": "Graph.InstallUbuntu",
    "options": {
        "defaults": {
            "obmServiceName": "noop-obm-service"
        },
        "install-os": {
            "repo": "{{api.server}}/ubuntu",
            "rootPassword": "ubuntu",
            "profile": "install-trusty.ipxe",
            "completionUri": "renasar-ansible.pub"
        }
    }
}
In fact the rootPassword is not ready for use, the real password after deployment
is RackHDRocks!.
Add one node(first you should make it pxed):
$ curl -H "Content-Type: application/json" -X POST --data @samples/noop_body.json http://localhost:8080/api/1.1/nodes/575fce38d23ba028051b4711/obm
$ curl -H "Content-Type: application/json" -X POST --data @samples/ubuntu_boot.json http://localhost:8080/api/1.1/nodes/575fce38d23ba028051b4711/workflows
Then restart the machine, you will get it installing ubuntu.
Jun 1, 2016
TechnologyFollowing are the steps for using the RackHD for deploying systems. Mainly refers to
http://dojoblog.emc.com/rackhd-cpi/setting-up-rackhd/
But the tutorial from emc includes lots of mistakes, so I listed all of the steps in
following chapters.
Vagrant Env Preparation
Initialize the vagrant env via(ubuntu1404 is my box name):
$ vagrant init ubuntu1404
A `Vagrantfile` has been placed in this directory.
$ vim Vagrantfile
  config.vm.provider "virtualbox" do |vb|
  #   # Display the VirtualBox GUI when booting the machine
  #   vb.gui = true
  #
  #   # Customize the amount of memory on the VM:
    vb.memory = "4096"
    vb.cpus = 4
    vb.customize ["modifyvm", :id, "--nicpromisc2", "allow-all", "--ioapic", "on"]
  end
$ vagrant up
Prerequisites
Use following scripts for installing the prerequisites for RackHD(pre_rackhd.sh):
#!/bin/bash
set -e
sudo apt-get -y update
sudo apt-get -y dist-upgrade
sudo apt-get autoremove
sudo apt-get install -y nodejs nodejs-legacy npm
# Runtime Dependencies
sudo apt-get install -y rabbitmq-server mongodb isc-dhcp-server
sudo apt-get install -y snmp ipmitool ansible amtterm apt-mirror unzip libkrb5-dev
# upstart will be installed after Ubuntu15.04.
# sudo apt-get -y install upstartsysv
sudo update-initramfs -u
# amttool
wget http://downloads.sourceforge.net/project/amttooltng/1.7/amttool
sudo chmod 777 amttool
sudo mv amttool /usr/bin/amttooltng
# Compile Dependencies
sudo apt-get install -y git openssh-server pbuilder dh-make devscripts ubuntu-dev-tools
# Git clone all of the repositories
RACKHD_INSTALL_DIR=~;cd $RACKHD_INSTALL_DIR
git clone https://github.com/RackHD/RackHD
RACKHD_PROJECT_DIR=${RACKHD_INSTALL_DIR}/RackHD
cd $RACKHD_PROJECT_DIR
git submodule update --init --recursive
git submodule foreach git pull origin master
# Configuration files
sudo touch /etc/default/on-http
sudo touch /etc/default/on-dhcp-proxy
sudo touch /etc/default/on-taskgraph
sudo touch /etc/default/on-syslog
sudo touch /etc/default/on-tftp
# Build And Install
cd ${RACKHD_PROJECT_DIR}/on-http
./HWIMO-BUILD
sudo dpkg -i on-http_*.deb
cd ${RACKHD_PROJECT_DIR}/on-dhcp-proxy
./HWIMO-BUILD
sudo dpkg -i on-dhcp-proxy_*.deb
cd ${RACKHD_PROJECT_DIR}/on-taskgraph
./HWIMO-BUILD
sudo dpkg -i on-taskgraph_*.deb
cd ${RACKHD_PROJECT_DIR}/on-syslog
./HWIMO-BUILD
sudo dpkg -i on-syslog_*.deb
cd ${RACKHD_PROJECT_DIR}/on-tftp
./HWIMO-BUILD
sudo dpkg -i on-tftp_*.deb
Now shutdown the vm, add one networking interface, because we want to add PXE in this
network apdater.
$ vim Vagrantfile
config.vm.network "private_network", ip: "172.31.128.1", virtualbox__intnet: "closednet"
Now startup the vagrant vm again. continue to configure the PXE.
Configuration
Examine the eth1 IP Configuration:
vagrant@ubuntu-1404:~$ ifconfig eth1
eth1      Link encap:Ethernet  HWaddr 08:00:27:c2:cf:3e
          inet addr:172.31.128.1  Bcast:172.31.128.255  Mask:255.255.255.0
Configure the isc-dhcp:
$ sudo vim /etc/default/isc-dhcp-server
INTERFACES="eth1"
Add the following configuration into /etc/dhcp/dhcp.conf:
# RackHD Added Lines
deny duplicates;

ignore-client-uids true;

subnet 172.31.128.0 netmask 255.255.252.0 {
    range 172.31.128.2 172.31.131.254;
    # Use this option to signal to the PXE client that we are doing proxy DHCP
    option vendor-class-identifier "PXEClient";
}
Download the config.json for monorail usage, and modify its tftpRoot Configuration:
$ cd /opt/monorail/
$ sudo wget https://raw.githubusercontent.com/RackHD/RackHD/master/packer/ansible/roles/monorail/files/config.json
$ sudo vim config.json
    "tftpRoot": "/opt/monorail/static/tftp",
Prepare the http and tftp folder:
$ sudo mkdir -p /opt/monorail/static/http/common/
$ sudo mkdir -p /opt/monorail/static/tftp/
Download the tftp and http static files:
$ cd /opt/monorail/static/tftp
$ sudo wget https://bintray.com/artifact/download/rackhd/binary/ipxe/monorail.ipxe
$ sudo wget https://bintray.com/artifact/download/rackhd/binary/ipxe/monorail-undionly.kpxe
$ sudo wget https://bintray.com/artifact/download/rackhd/binary/ipxe/monorail-efi32-snponly.efi
$ sudo wget https://bintray.com/artifact/download/rackhd/binary/ipxe/monorail-efi64-snponly.efi
$ cd /opt/monorail/static/http/common/
$ sudo wget https://bintray.com/artifact/download/rackhd/binary/builds/discovery.overlay.cpio.gz
$ sudo wget https://bintray.com/artifact/download/rackhd/binary/builds/base.trusty.3.16.0-25-generic.squashfs.img
$ sudo wget https://bintray.com/artifact/download/rackhd/binary/builds/initrd.img-3.16.0-25-generic
$ sudo wget https://bintray.com/artifact/download/rackhd/binary/builds/vmlinuz-3.16.0-25-generic
Now reboot the vm again, next step we will test the PXE boot.
PXE Clients
The PXE will be avaiable and after it finishes, the vm will look like:
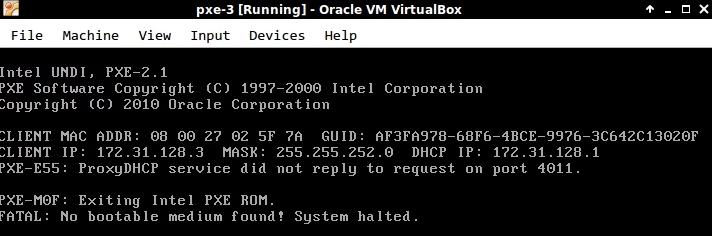
Now you could get the node info via following RESTFUL api call:
$ curl http://localhost:8080/api/1.1/nodes | python -m json.tool
        "createdAt": "2016-06-01T03:44:09.064Z",
        "id": "574e5a0944ff724a05284005",
        "identifiers": [
            "08:00:27:02:5f:7a"
        ],
        "name": "08:00:27:02:5f:7a",
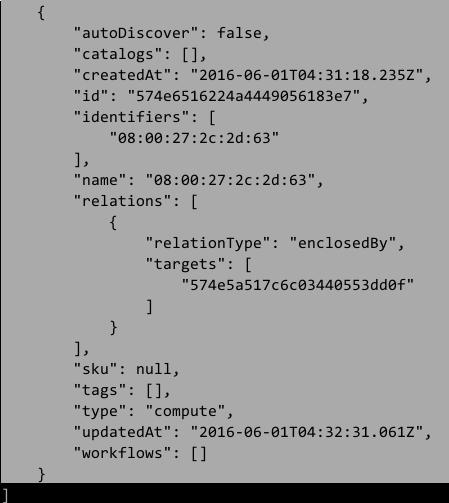
Examine the mac correponding node ID 574e5a0944ff724a05284005, later we wil use this id for deploying CentOS.
Add CentOS7 Deployment
Add CentOS7 DVD into the deployment:
$ sudo python ~/RackHD/on-tools/scripts/setup_iso.py /mnt/CentOS-7-x86_64-Everything-1511.iso /opt/monorail/static/http --link=/home/vagrant/RackHD
This will takes around 10 mins for importing the iso into the RackHD.
Configure the node:
$ curl -H "Content-Type: application/json" -X POST --data @samples/noop_body.json http://localhost:8080/api/1.1/nodes/574e5a0944ff724a05284005/obm | python -m json.tool
$ curl -H "Content-Type: application/json" -X POST --data @samples/centos_iso_boot.json http://localhost:8080/api/1.1/nodes/574e5a517c6c03440553dd0f/workflows | python -m json.tool
Then added the configuration for deploying CentOS7 via:
$ cd ~/RackHD/example/
$ curl -H "Content-Type: application/json" -X POST --data @samples/noop_body.json http://localhost:8080/api/1.1/nodes/574e6516224a4449056183e7/obm | python -m json.tool
$ curl -H "Content-Type: application/json" -X POST --data @samples/centos_iso_boot.json http://localhost:8080/api/1.1/nodes/574e6516224a4449056183e7/workflows | python -m json.tool
PXE the node, thus you will get a CentOS7 installed.
May 31, 2016
Technology对比xfce4, lxde, gnome, mate等桌面环境占用内存/CPU对比
先决条件
使用vagrant的镜像(ubuntu14.04):
$ vagrant box list
ubuntu1404                                   (virtualbox, 0)
每一个桌面环境的验证如下:
$ vagrant init ubuntu1404
$ vim Vagrantfile
  config.vm.provider "virtualbox" do |vb|
    # Display the VirtualBox GUI when booting the machine
  #  vb.gui = true

    # Customize the amount of memory on the VM:
    vb.memory = "1024"
  end
$ vagrant up
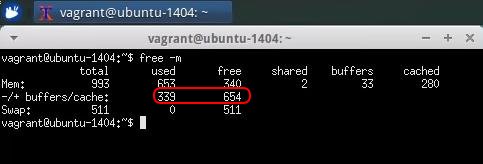
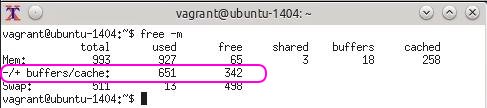
基础镜像占用内存
用free -m来查看系统运行时所占用内存:

xfce4(xubuntu)
安装:
$ sudo apt-get update
$ sudo apt-get install xubuntu-desktop
启动xfce4桌面后,内存占用结果为:
lxde(lubuntu)
安装:
$ sudo apt-get update
$ sudo apt-get install -y lubuntu-desktop
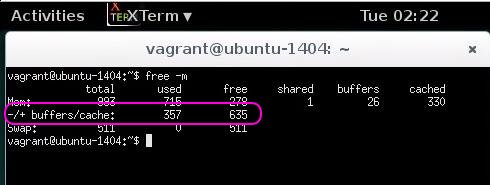
启动lxde后,内存占用为:

gnome(gnome-session-fallback)
安装:
$ sudo apt-get update; sudo apt-get install gnome-session-fallback
$ sudo apt-get install -y gdm xterm
启动gnome-session-fallback后,内存占用为:
unity
安装:
$ sudo apt-get update && sudo apt-get install -y ubuntu-desktop
启动unity后,内存占用为:

mate
安装:
$ sudo apt-add-repository ppa:ubuntu-mate-dev/ppa
$ sudo apt-add-repository ppa:ubuntu-mate-dev/trusty-mate
$ sudo apt-get update && sudo apt-get upgrade
$ sudo apt-get install --no-install-recommends ubuntu-mate-core ubuntu-mate-desktop
启动mate后,内存占用为:
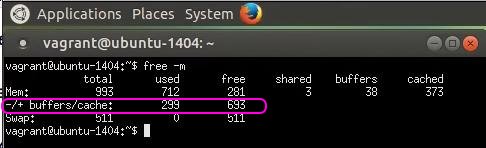
KDE
安装:
$ sudo apt-get update && sudo apt-get install -y kubuntu-desktop
内存占用:
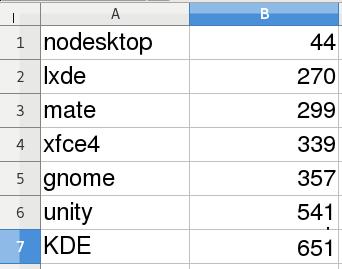
对比
统计结果:
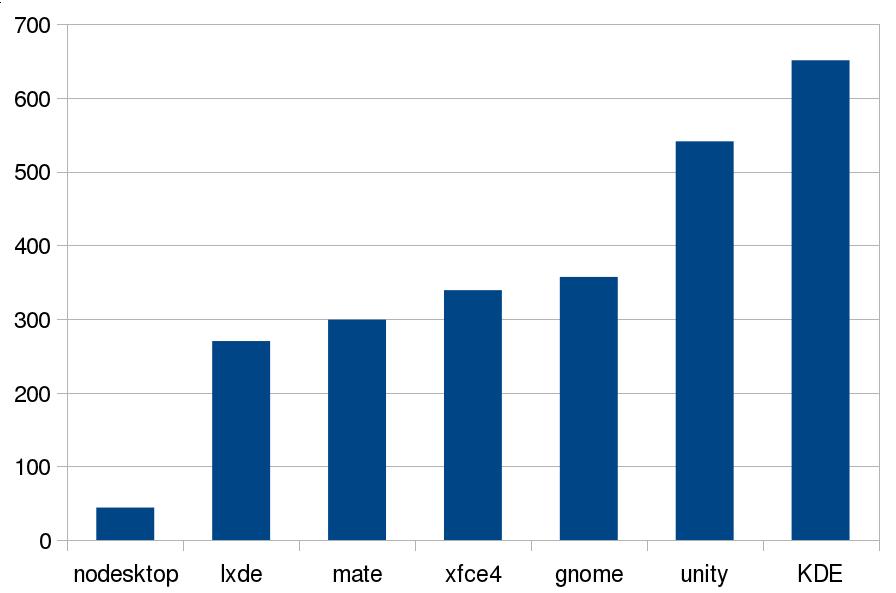
图例:
May 29, 2016
Life计划不如变化,昨天说要去南越文王博物馆,结果上午下暴雨,中午有饭局,延后。饭局中有
小伙伴说去看广美的毕业设计,想起来几天前在微博上看到一广美学生关于GFW的讽刺毕业设计,
酒足饭饱后一行人即赶赴大学城观展。
广美毕业设计展
广美毕业展分五楼,每个展厅都有数百平米,囊括了绘画、动画、建筑设计、服装设计、模型设计、
汽车设计…………内容。一路看来,真是让人大开眼界。
设计是很重要的,有了好的设计才会有好的产品。在制造业已然日薄西山的当下,往设计转型也许
是个不错的发展方向。好了,以下是一些走马观花的掠影。
彩陶制作的城堡摆件。笨拙的造型和鲜活的配色让诸多小朋友流连往返:

这组憨态可掬的作品叫《不减肥挺好的》,一个妹子的本科毕业设计:

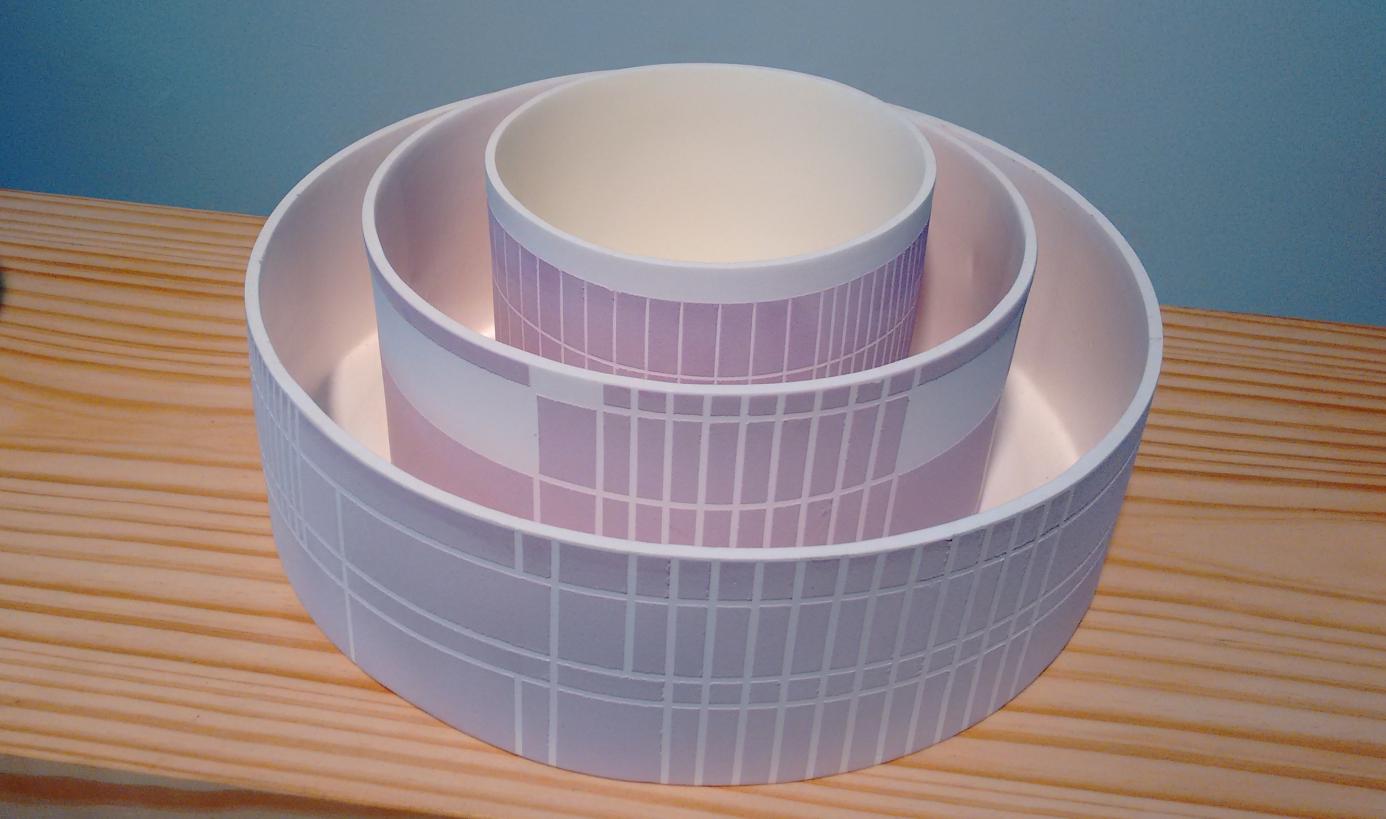
这个屏风摆件很有想象力:

如果家里有一个温馨如此的阳台:

适合培养多肉植物的摆盘:
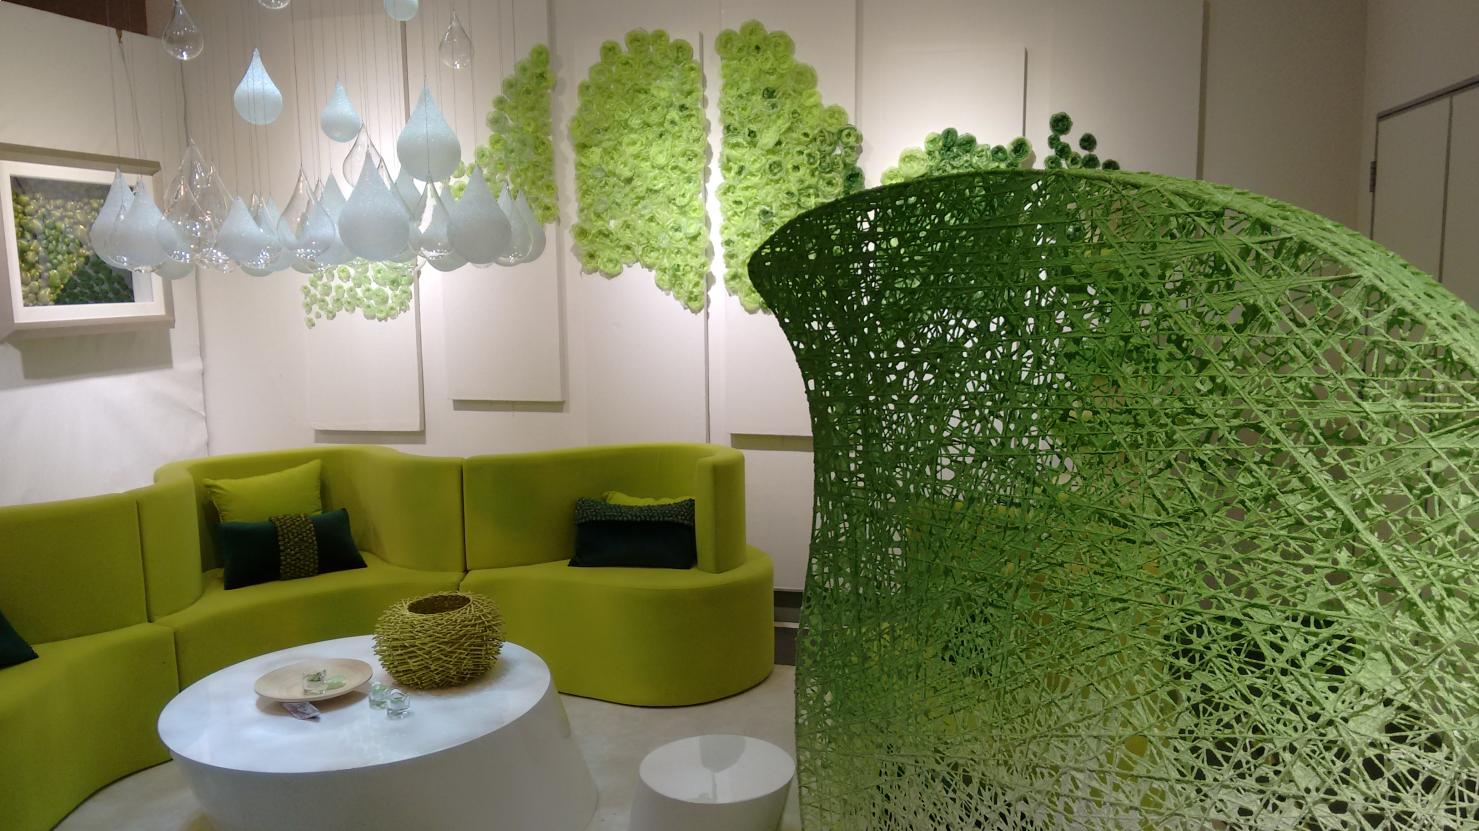
生活在绿色里:
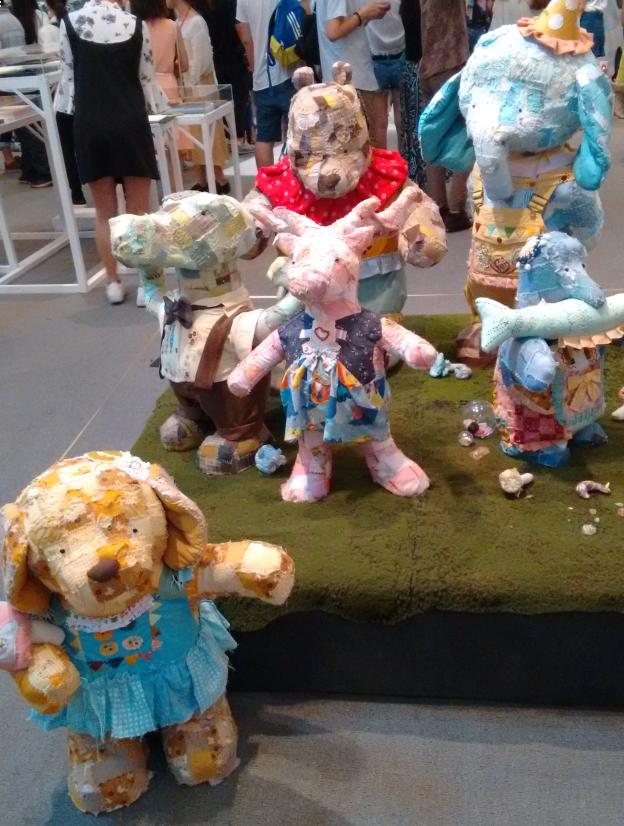
破烂狗熊和它的朋友们:
这几个皮革的配色相当不错,有手工打造一个键盘皮套的冲动:

喵星人专属的浴室设计, 这个真的要狂赞:

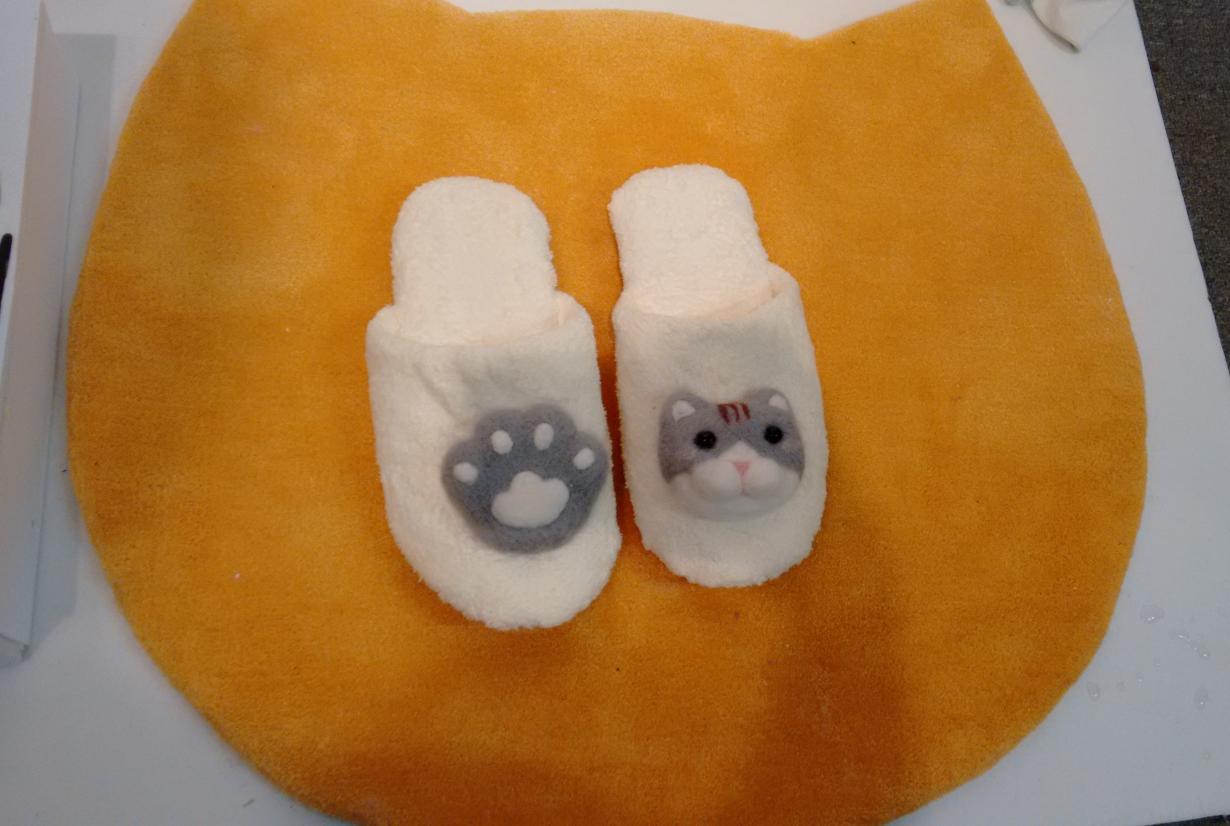
萌爆了的拖鞋!
让人马上能安静下来的书桌设计,萌萌的北极熊,蓝+白色调。超赞的设计!

这个家居摆设让人无法抗拒一杯咖啡或者啤酒的诱惑:
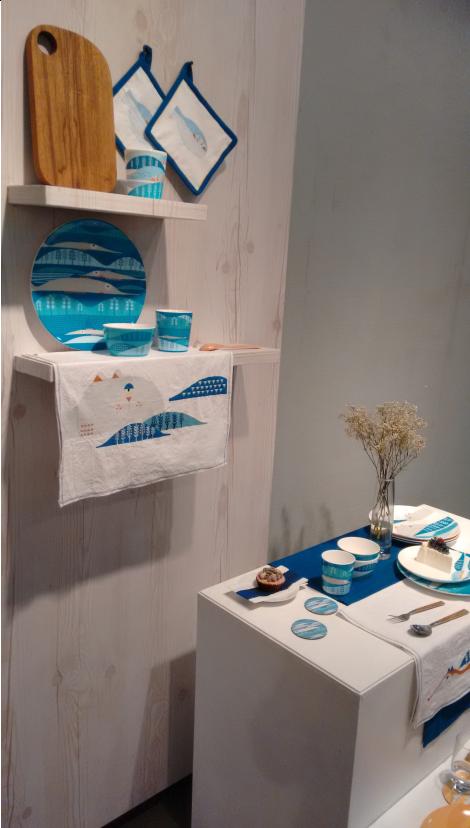
一位兰州籍学子为家乡设计的兰州珍品包装,也是超级赞哦!!!
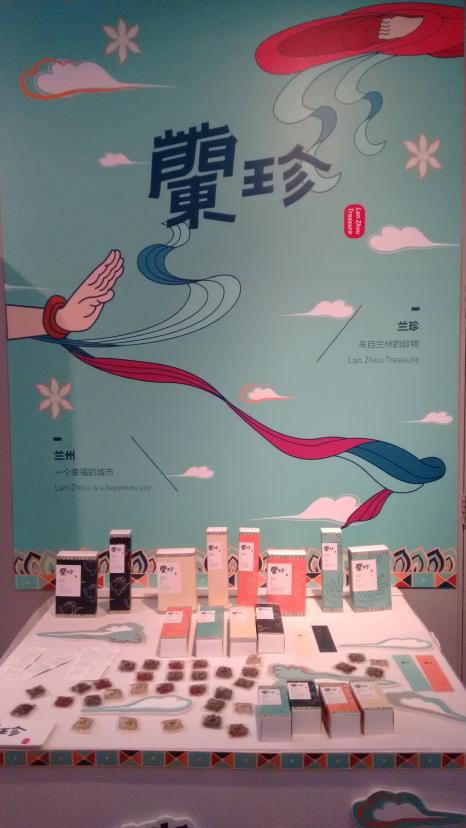
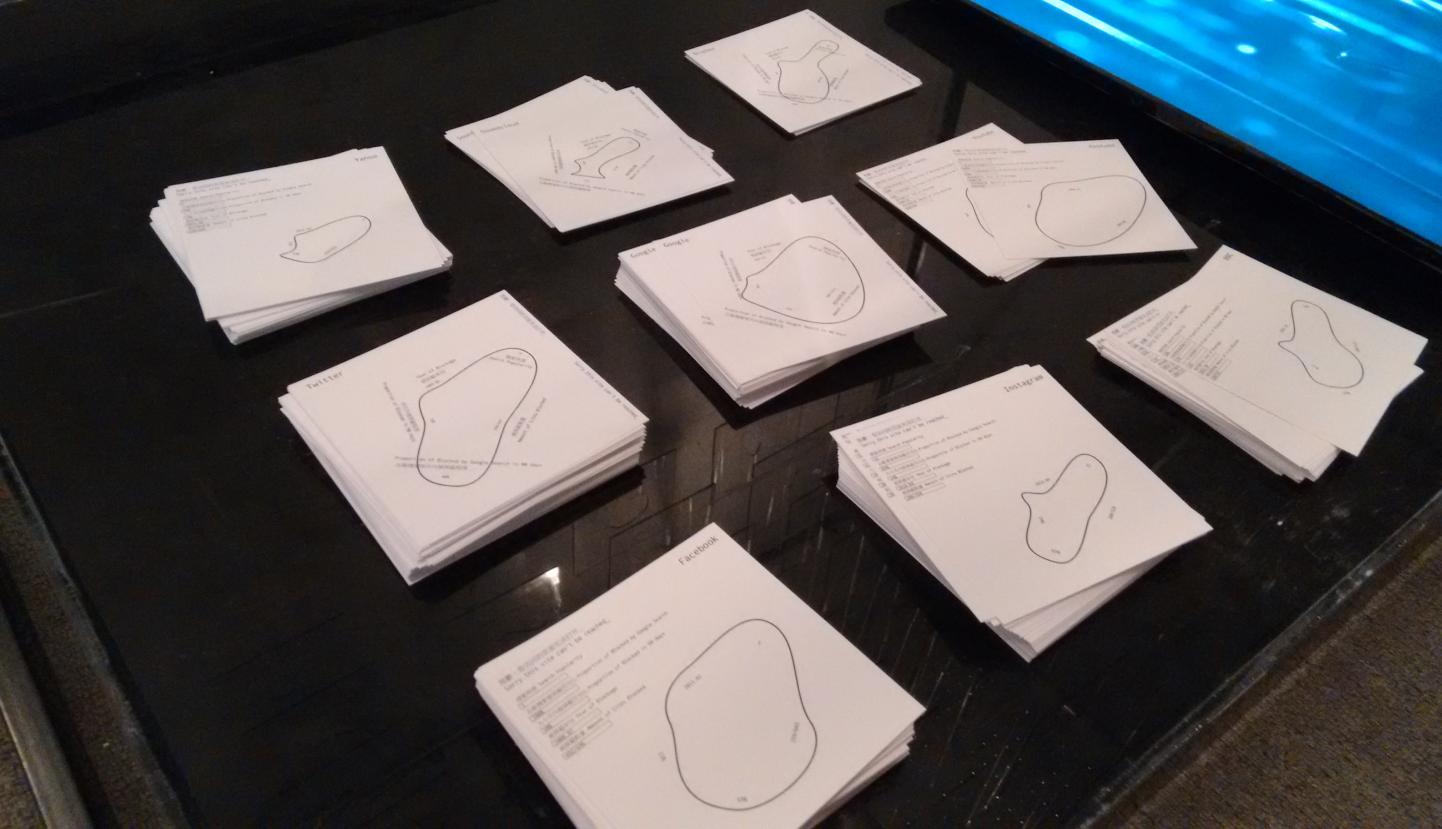
这里头的一个吊牌,就是一个被GFW屏蔽的网站, 叹气。。。
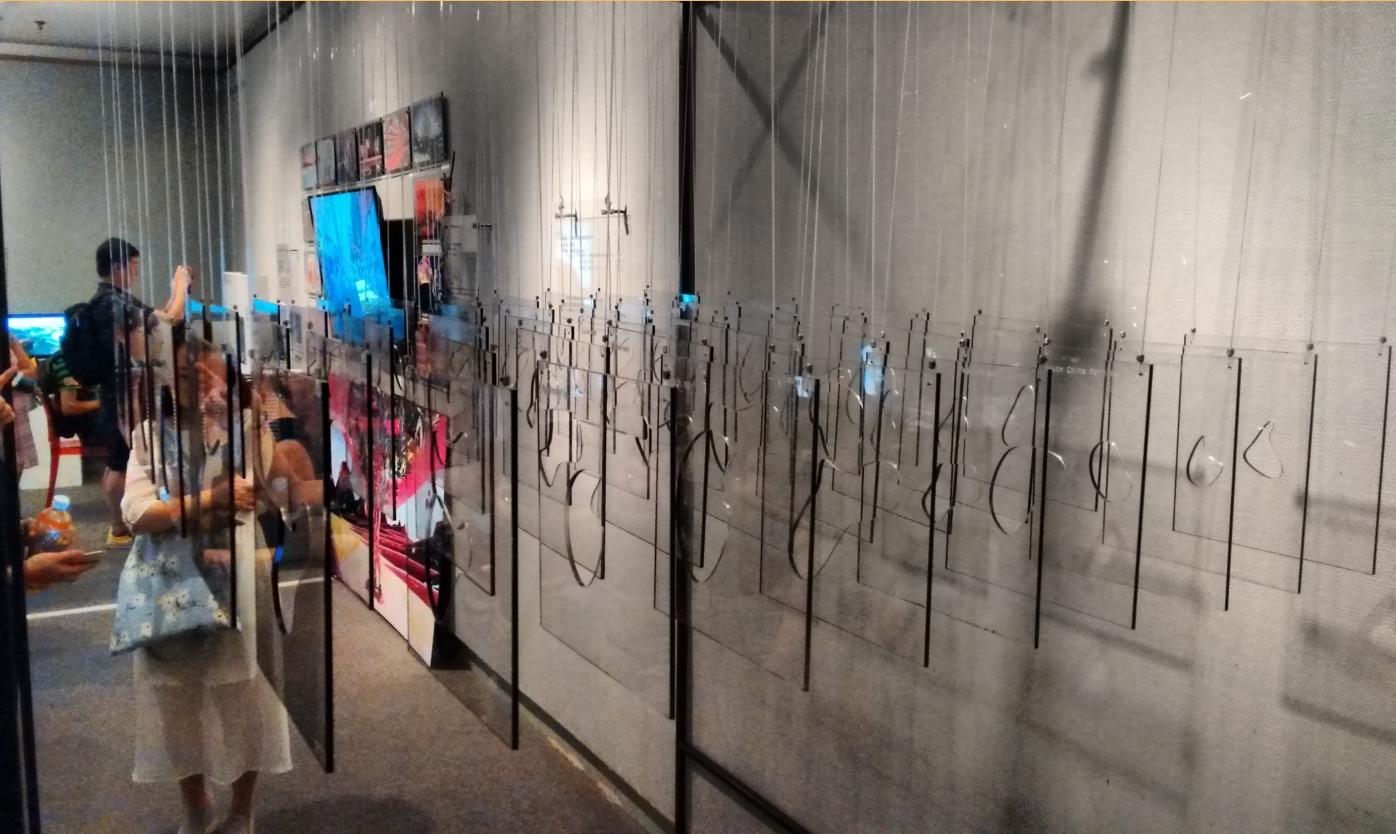
而吊牌下的小卡片,则是该网站不能访问的起始时间,9个卡片里,有twitter,facebook,google等:
视觉跟踪的小黄鸭们,用传感器,实现小黄鸭随着观众的体感而转动,老大哥能从任一方向都看着你:

中国人用了太多抗生素,滥用了太多。这幅作品就是指的这个:
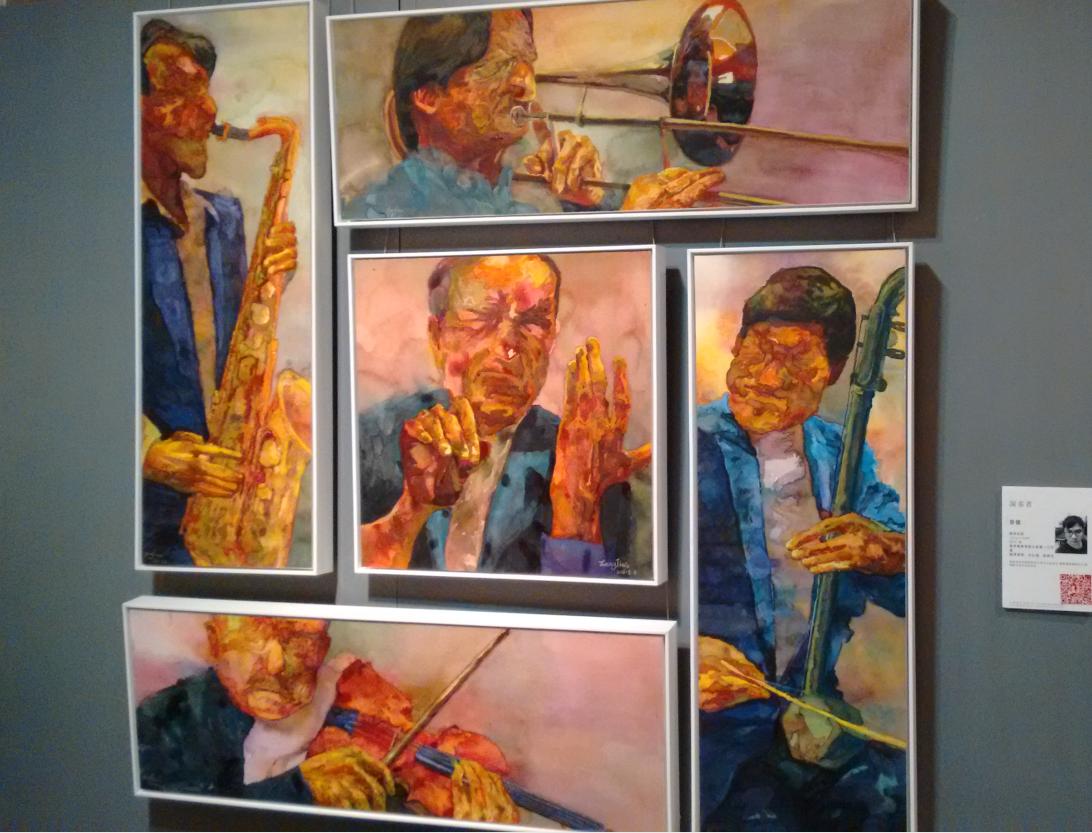
水墨展示的乐师们的神态。虽然没有面部表情,但是,那种陶醉的形态已经栩栩如生:
好作品真是太多。限于时间,没法一一展示了。我们只是看了4层,还有一层没看。这次展览
完全出乎我的意料之外,首先我没想到本科生的毕业设计水准已经如此之高;再次我没想到美术学院
的学生,他们所着眼的范围已经覆盖得如此之广,他们涉及了城市设计、环境保护、家居设计、工业
包装等等等等诸多领域。而我们这群技术工人,相比之下,做的只是一点点微小的工作吧。
Life is long, play more.
纯吃货贴
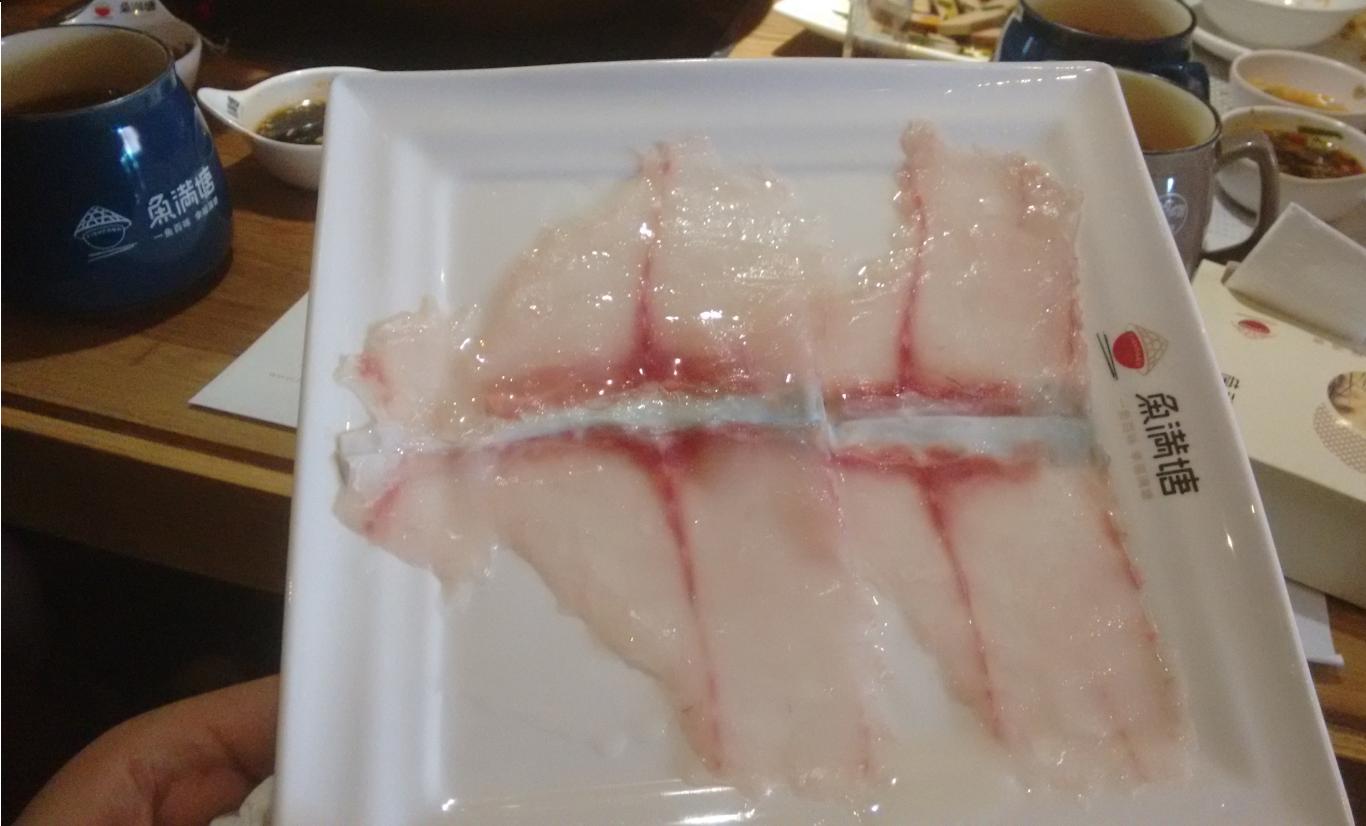
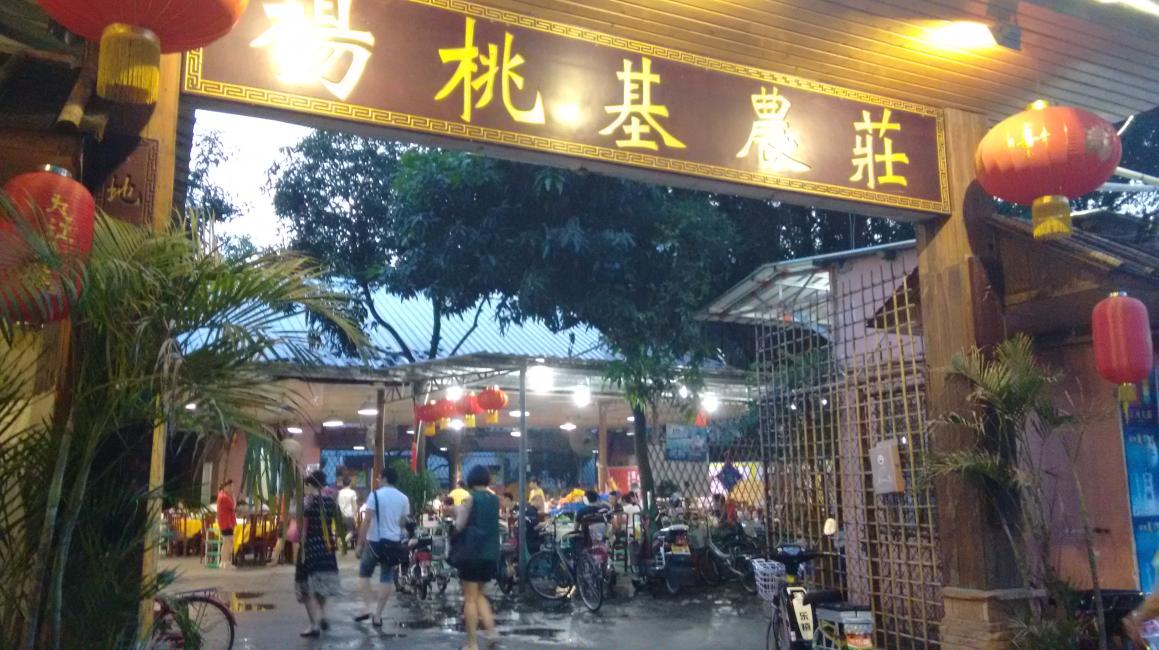
本日主打斑鱼,顺祝某位小伙伴生日快乐。
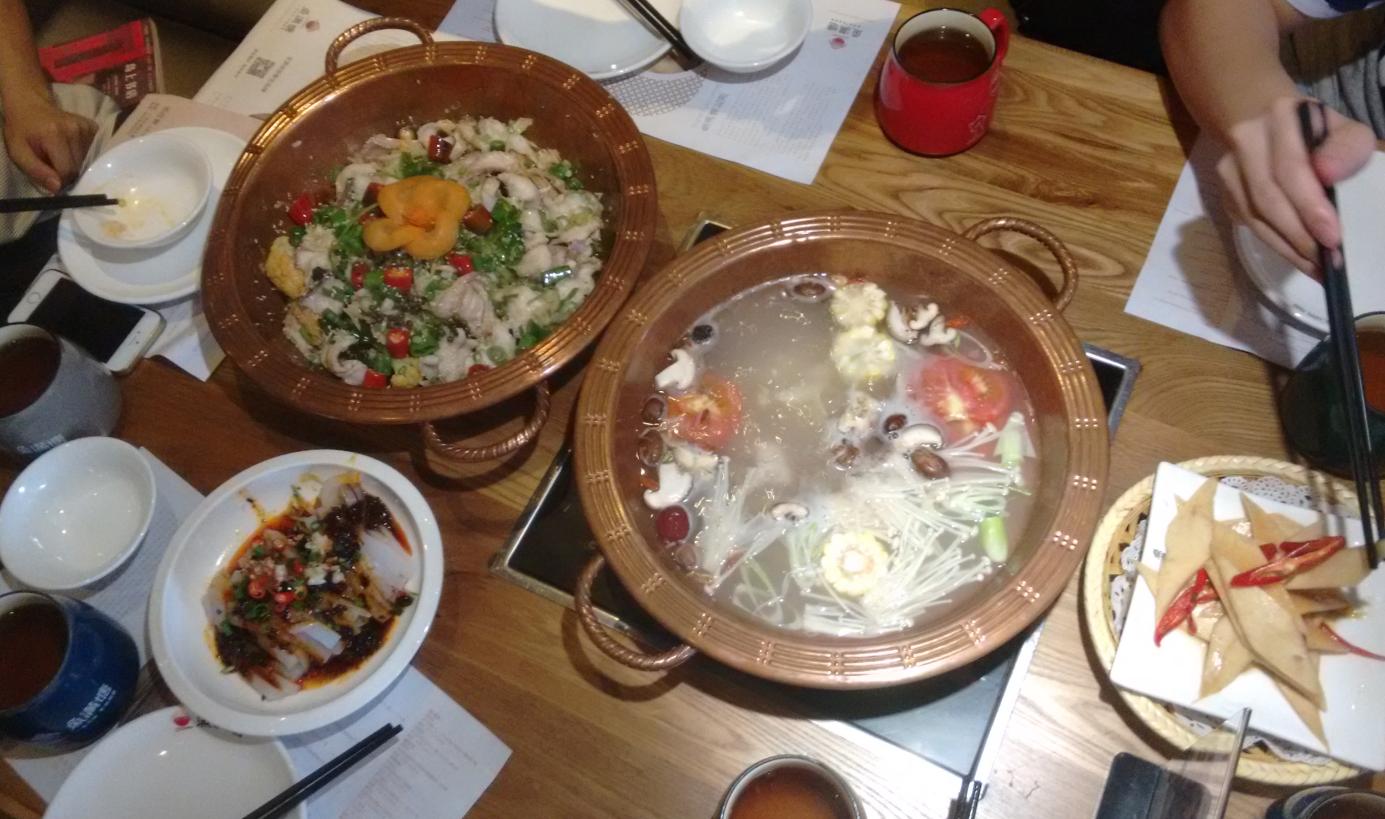
传说中的斑鱼:
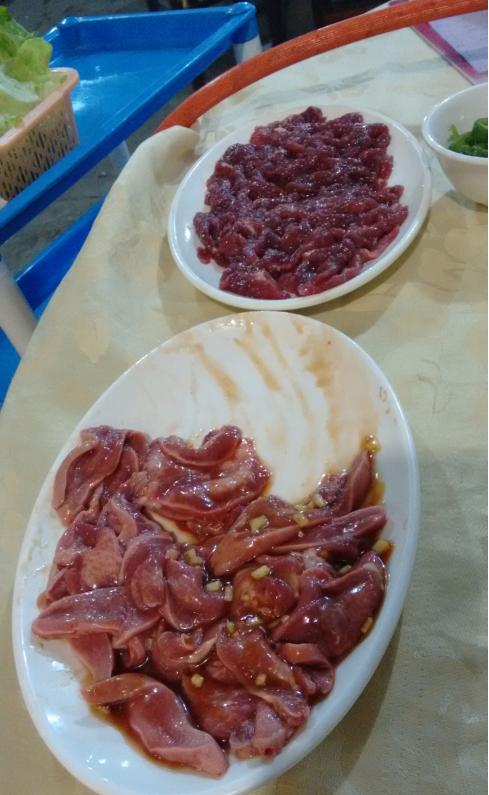
晚餐呢接着腐败,驴肉:
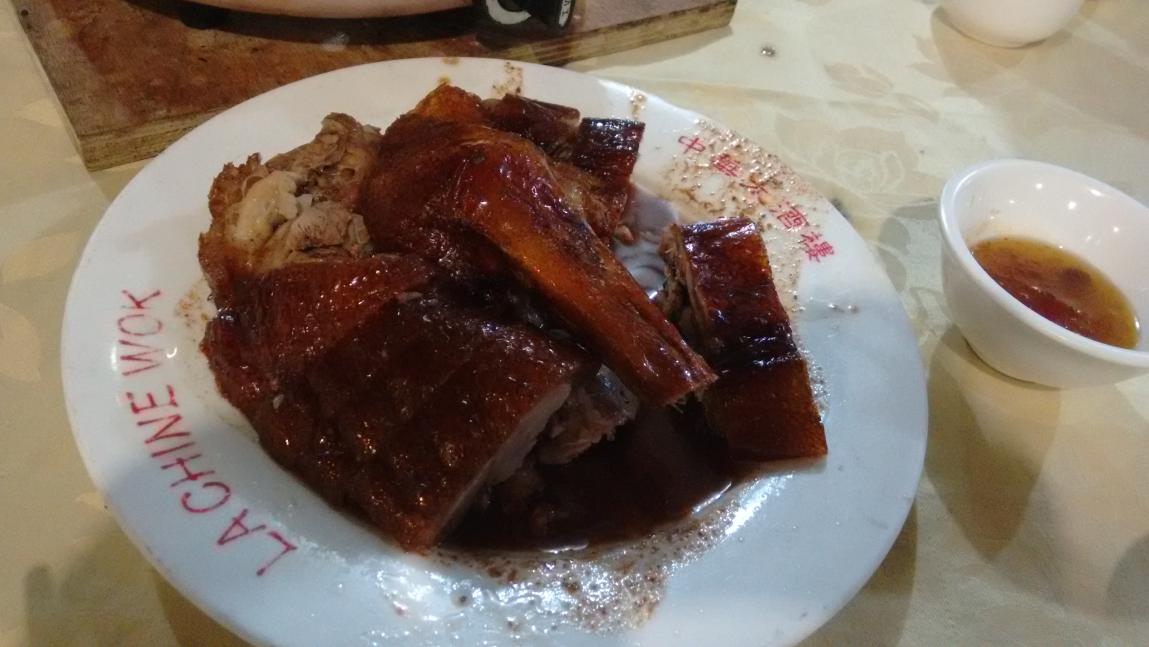
好烧鹅:
天上龙肉,地下驴肉:
酒足饭饱外加精神愉悦的一天!好了,周末再见,周一继续狠狠的上班吧!
May 28, 2016
Life题记
近来多了不少个人时间,周末得以在广州和周边自由行走。又鉴于一直以来对朋友圈封闭生态系统的反感
、有限文字带来的表达能力的局限的顾虑,决定把游记整理在blog中。
2016.05.28,周六,雨,行程:陈家祠,越秀山。
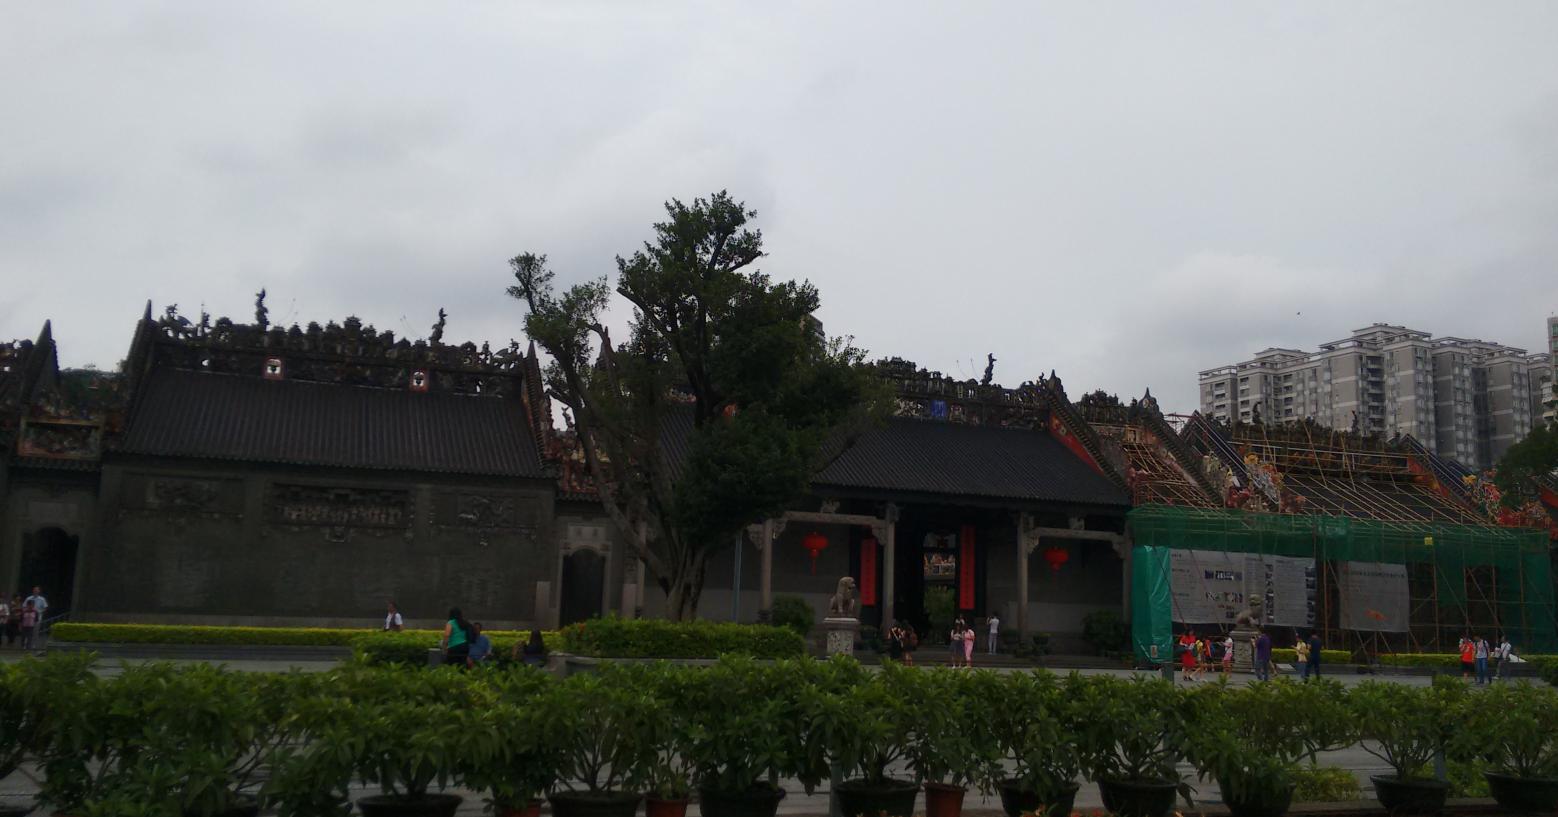
陈家祠
陈家祠实在是名声在外得太响,俨然成为岭南建筑的一大地标性建筑,以至于我一个朋友出差路过广州还
专程去访了一次(WMZDBD,说你呢:)哈哈哈)。我想可能和它地处闹市区外加交通便利有很大关系—-地铁1号线坐到陈家祠站,出D口,
票价10元,好了,陈家祠欢迎你。
下图是祠堂正门。中国各地的祠堂并无两样,牌坊打先锋,往后两根大旗杆,门口用石狮镇门,对联则用来表示
本宗姓优越感的字句,无非也是诗书耕读勤俭发奋一类的语调。本族子弟一接近这门,心底的自豪感嗖的
一下即提升到爆表。祠堂里供奉的,当是本姓人里的成大器者。从这个意义上讲,宗祠可算得上是某个姓的”靖国神社“。
陈家祠堂有名的就是它的各种雕刻了。网上说这些雕刻美仑美奂(“图案题材广泛,造型生动逼真,雕刻技艺精湛,
用笔简炼粗放却又精雕细琢,与雄伟的厅堂浑然一体”)。
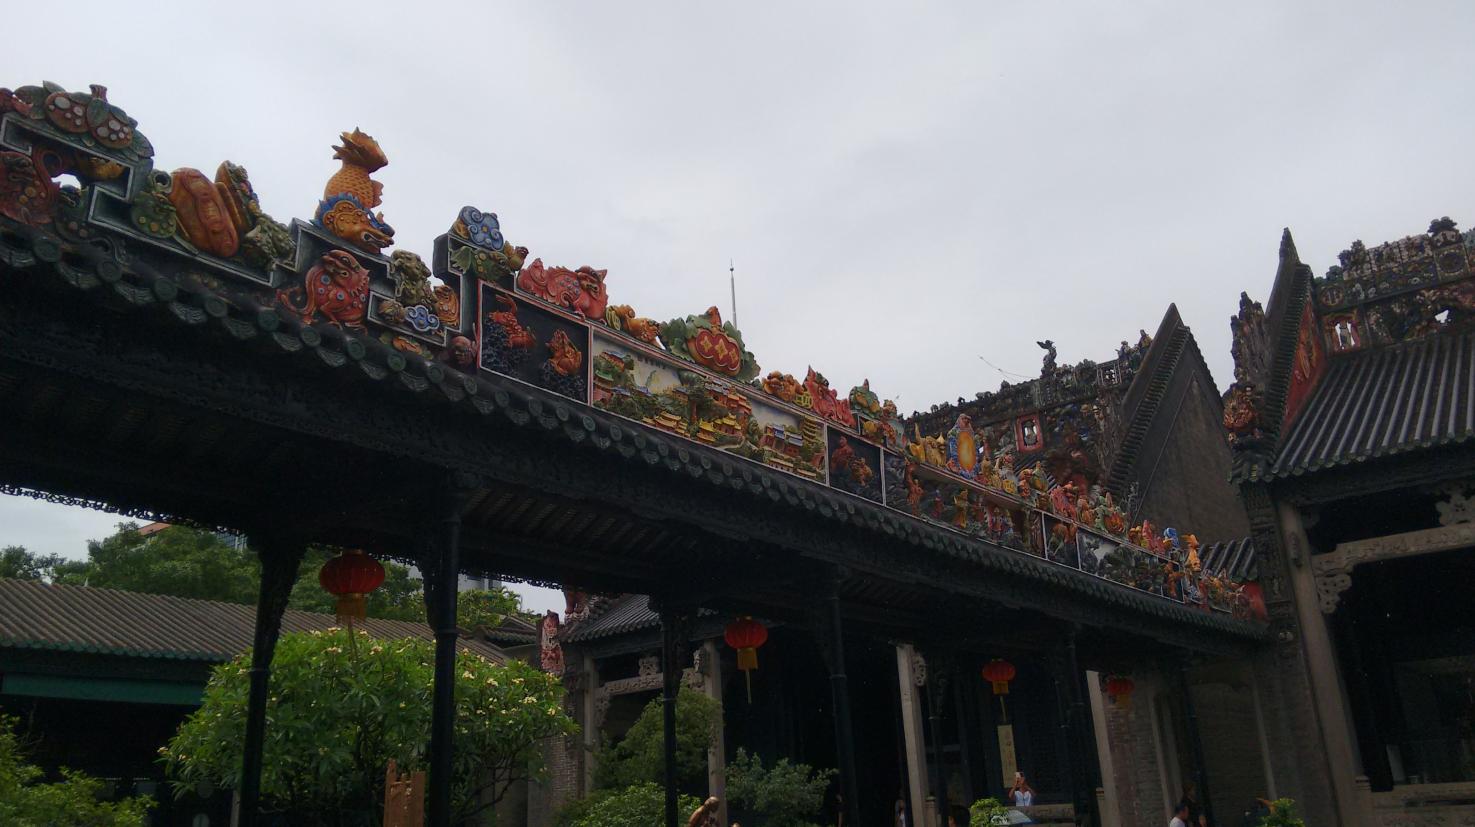
讲真,我觉得网上的说法言过其实。来广州一年多,喜欢游走的缘故,看过不少岭南派建筑。砖雕做得好的
我推荐:佛山祖庙和顺德城煌庙。若是以前从没见过岭南雕刻艺术的,到了陈家祠可能觉得“哇噻好漂亮”, 但
若是看得多、有了比较,就会有高下立判之感。陈家祠砖雕的人物造型过于呆板,层次感对比于我提起的两个
地方显得不够分明。而且它们都高高的站在了屋顶上,原谅我的老颈椎实在没法承受仰望星空的45度角。很多砖雕又
太新了,就像是刻意做新的一般。
还有就是,看各种雕刻一定要慢慢看,干扰越少越好。陈家祠里爱自拍的小姑娘和爱玩单反的大爷大妈太多了,拜托,
我已经抑制住了很多次做V字型手势的冲动。
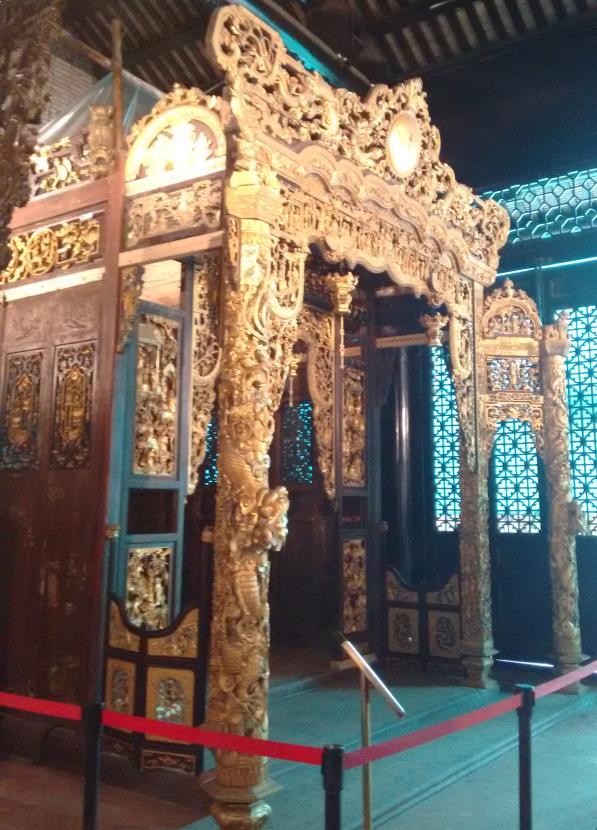
据说这是在陈家祠的文物仓库里发现的一个用于祭拜神像的木质建筑,官方介绍说它在仓库里沉睡了数十年后,终于
于2015年被发现而后组装出来展览喽!我比较怀疑这个建筑展览人做策划时的智商及情商,我也可以花几万找文物贩子
做旧一个然后说成是"沉睡数十年"啊。。。。。。
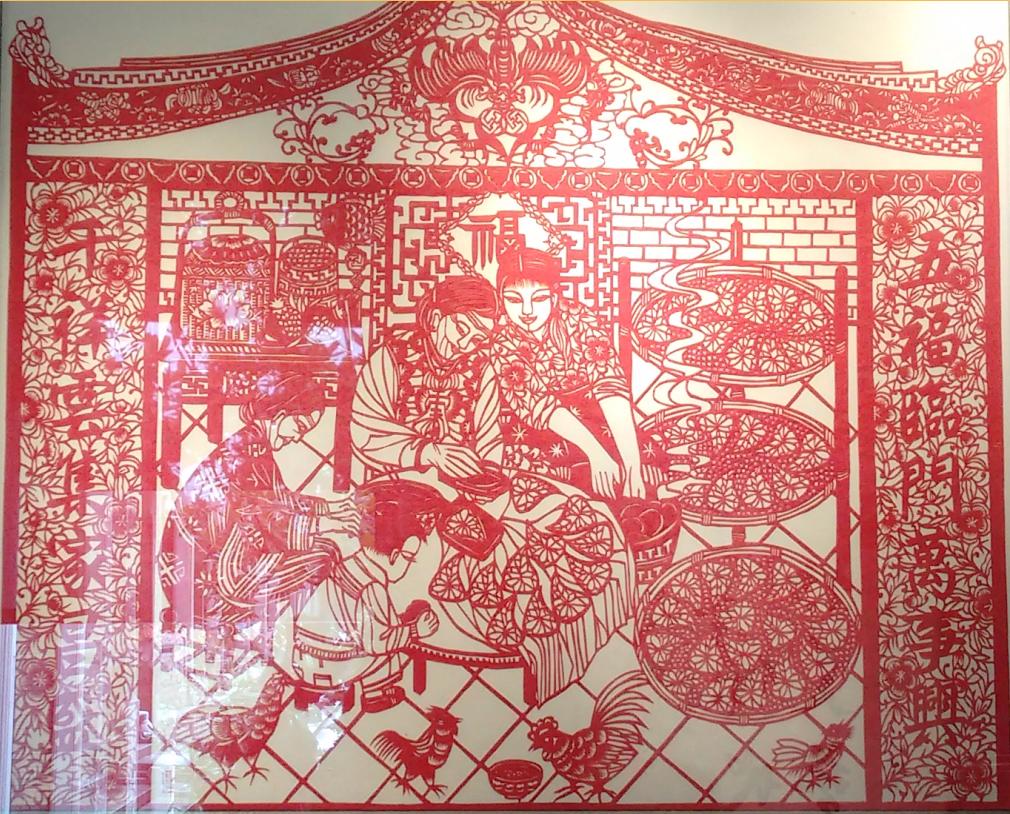
陈家祠还有个身份是广东民俗博物馆,因而在它里头有很多民俗藏品,譬如:
大潮汕剪纸:

特别强调一下”红头船“和”妈祖“, 怡乐路上有家馆子,名字就叫红头船, 鹅肝专卖:

做桃粿,潮汕的一种过年用的食物:
汕头那边的漆版画,这张是说”李白醉酒应诏答番书“:

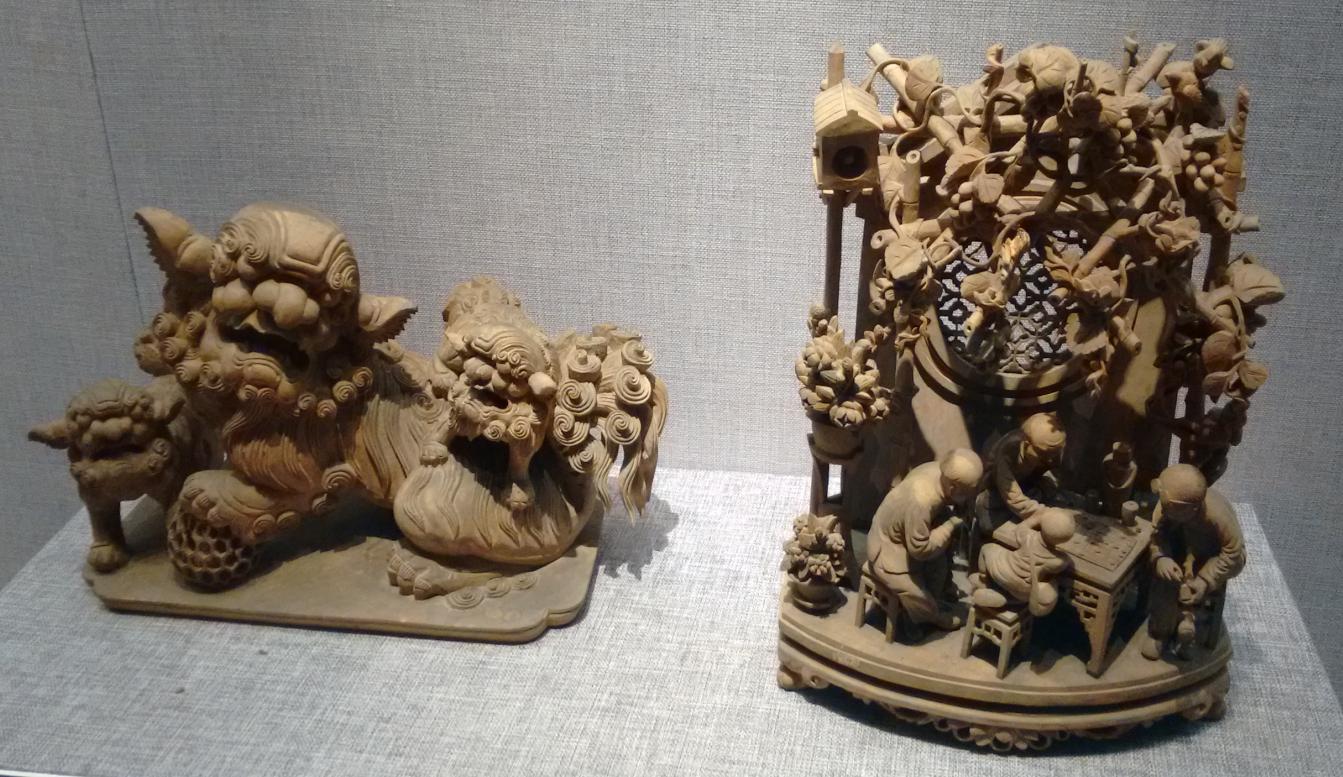
木雕中的上品,没想到一块木头里即可幻化出人生万象:
一副刻填彩漆画,50年代创作,浓郁的时代风情,《蔗糖丰收》:

此外还有各种绘画/刺绣/雕刻艺术等等,个人喜好问题,我没有完全拍下来。
个人表示很排斥陈家祠里的象牙雕刻展览及售卖场所,你可以说象牙雕刻出来的东西很精美,富有收藏价值等等。但
如果一件艺术品要建立在一条生命的泯灭上,那这种艺术可以说成是杀戮。从这个意义上讲,那些标价数百万的象牙雕刻作品
,背后站着的都是一头或是数头可怜的惨遭虐杀的大象。
综上所述, 陈家祠我勉强给它给到60分。我给它的评价是一个岭南派建筑的快餐式消费产品。做新痕迹太重,商业气息太浓,
而且,贩卖象牙制品。有朋友路过想走马观花看一下岭南建筑及民俗的,又不想出市区的话,可以带过来走一走。
越秀山
基于陈家祠实在没啥好逛的,出门我就上了109,一路坐到越秀山, 电车,很平稳,很舒服。
越秀山的植被相当好。在市区里来讲,NO.1。 它让我想起南宁的青秀山,青秀山也是个植被很不错的地方,比越秀山要大很多。
雨后的越秀山空气清新,各种热带植物在视野里简直是青翠欲滴,赤裸裸的挑战着你的视觉神经。生态好,所以随处可以看到
小动物,比如:

越秀山里残存了一段明城墙,全广州唯一。 一棵开花的树VS明城墙,很奇妙。要知道在南京的明城墙,大部分都是光秃秃的:
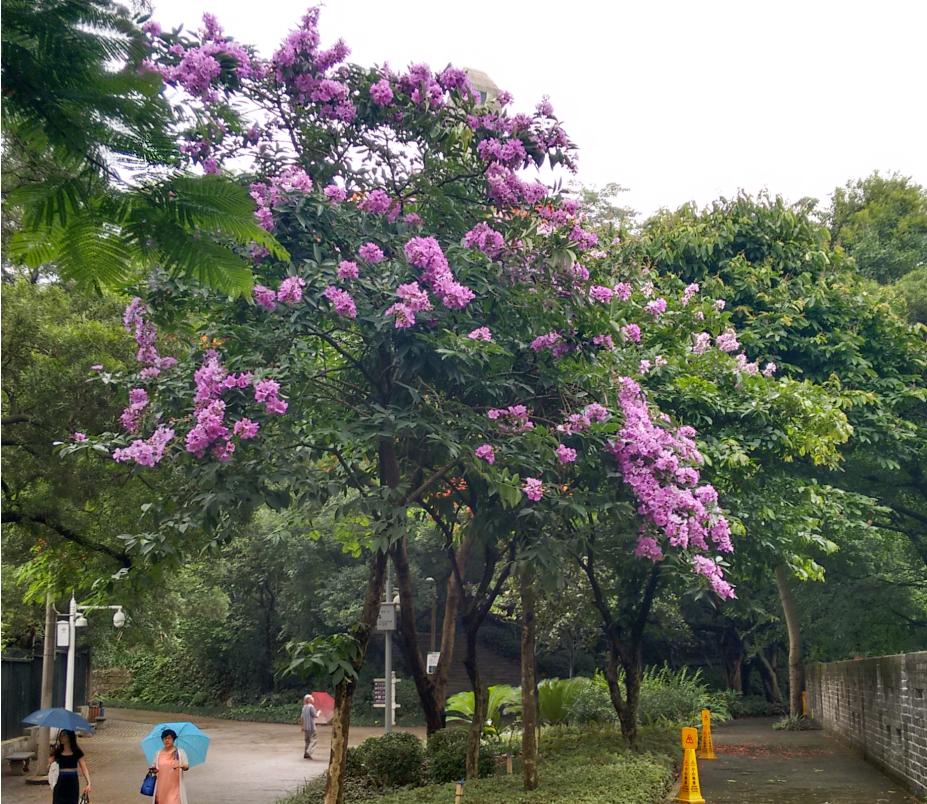
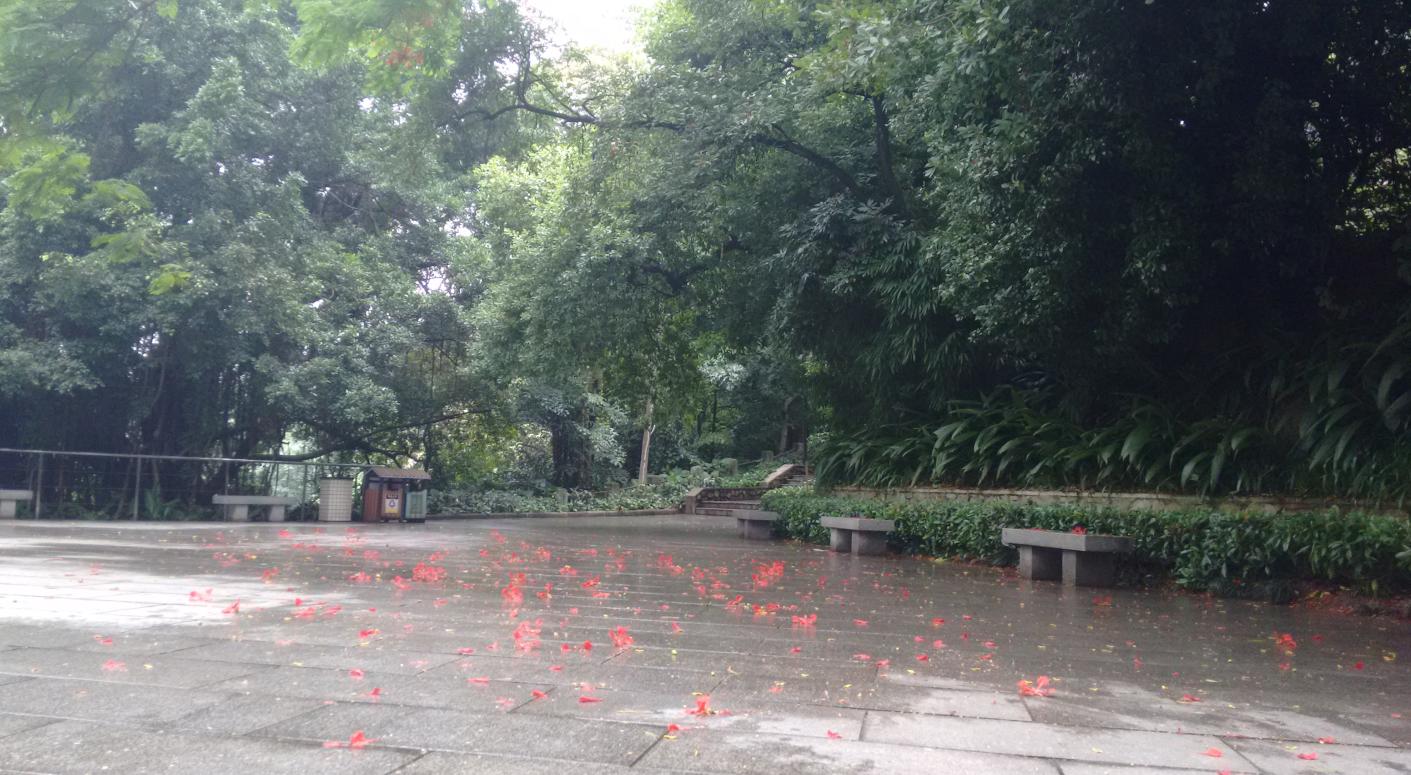
红花残,满地伤,适合发呆一下午的所在:
越秀山里的标志性建筑有两个,先说第一个: 镇海楼, 别名”五层楼“, 广州地标建筑,感兴趣的自行Google之. 见图。
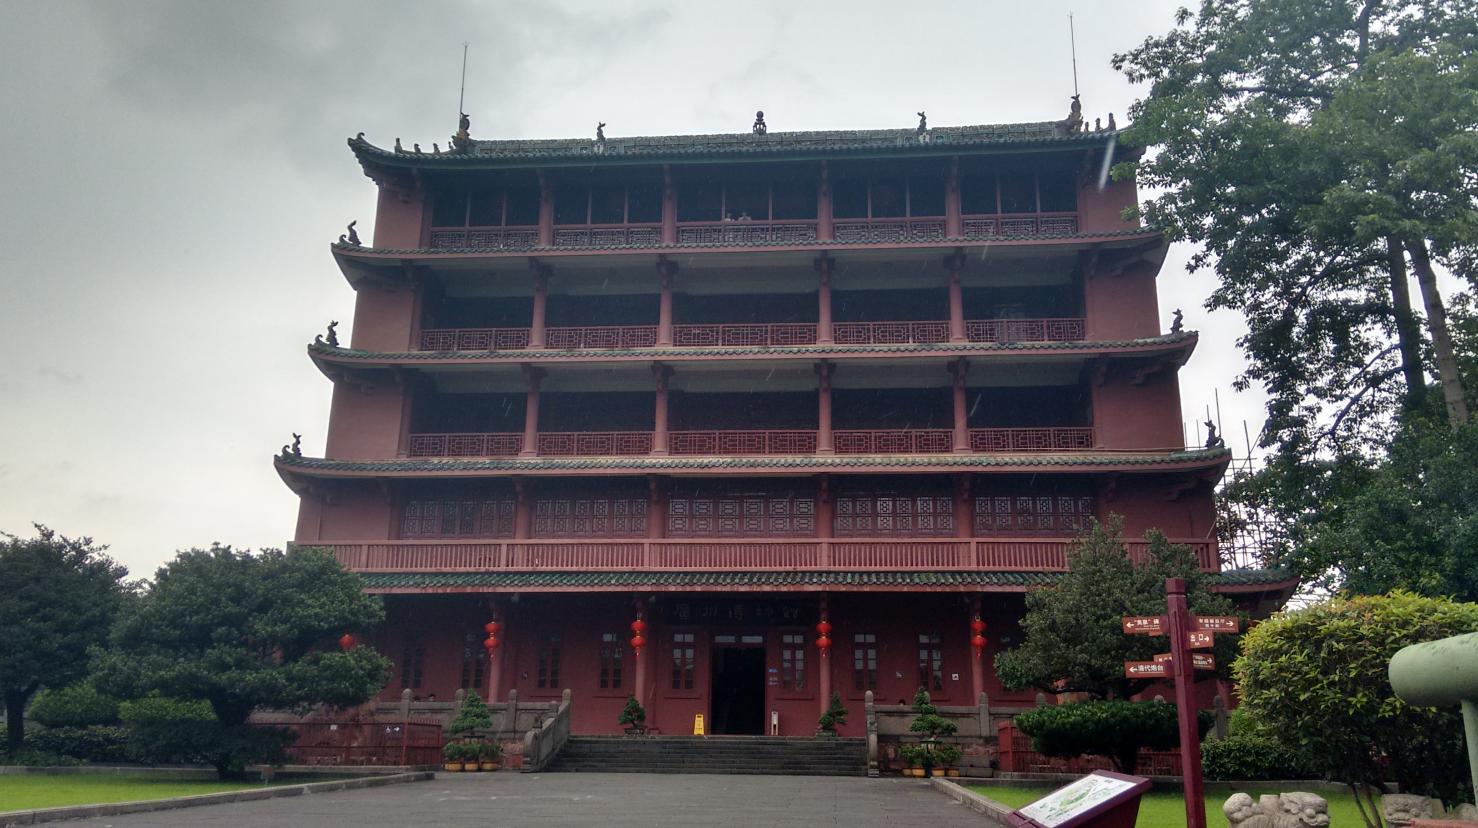
进到楼里,即是广州博物馆,各种文物古玩众多,值得细细品尝。 当然文物这东西的喜好个人都不一样,这里仅列举几例,
展示一下窝的品味,勾引一下泥的欲望:
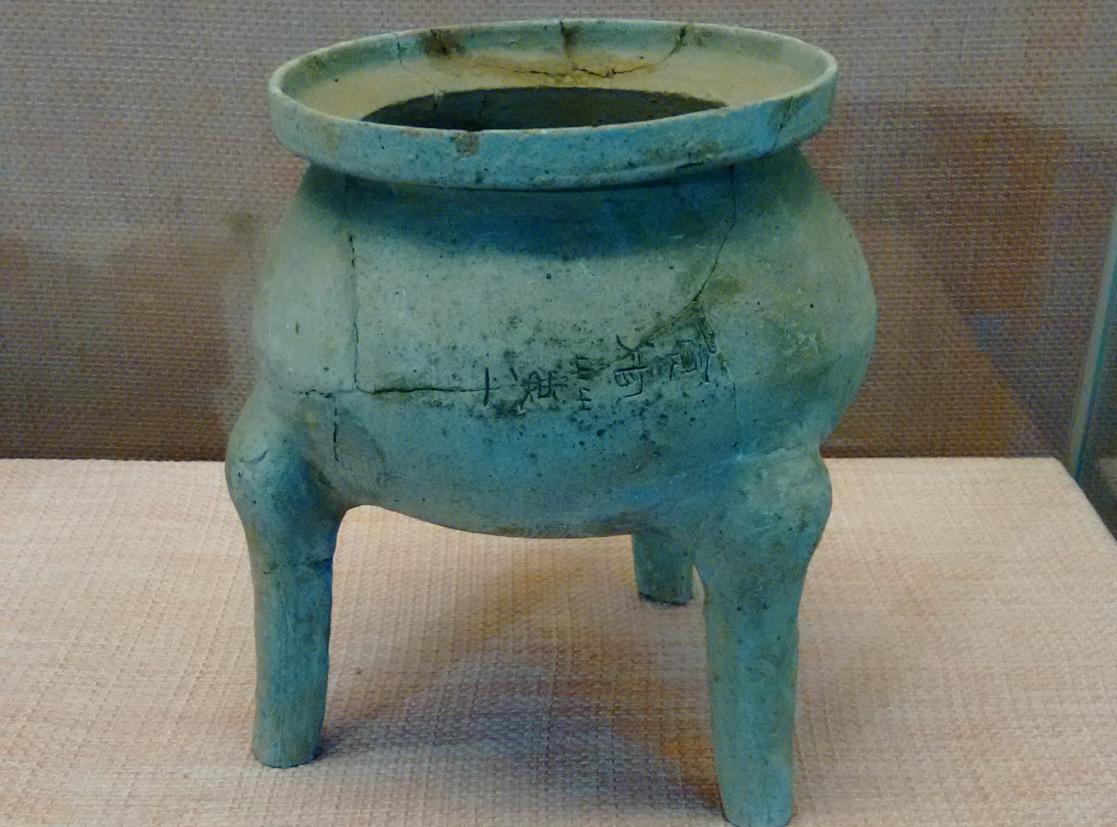
南越国(公元前100多年)时陶器,上塑"食官第一”。 说人话就是:吃货才是老大:
陶制小船,公元前作品:

来呀,快活呀,反正有大把时光:
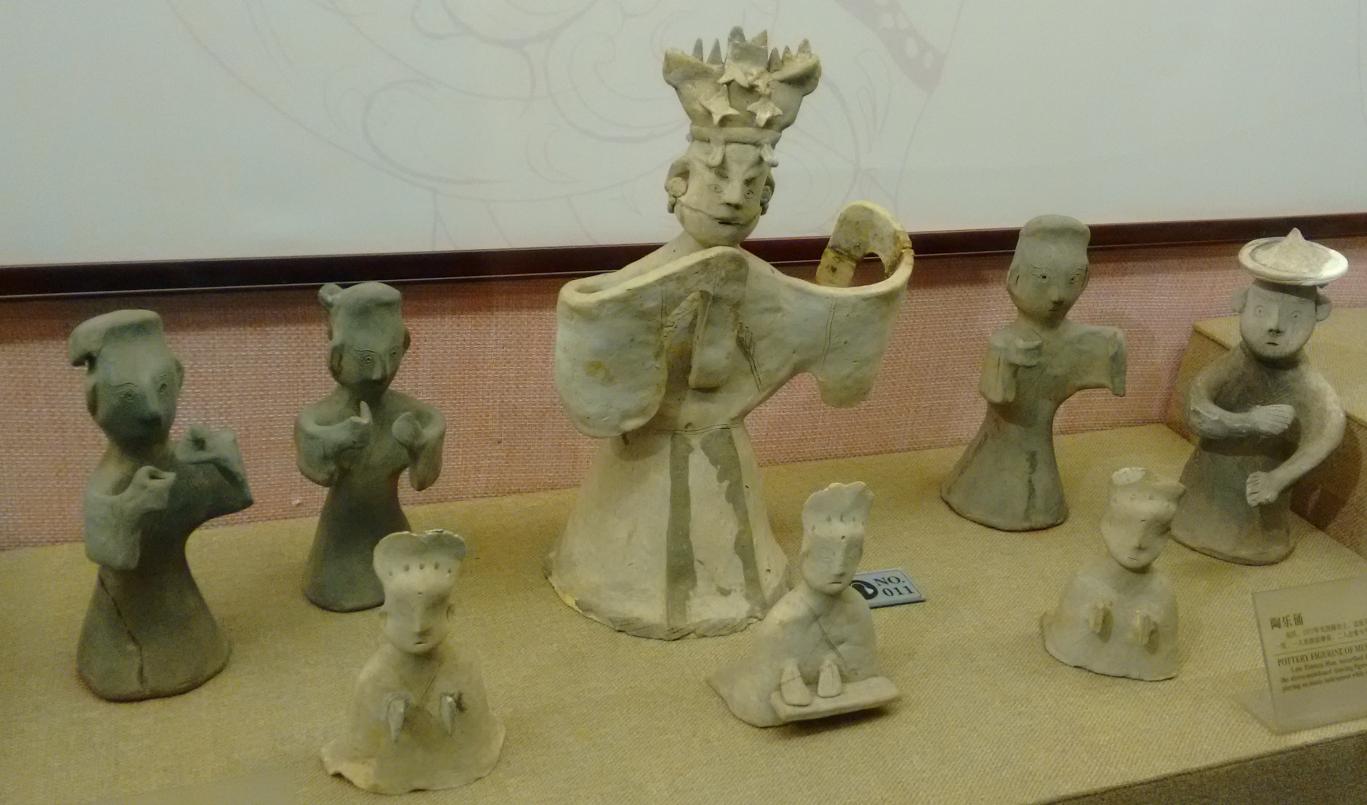
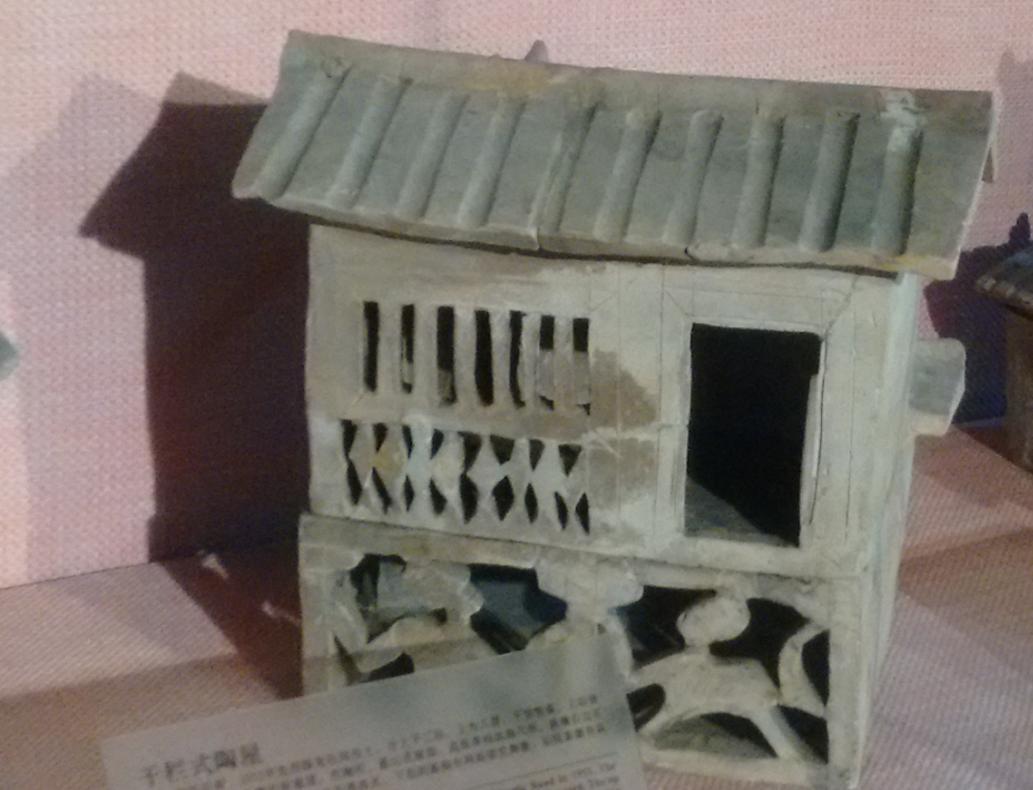
各种各样的陶制建筑,东汉作品:
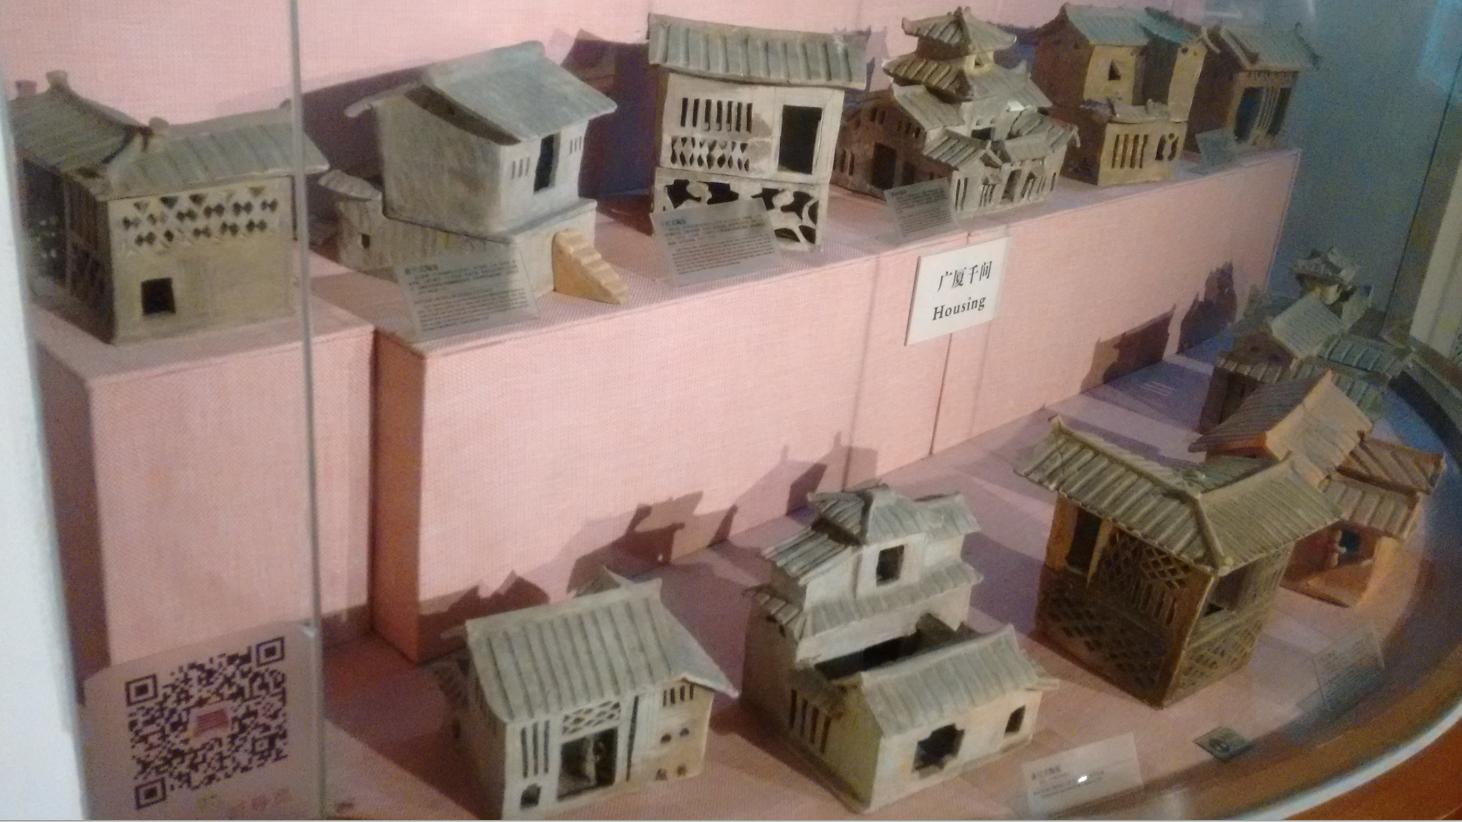
特写一个,上层住人,下层养猪的陶屋:
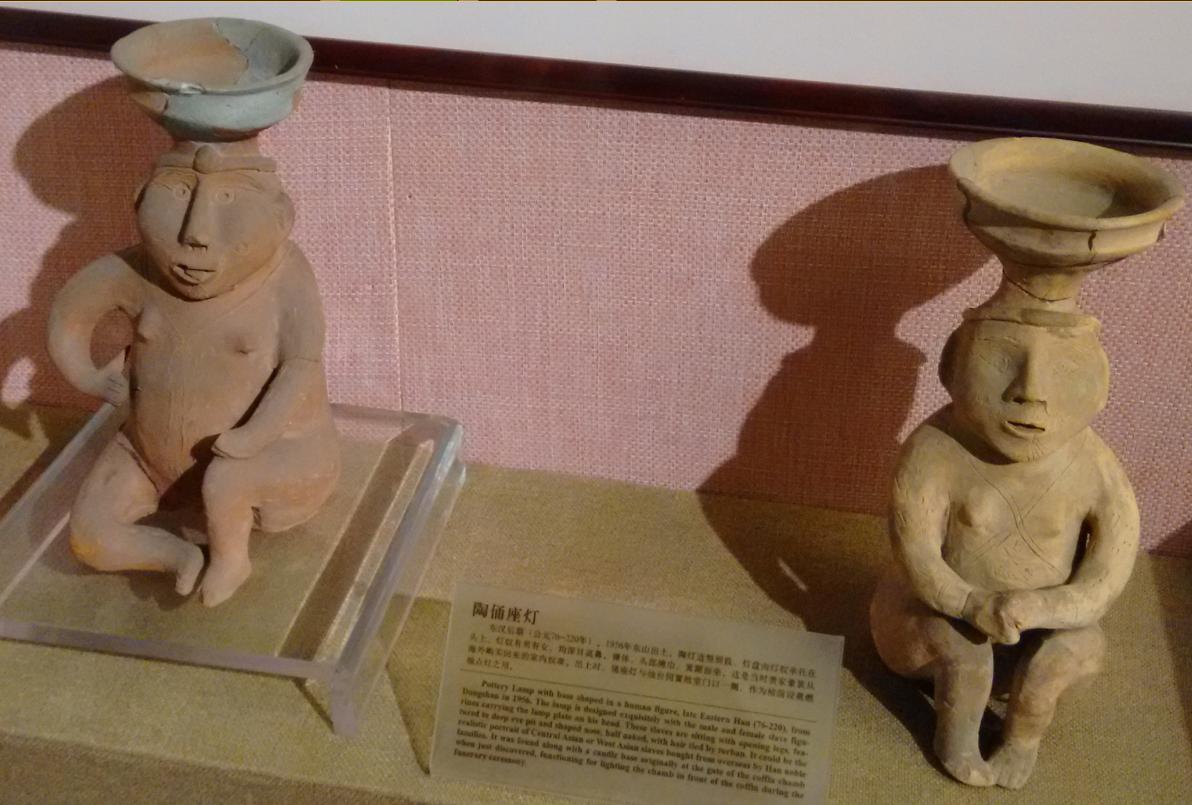
把灯放在大脸人的头上真的很好咩, 陶娃娃无辜的表情说明了一切。
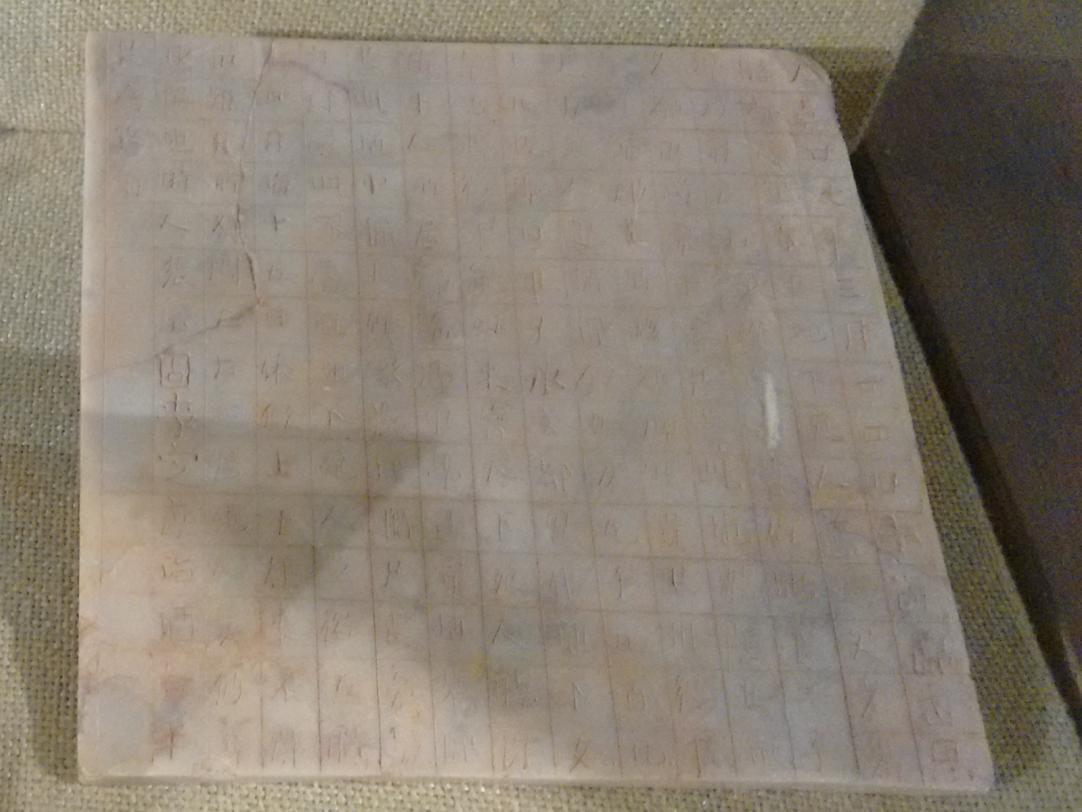
南朝时的一张地契,刻在石头上的, 买卖双方都以为可以一直如约下去,没想到过了2000年,全TM国有了:
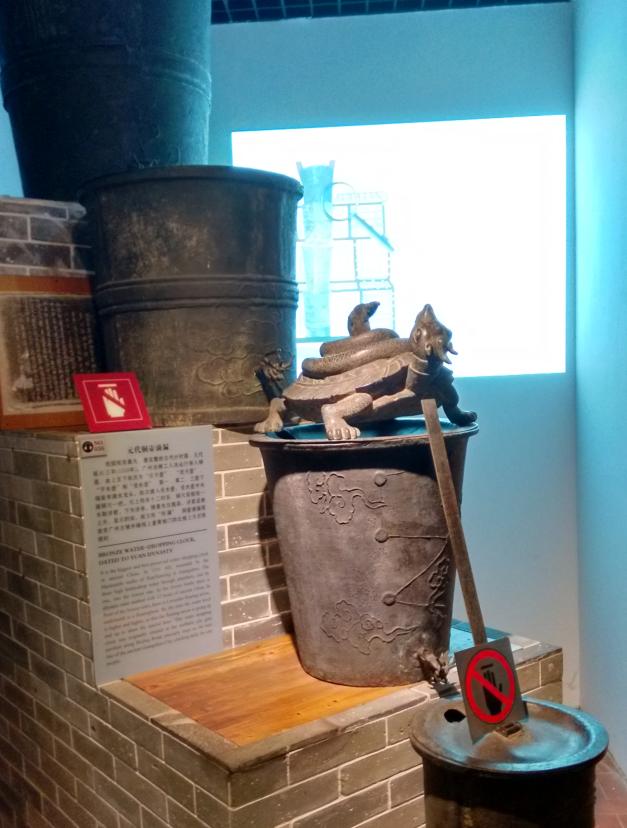
元代的计时器,运用滴水的原理,判断时辰:
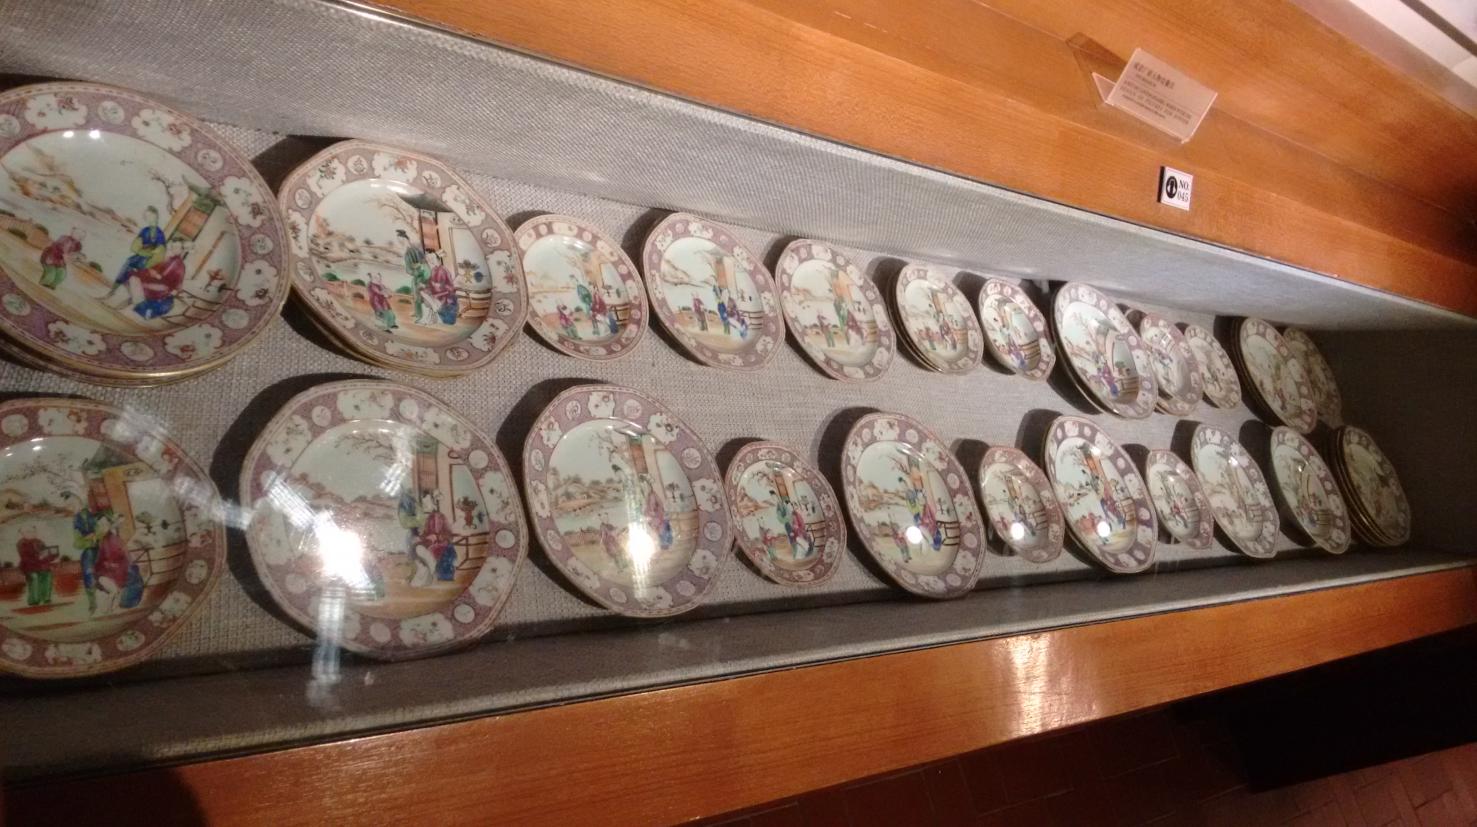
这是清代的一套出口丹麦的盘子:
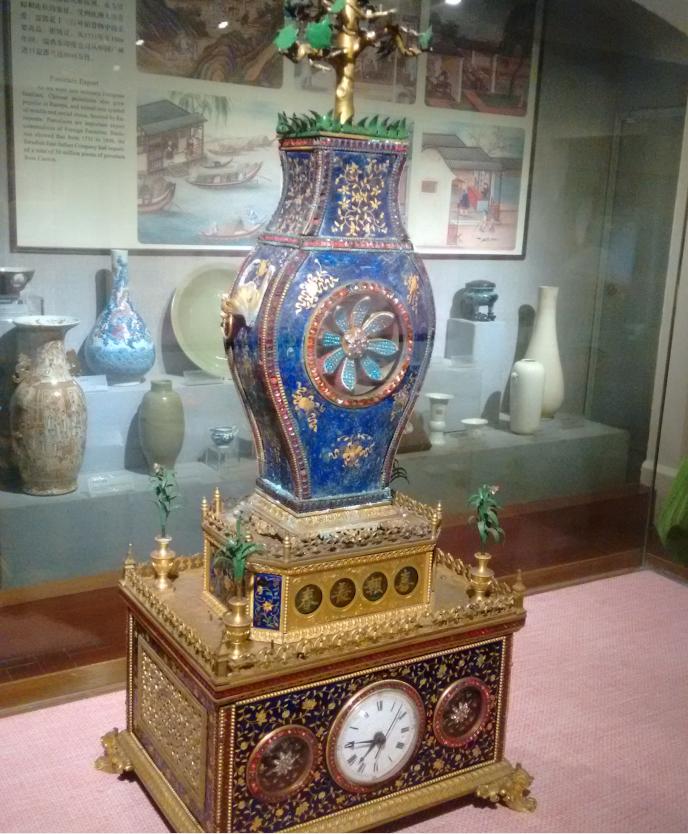
清朝的西洋钟,非常精美:
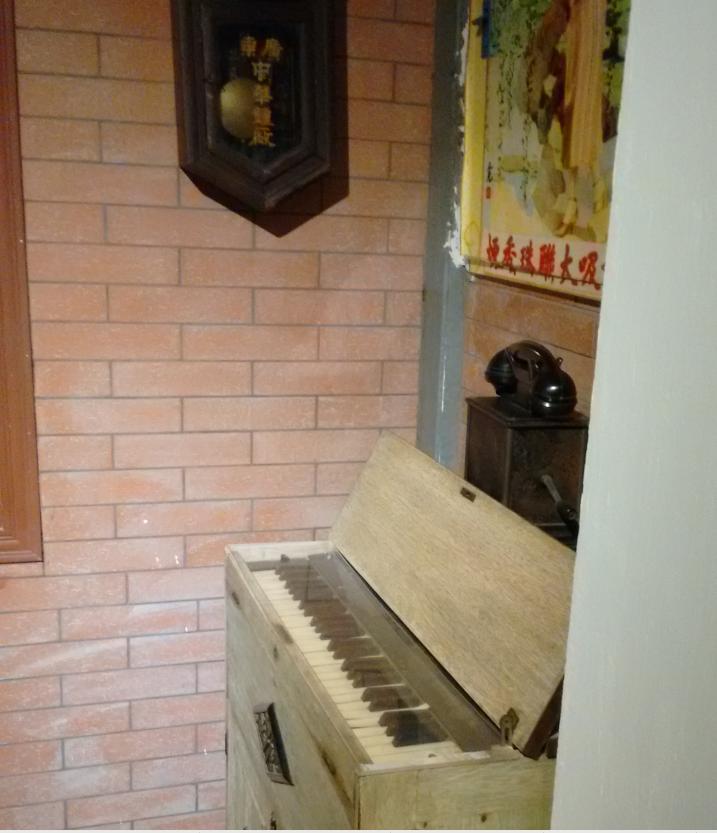
民国时期的陪嫁,好想在这钢琴上来一首《Somewhere in time》 :
这是一份民国时中国基督教徒的结婚证书。
上写"神所配合人不可分”。
右边新娘位写"上帝曰不可使人独处”。
左边新郎位写"必须造一相助为理者”。
接下来写新郎新娘的名字、出生年月。结婚日期,秉神的旨意,于某年某月结为连理。再下来,是用中文
书写的家谱,有籍贯、家人姓名等。最后是证婚人的亲笔签名。
结婚证制作精美,温情、温馨。留意看新郎新娘的面相,会发现他们真的很有夫妻相。照片里的那一对年轻夫妻
如今早已离别人世,然而一份正式、郑重、真诚、温馨的契约,依然在这红尘中流芳百世。

镇海楼1~5层就这样从石器时代到近代、当代,展现了整个南粤文化的发展。最后上到5楼,你看到的风景是
这样的:
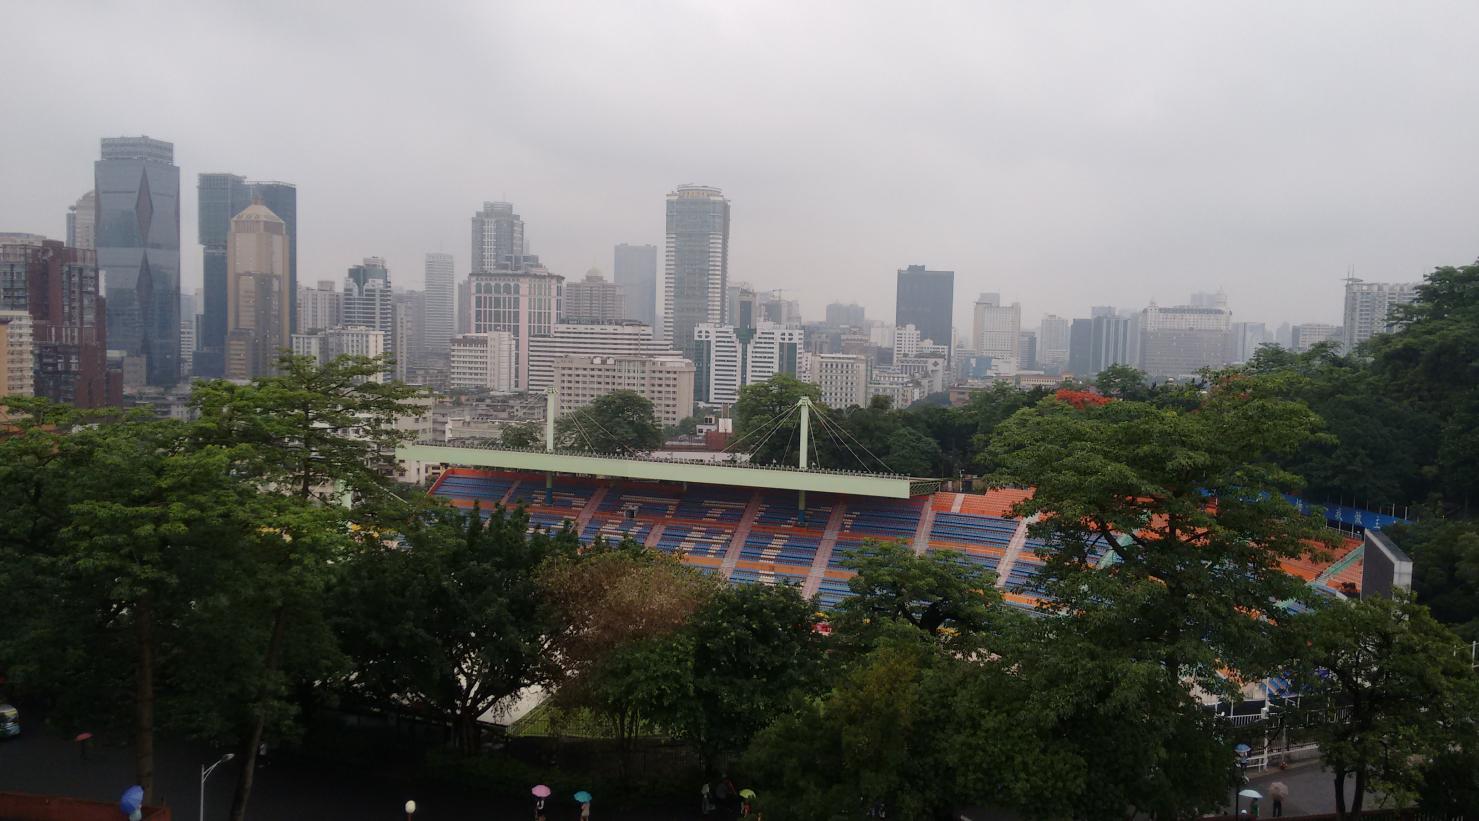
没什么卵意思! 于是下楼,去看五羊雕塑,沿途经过总统纪念碑,拍一张:

依然没什么卵意思嘛!国民党最近都失了台湾的总统,英文妹子上台来,搞得风风火火嘛!好了,继续往前走,看
雕塑去。
羊:
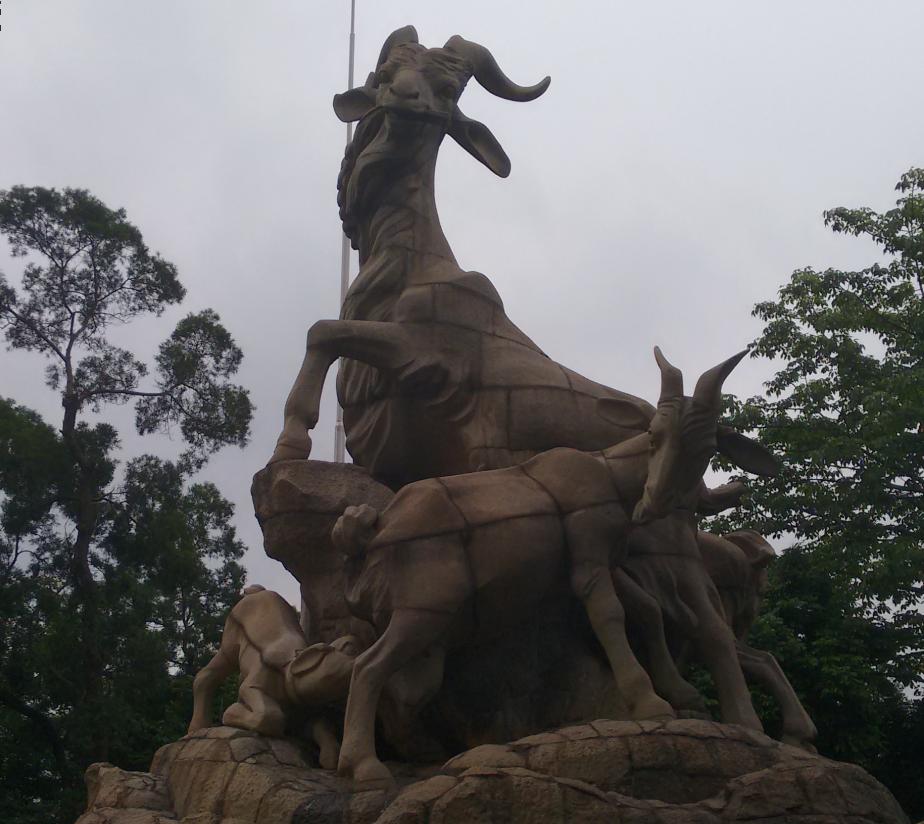
羊:

羊:
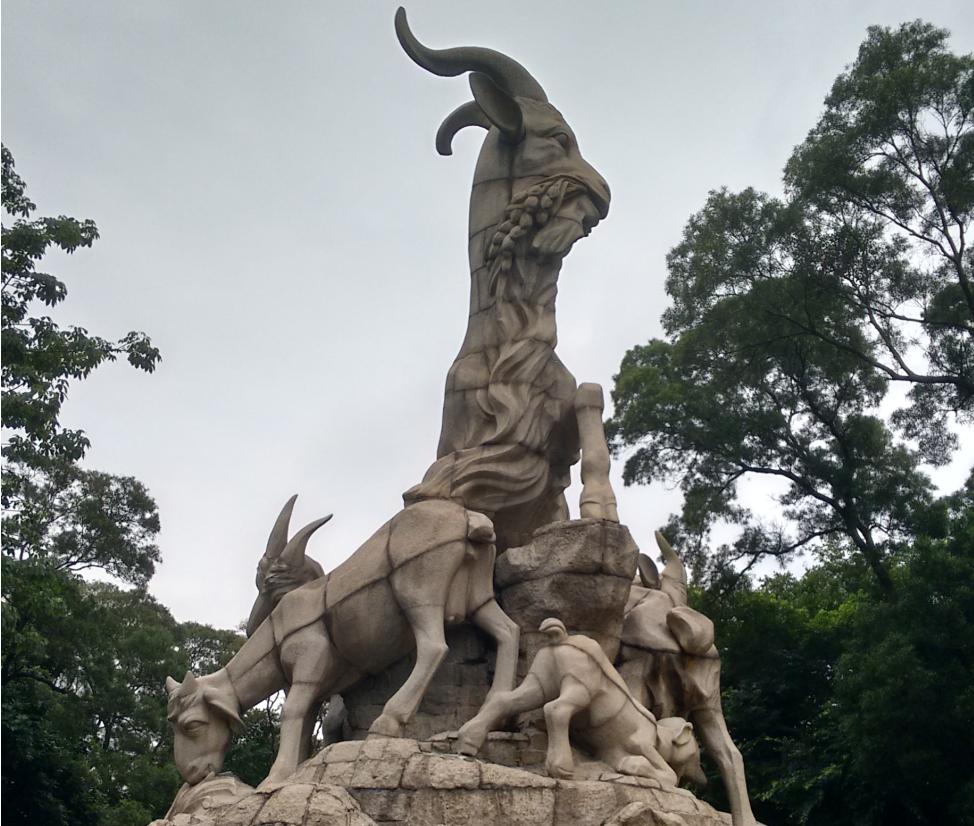
好了,羊羊羊,恒源祥,回家吧。
小总结一下:
越秀山我给到90分。越秀,粤秀,果然景色秀美,植被繁茂。山下有湖,可以带情侣或者小朋友来泛舟,价格有点小贵,
不过呢,泡妞这种事,泡熊孩子这种事,忍忍吧,谁让它环境那么好!
广州博物馆是出乎我意料之外的,我没想到广州这种"蛮夷之地"居然也有数目如此众多、质量如此精美的文物。所以说大
汉族主义真是要不得哈。
广州博物馆里还有诸多展品,限于篇幅没法一一列举了,文物这种东西,就是个人喜好。譬如说, 那份结婚证书会让我
想起来在南京紫金山中山纪念馆里看过的的孙中山与宋庆龄的结婚契约。
2010年我初次看到那份契约,端正抄写在绢上,一丝不苟,三人手印(孙、宋、证婚人)历经近百年依然清晰。
其实吧,我后来又看了很多书,也了解了很多八卦,发现孙和宋之间也没那么简单,有些情节简直狗血。但,怎么说呢?
至少相信他们按手印那一刻是真心吧。人这一世,又能有多少个真心如此的瞬间呢?
好了闲话不多说,谁看谁知道,广州博物馆10块钱的门票欢迎你!
越秀山很大,我今天走的大概是50%, 以后可以再找个机会去闲逛、发呆。
《羊城漫步(一)》完结。明天继续(如果可以的话),打算把南越文王博物馆给逛了, 谁让哥每次坐地铁经过它都提醒你
”去往南越文王博物馆的乘客请在此站下车“呢?
