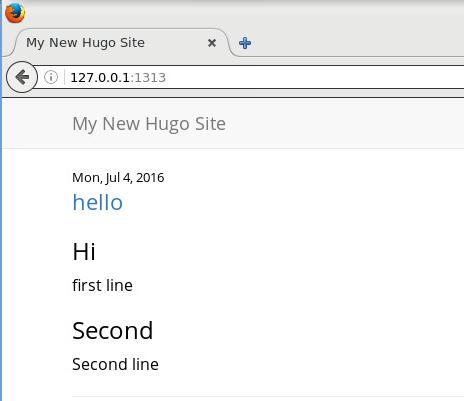
Jul 4, 2016
TechnologyFor switching my blogging engine from octopress to hugo, following are the steps.
Installing GO
ArchLinux installation is:
$ sudo pacman -S go
$ mkdir -p ~/go/{bin,src}
$ export GOPATH=~/go
$ export PATH="$PATH:$GOPATH/bin"
Get Hugo
Hugo could be fetched directly from github, install it via:
$ Notice you have to use redsocks!
$ go get -u -v github.com/spf13/hugo
$ which hugo
/home/vagrant/go/bin/hugo
First Blog
Create a new site:
$ hugo new site myblog
$ tree myblog
myblog/
|-- archetypes
|-- config.toml
|-- content
|-- data
|-- layouts
|-- static
`-- themes

6 directories, 1 file
Creat a new blog:
$ hugo new post/hello.md
$ vim /home/vagrant/Code/myblog/content/post/hello.md
$ cd themes/
    git clone git@github.com:dim0627/hugo_theme_beg.git
Run preview of the blog:
$ hugo server -w --theme=hugo_theme_beg
Now open browser for visiting `http://localhost:1313”, you could see:
Import From Octopress
Import from existing Octopress via:
$ hugo import jekyll /home/dash/Code/NewBlog/source hugodash
Importing...
Congratulations! 720 post(s) imported!
....
A little tricky for changing the categories definitions:
$ cd hugodash/content/post
$ vim change.sh
$ chmod 777 change.sh
$ ./change.sh
The content of the change.sh is listed as following:
#!/bin/bash
for i in `ls ./*.markdown`
do
	# Generate the modified result, like categories: ["Technology"]
	replaceline=`grep -i "categories: ["Technology"]
'{for(i=2;i<=NF;i++){if(i!=NF){$i="\""$i"\""","}else{$i="\""$i"\""}}}1'`
	sed -i "2s|.*|$replaceline|" $i
done
Then run following command:
$ sed -i '2s/\(:[[:blank:]]*\)\(.*\)/\1[\2]/' *.markdown
Now check your categories: [“Technology”]
$ grep -i "categories: ["Technology"]
./2015-03-12-maas-deploy-3.markdown:categories: ["Technology"]
./2016-03-31-nodemcu-and-1602i2c.markdown:categories: ["Technology"]
....
With this format could our markdown files be analyzied via new theme.
$ cd hugodash/themes
$ git clone https://github.com/zyro/hyde-x
Preview the generated website via:
$ cd hugodash
$ hugo server --theme=hyde-x
Now open your browser and view http://localhost:1313.
Publishment
Some work tips:
Remove all of the fucking codeblock in markdown:
$ sed -i -- 's|{% endcodeblock%}|\`\`\`|' *.markdown
$ sed -i -- 's|{% codeblock *.*%}|\`\`\`|' *.markdown
Remove all of the fucking backtick with language extended in markdown:
$ sed -i -r -e 's|^\`\`\`.*|\`\`\`|' *.markdown
Now all of the syntax hightlight is OK.
Jul 1, 2016
TechnologyDirect write rrd into graphite, refers to:
$ git clone https://github.com/jgilmour/XenGraphiteIT.git
Then you get the storage pool information fro xsconsole via:
$ xe vdi-list
Notice it will contain the hard disk and iso repositories, use harddisk.
Now edit the .config file:
[XENAPI]
URL = http://192.168.10.187
USERNAME = root
PASSWORD = xxxxxxx
SR-UUID = 51977c4b-8dc2-bcff-b7ad-de7cc5c7e717

[GRAPHITE]
CARBON_HOST = 192.168.1.79
CARBON_PORT = 2003
CARBON_NAME = collectd.com.IT.servers.xen.
Run python2 xengraphite.py you could get your XenServer statistic data into your
graphite database, enjoy it.
Jun 29, 2016
TechnologyReference
Refers to:
https://clauseriksen.net/2011/02/02/ipsec-on-debianubuntu/
And
http://xmodulo.com/create-site-to-site-ipsec-vpn-tunnel-openswan-linux.html
Network Topology
The topology is listed as following:
Host1 – LAN1 – Router1 –[BIG, BAD INTERNET]– Router2 – LAN2 – Host2
Router1 and Router2 are Ubuntu14.04 machine, which runs in virt-manager,thus you have
to create 2 new networks, each in one physical machine.
Physical Machine 1: 192.168.1.79
Router1:
eth0: bridge to physical machine’s networking. 192.168.10.100
eth1: 10.47.70.2.
DHCP on eth1.
Physical Machine 2: 192.168.1.69
Router2:
eth0: bridge to physical machine’s networking. 192.168.10.200
eth1: 10.47.67.2.
DHCP on eth1.
Router Network Configuration
Router1’s networking configuration:
$ vim /etc/network/interfaces
    # The loopback network interface
    auto lo
    iface lo inet loopback

    # The primary network interface
    auto eth0
    iface eth0 inet static
    address 192.168.10.100
    netmask 255.255.0.0
    gateway 192.168.0.176
    dns-nameservers 223.5.5.5

    auto eth1
    iface eth1 inet static
    address 10.47.70.2
    netmask 255.255.255.0
Router2’s networking configuration:
$ vim /etc/network/interfaces
    # The loopback network interface
    auto lo
    iface lo inet loopback

    # The primary network interface
    auto eth0
    iface eth0 inet static
    address 192.168.10.200
    netmask 255.255.0.0
    gateway 192.168.0.176
    dns-nameservers 223.5.5.5
    auto eth1
    iface eth1 inet static
    address 10.47.67.2
    netmask 255.255.255.0
After configuration , restart the Router1 and Router2.
IPSEC Configuration
Router1
Install following package:
$ sudo apt-get install -y openswan
Append following lines at the end of /etc/sysctl.conf,then run sysctl -p /etc/sysctl.conf to take effects.
$ vim /etc/sysctl.conf
net.ipv4.ip_forward=1
net.ipv4.conf.all.accept_redirects = 0
net.ipv4.conf.all.send_redirects = 0
net.ipv4.conf.default.send_redirects = 0
net.ipv4.conf.eth0.send_redirects = 0
net.ipv4.conf.default.accept_redirects = 0
net.ipv4.conf.eth0.accept_redirects = 0
Also you have to disable the redirects via following commands:
for vpn in /proc/sys/net/ipv4/conf/*;
do echo 0 > $vpn/accept_redirects;
echo 0 > $vpn/send_redirects;
done
iptables rules should be done via following:
iptables -A INPUT -p udp --dport 500 -j ACCEPT
iptables -A INPUT -p tcp --dport 4500 -j ACCEPT
iptables -A INPUT -p udp --dport 4500 -j ACCEPT
iptables -t nat -A POSTROUTING -s 10.47.70.0/24 -d 10.47.67.0/24 -j SNAT --to 192.168.10.100
#iptables -t nat -A POSTROUTING -s site-A-private-subnet -d site-B-private-subnet -j SNAT --to site-A-Public-IP
iptables -A POSTROUTING -t nat -d 10.47.70.0/24 -o eth1 -m policy --dir out --pol ipsec -j ACCEPT
iptables -A INPUT -m policy --dir in --pol ipsec -j ACCEPT
iptables -A INPUT -p udp -m multiport --dports 500,4500 -j ACCEPT
iptables -A INPUT -p esp -j ACCEPT
iptables -A FORWARD -m policy --dir in --pol ipsec -j ACCEPT
Now continue to configure the ipsec:
$ sudo vim /etc/ipsec.conf
    ## general configuration parameters ##

    config setup
            plutodebug=all
            plutostderrlog=/var/log/pluto.log
            protostack=netkey
            nat_traversal=yes
            virtual_private=%v4:10.0.0.0/8,%v4:192.168.0.0/16,%v4:172.16.0.0/12
            ## disable opportunistic encryption in Red Hat ##
            oe=off

    ## disable opportunistic encryption in Debian ##
    ## Note: this is a separate declaration statement ##
    #include /etc/ipsec.d/examples/no_oe.conf

    ## connection definition in Debian ##
    conn demo-connection-debian
            authby=secret
            auto=start
            ## phase 1 ##
            keyexchange=ike
            ## phase 2 ##
            esp=3des-md5
            pfs=yes
            type=tunnel
            left=192.168.10.100
            leftsourceip=192.168.10.100
            leftsubnet=10.47.70.0/24
            ## for direct routing ##
            #leftsubnet=192.168.10.100/32
            #leftnexthop=%defaultroute
            leftnexthop=192.168.10.200
            right=192.168.10.200
            rightsubnet=10.47.67.0/24
Notice the left/right configuration, should corresponding the our definition
of the networking.
Now generate the pre-shared keys via:
$ dd if=/dev/random count=24 bs=1 | xxd -ps
24+0 records in
24+0 records out
24 bytes copied, 4.5529e-05 s, 527 kB/s
cece1b0ffe27f82c27efc94339f08c418abb9e5f5c0d5bf5
the cece1b0ffe27f82c27efc94339f08c418abb9e5f5c0d5bf5 is the keys we want to
fill into the secrets:
$ sudo cat /etc/ipsec.secrets
    # This file holds shared secrets or RSA private keys for inter-Pluto
    # authentication.  See ipsec_pluto(8) manpage, and HTML documentation.

    # RSA private key for this host, authenticating it to any other host
    # which knows the public part.  Suitable public keys, for ipsec.conf, DNS,
    # or configuration of other implementations, can be extracted conveniently
    # with "ipsec showhostkey".

    # this file is managed with debconf and will contain the automatically created RSA keys
    include /var/lib/openswan/ipsec.secrets.inc
    192.168.10.100  192.168.10.200:  PSK  "cece1b0ffe27f82c27efc94339f08c418abb9e5f5c0d5bf5"
Now Router1 is configured, we continue to configure Router2.
Router2
Ipsec and sysctl are the same as in Router1, the iptables scripts is listed as:
iptables -A INPUT -p udp --dport 500 -j ACCEPT
iptables -A INPUT -p tcp --dport 4500 -j ACCEPT
iptables -A INPUT -p udp --dport 4500 -j ACCEPT
iptables -t nat -A POSTROUTING -s 10.47.67.0/24 -d 10.47.70.0/24 -j SNAT --to 192.168.10.200

#iptables -A POSTROUTING -t nat -d 192.168.1.0/24 -o eth0 -m policy --dir out --pol ipsec -j ACCEPT
iptables -A POSTROUTING -t nat -d 10.47.67.0/24 -o eth1 -m policy --dir out --pol ipsec -j ACCEPT
iptables -A INPUT -m policy --dir in --pol ipsec -j ACCEPT
iptables -A INPUT -p udp -m multiport --dports 500,4500 -j ACCEPT
iptables -A INPUT -p esp -j ACCEPT
iptables -A FORWARD -m policy --dir in --pol ipsec -j ACCEPT
Now configure the ipsec.conf like following:
$ sudo vim /etc/ipsec.conf
## general configuration parameters ##

config setup
        plutodebug=all
        plutostderrlog=/var/log/pluto.log
        protostack=netkey
        nat_traversal=yes
        virtual_private=%v4:10.0.0.0/8,%v4:192.168.0.0/16,%v4:172.16.0.0/12
        ## disable opportunistic encryption in Red Hat ##
        oe=off

## disable opportunistic encryption in Debian ##
## Note: this is a separate declaration statement ##
#include /etc/ipsec.d/examples/no_oe.conf

## connection definition in Debian ##
conn demo-connection-debian
        authby=secret
        auto=start
        ## phase 1 ##
        keyexchange=ike
        ## phase 2 ##
        esp=3des-md5
        pfs=yes
        type=tunnel
        left=192.168.10.200
        leftsourceip=192.168.10.200
        leftsubnet=10.47.67.0/24
        ## for direct routing ##
        #leftsubnet=192.168.10.200/32
        #leftnexthop=%defaultroute
        leftnexthop=192.168.10.100
        right=192.168.10.100
        rightsubnet=10.47.70.0/24
Notice the definition’s differences comparing to Router1.
The ipsec.secrets is the same as Router1, but you have to change like following:
$ sudo vim /etc/ipsec.secrets
192.168.10.200  192.168.10.100:  PSK  "3030804556207bde9fc5c9a043c6ac13fce136ce41eb98a6"
Examine
Restart the ipsec services on both Router.
$ sudo /etc/init.d/ipsec restart
Examine the route via:
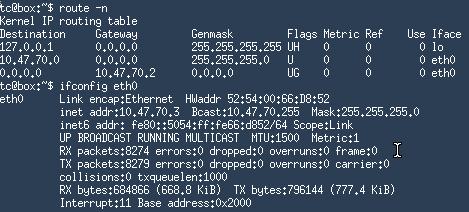
adminubuntu@vpn1:~$ ip route
default via 192.168.0.176 dev eth0
10.47.67.0/24 dev eth0  scope link  src 192.168.10.100
10.47.70.0/24 dev eth1  proto kernel  scope link  src 10.47.70.2
192.168.0.0/16 dev eth0  proto kernel  scope link  src 192.168.10.100
adminubuntu@vpn2:~$ ip route
default via 192.168.0.176 dev eth0
10.47.67.0/24 dev eth1  proto kernel  scope link  src 10.47.67.2
10.47.70.0/24 dev eth0  scope link  src 192.168.10.200
192.168.0.0/16 dev eth0  proto kernel  scope link  src 192.168.10.200
So we can see the route shows the connection of the vpn.
Now examine the ipsec status:
$ sudo service ipsec status
IPsec running  - pluto pid: 930
pluto pid 930
1 tunnels up
some eroutes exist
More detailed infos could be examine via: sudo ipsec auto --status.
DHCP Server
Install dhcpd and configure it via following command:
$ sudo apt-get install -y isc-dhcp-server
$ sudo vim /etc/default/isc-dhcp-server
INTERFACES="eth1"
Append following lines to /etc/dhcp/dhcpd.conf:
Router1:
subnet
10.47.70.0 netmask 255.255.255.0 {
# --- default gateway
option routers
10.47.70.2;
# --- Netmask
option subnet-mask
255.255.255.0;
# --- Broadcast Address
option broadcast-address
10.47.70.255;
# --- Domain name servers, tells the clients which DNS servers to use.
option domain-name-servers
223.5.5.5,180.76.76.76;
option time-offset 0;
range 10.47.70.3 10.47.70.254;
default-lease-time 1209600;
max-lease-time 1814400;
}
Router2:
subnet
10.47.67.0 netmask 255.255.255.0 {
# --- default gateway
option routers
10.47.67.2;
# --- Netmask
option subnet-mask
255.255.255.0;
# --- Broadcast Address
option broadcast-address
10.47.67.255;
# --- Domain name servers, tells the clients which DNS servers to use.
option domain-name-servers
223.5.5.5,180.76.76.76;
option time-offset 0;
range 10.47.67.3 10.47.67.254;
default-lease-time 1209600;
max-lease-time 1814400;
}
Now your subnet is ready, restart the Router1 and Router2, next step we will
verify our site-to-site VPN.
Verification
Create 2 new vm on 2 physical machine, each of them attached to our Router’s
eth1 networking. I use tinycore for experiment.
Tinycore Attaches to Router1:
Tinycore Attaches to Router2:
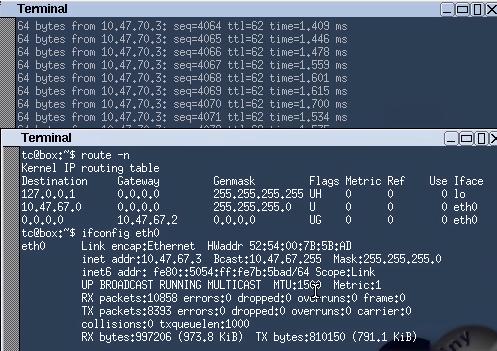
The picture also shows the ping each other without any problem.
Jun 20, 2016
TechnologyGraphite/Grafana
这两个用于记录和展示监控数据,通过以下命令可以快速搭建:
Graphite
开启容器:
$ mkdir -p /local/path/to/graphite/storage/whisper/
$ sudo docker run -d \
  --name graphite \
  -p 8080:80 \
  -p 2003:2003 \
  -v /local/path/to/.htpasswd:/etc/nginx/.htpasswd \
  -v /local/path/to/graphite/storage/whisper:/opt/graphite/storage/whisper \
  sitespeedio/graphite
创建htpasswd文件的方法可以参阅:
http://httpd.apache.org/docs/2.2/programs/htpasswd.html
当然如果你使用默认的密码的话,用户名/密码是:guest/guest.
Grafana
开启容器:
# mkdir -p /local/path/to/grafana
# docker run -d -p 3000:3000 --name=grafana -v /local/path/to/grafana:/var/lib/grafana  grafana/grafana
默认用户名/密码为admin/admin.
Collectd
用于采集节点机上的数据,
# docker run -d --net=host --privileged -v /:/hostfs:ro --name=collectd -e \
HOST_NAME=localhost -e \
GRAPHITE_HOST=192.168.1.79 andreasjansson/collectd-write-graphite
参数说明:
--net=host : 	使用主机上的网络配置
GRAPHITE_HOST:  前面设置的graphite机器的地址
systemd 启动方式
collectd启动方式:
$ sudo vim /usr/lib/systemd/system/collectddocker.service
[Unit]
Description=collectd container
Requires=docker.service
After=docker.service

[Service]
Restart=always
ExecStart=/usr/bin/docker start -a collectd
ExecStop=/usr/bin/docker stop -t 2 collectd

[Install]
WantedBy=multi-user.target
启动并使能服务:
$ sudo systemctl enable collectddocker.service
Jun 18, 2016
Technology网络准备
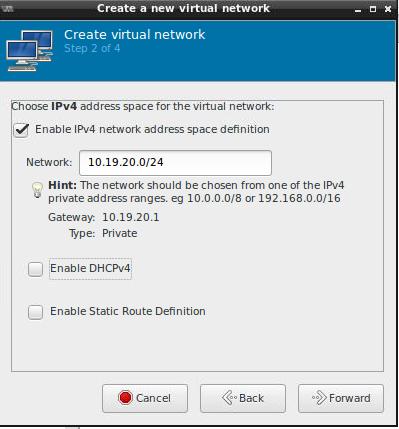
创建一个无DHCP的网络:
DHCP服务器我们将配置在PXE服务器节点上。
PXE节点配置
初始化配置
最小化安装CentOS 7 Server。并配置其IP地址为10.19.20.2.
关闭selinux和firewalld服务:
# vi /etc/selinux/config
SELINUX=disabled

# systemctl disable firewalld.service
使用DVD作为源
创建挂载目录并挂在DVD:
# mkdir /cdrom
# mount -t iso9660 -o loop ./CentOS-7-x86_64-Everything-1511.iso /cdrom/
创建新的repo文件:
# vi /etc/yum.repos.d/local.repo

[LocalRepo]
name=Local Repository
baseurl=file:///cdrom
enabled=1
gpgcheck=1
gpgkey=file:///etc/pki/rpm-gpg/RPM-GPG-KEY-CentOS-7
生成新的缓存:
# mkdir back
# mv CentOS-* back
# yum makecache
安装一些必要的包:
# yum install -y vim wget
TFTP Server
安装必要的包:
# yum -y install syslinux xinetd tftp-server
# mkdir /var/lib/tftpboot/pxelinux.cfg
# cp /usr/share/syslinux/pxelinux.0 /var/lib/tftpboot/
配置PXE:
# vim /etc/xinetd.d/tftp
disable = no
# systemctl start xinetd
# systemctl enable xinetd
DHCP服务器
安装:
# yum install -y dhcp
配置:
# vim /etc/dhcp/dhcpd.conf
    #
    # DHCP Server Configuration file.
    #   see /usr/share/doc/dhcp*/dhcpd.conf.example
    #   see dhcpd.conf(5) man page
    #
    # create new

    # specify domain name
    option domain-name "srv.world";
    # specify name server's hostname or IP address
    option domain-name-servers dlp.srv.world;
    # default lease time
    default-lease-time 600;
    # max lease time
    max-lease-time 7200;
    # this DHCP server to be declared valid
    authoritative;
    # specify network address and subnet mask
    subnet 10.19.20.0 netmask 255.255.255.0 {
        # specify the range of lease IP address
        range dynamic-bootp 10.19.20.200 10.19.20.254;
        # specify broadcast address
        option broadcast-address 10.19.20.255;
        # specify default gateway
        option routers 10.19.20.1;
        option domain-name-servers   10.19.20.2;
        filename        "pxelinux.0";
        next-server     10.19.20.2;
    }
启动并使能服务:
# systemctl start dhcpd
# systemctl enable dhcpd
PXE服务器
安装一些必要的包:
# yum -y install dracut-network nfs-utils
在PXE服务器上构建一个无盘系统用的文件系统
# mkdir -p /var/lib/tftpboot/centos7/root
# yum groups -y install "Server with GUI" --releasever=7 --installroot=/var/lib/tftpboot/centos7/root/
给出root用户的默认密码:
# python -c 'import crypt,getpass; \
print(crypt.crypt(getpass.getpass(), \
crypt.mksalt(crypt.METHOD_SHA512)))'
Password:
xxxxxxxxxxxxxxxxxxxxxxxxxxxxxxxxxxx
填入root密码到/etc/shadown中:
# vim /var/lib/tftpboot/centos7/root/etc/shadow
root:xxxxxxxxxxxxxxxxxxxxxxxxxxxxxxxx:16372:0:99999:7:::
构建/etc/fstab文件:
# vi /var/lib/tftpboot/centos7/root/etc/fstab
 none    /tmp        tmpfs   defaults   0 0
tmpfs   /dev/shm    tmpfs   defaults   0 0
sysfs   /sys        sysfs   defaults   0 0
proc    /proc       proc    defaults   0 0
下载pxe所需要的vmlinuz和initrd.img文件:
# wget -P /var/lib/tftpboot/centos7/ \
http://mirrors.aliyun.com/centos/7/os/x86_64/images/pxeboot/vmlinuz \
http://mirrors.aliyun.com/centos/7/os/x86_64/images/pxeboot/initrd.img
创建默认的pxe启动项目:
# vi /var/lib/tftpboot/pxelinux.cfg/default
# create new
 default centos7

label centos7
    kernel centos7/vmlinuz
    append initrd=centos7/initrd.img root=nfs:10.19.20.2:/var/lib/tftpboot/centos7/root rw selinux=0
映射NFS服务器:
# vi /etc/exports
/var/lib/tftpboot/centos7/root 10.19.20.0/24(rw,no_root_squash)
# systemctl start rpcbind nfs-server
# systemctl enable rpcbind nfs-server
现在在网络中加入新的机器,从PXE启动后,将直接进入到CentOS7的桌面。
