Aug 19, 2016
TechnologyVirtualBox Setup
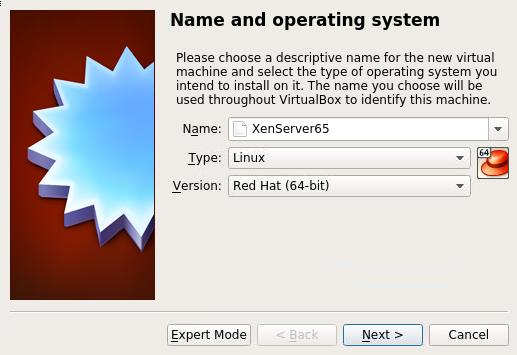
Define a virtual machine:
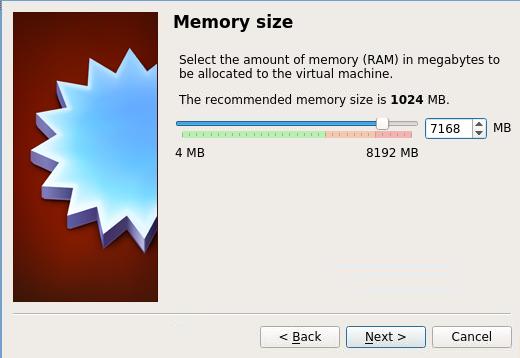
Use 7G of 8G memory for this VM:
Create a new disk(200G), choose VDI, Dynamically allocated, And specify the location
for storing it.
Now create the virtual machine, and configure its networking like following:

CPUs, we allocated 4:

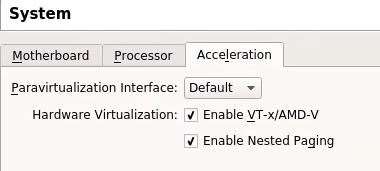
And also the acceleration configuration:
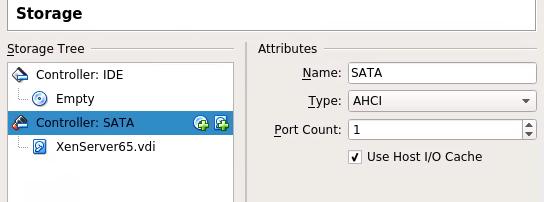
Storage Configuration:
For saving the resources, disable USB/Audio.
Now insert the XenServer Installation CDROM, and install it.
XenServer Configuration
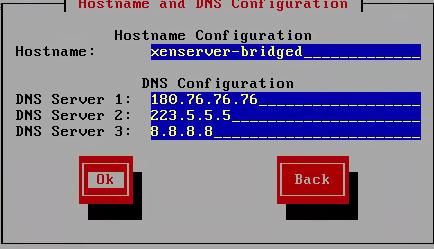
IP Address, for bridged networking:

DNS Configuration:
NTP Server Configuration:
server 0.cn.pool.ntp.org
server 0.asia.pool.ntp.org
server 2.asia.pool.ntp.org
Now Install the XenServer.
After installation, apply xs patches.
Aug 18, 2016
TechnologyBackground
I will use XenServer for testing, while I made a vagrant box of XenServer 6.5, it could
work properly in seperated networking, so following I will try to setup a bridged
“XenServer” which will acts like a real physical machine.
Vagrantfile
The configuration part is listed as:
  # csagentxen65 node.
  # Add one networking, modify hostname, define memory, CPU cores.
  config.vm.define :csagentxen65 do |csagentxen65|
    csagentxen65.vm.box = "Xen65Box"
    csagentxen65.vm.boot_timeout = '36000'
    csagentxen65.vm.hostname = CLOUDSTACK_AGENT_HOSTNAME
    csagentxen65.vm.network :public_network,
	    :dev => "br0",
	    :mode => "bridge",
	    :type => "bridge",
	    :ip => "192.168.10.3"
    # Disable mounting of vagrant folder as it's not supported on xenserver
    csagentxen65.vm.synced_folder ".", "/vagrant", disabled: true
    csagentxen65.vm.provider :libvirt do |domain|
      domain.memory = 8192
      domain.cpus = 4
      domain.storage_pool_name = 'XenStoragePool'
      domain.nested = true
      domain.cpu_mode = 'host-passthrough'
      domain.nic_model_type = 'e1000'
      domain.management_network_mac = "08:00:27:1D:90:A8"
    end
  end
Here we used our newly created storage pool, I use virt-manager for creating a new
storage pool, which is in a seprated disk, could gain much more IOPS.
Bug-Fix
vagrant-libvirt will create 2 ethernet port, while the default one is xenbr0, but we
want the xenbr1 be the management port.
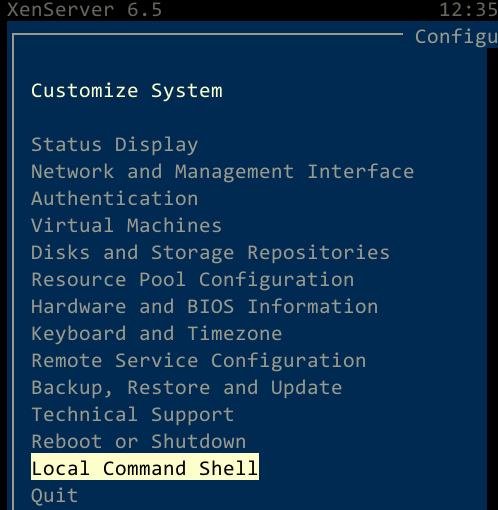
Gain a administration shell:
Enter following command:
# ifconfig eth1 netmask 255.255.0.0
# route add default gw 192.168.0.xxx eth1
Now you can run ansible-playbook against the XenServer, but it will stuck.
Now manually configure eth1’s netmask and its gateway. ansible-playbook could be run
properly.
Aug 3, 2016
TechnologyReference
Mainly refers to:
https://api.slack.com/incoming-webhooks
http://blog.pragbits.com/it/2015/02/09/slack-notifications-via-curl/
Incomming webhooks
Create a incoming webhooks in:
https://skyruntime.slack.com/apps/new/A0F7XDUAZ-incoming-webhooks

After created the webhook use curl for sending out the direct message:
$ curl -X POST --data-urlencode 'payload={"channel": "#general", "username":
"webhookbot", "text": "This is posted to #general and comes from a bot named
webhookbot.", "icon_emoji": ":ghost:"}'
https://hooks.slack.com/services/xxxxxxxxxxxxxxxxxxxxxxxxxx
Wrap the message
In Bash:
$ proxychains4 curl -X POST --data-urlencode 'payload={"channel": "#general", "username":
"webhookbot", "text": "'$1'", "icon_emoji": ":ghost:"}'
https://hooks.slack.com/services/xxxxxxxxxxxxxxxxxxxxxxxxx
Turn it into a executable file under bin, then you could use command like this:
$ command1; sendSlack 'fcuk...'
Jul 28, 2016
TechnologyBackground
Recently I am playing the jenkins and VM Templates, so I want to setup the CI(Continous
Integration) environment which could automatically finish the template building,
following are the tips on how to setup these environment and let everything working
together.
Using Makefile
boxcutter https://github.com/boxcutter has lots of
projects for packering the templates, directly clone them to local and run them, you
could get the standard vagrant box, which could be used via virtualbox/vmware/paralles.
But what I wanna is the qemu images, or vhd files, which could be used under CloudStack/OpenStack, so I have to modify the Makefile and box system.
Only build virtualbox, because we don’t have vmware/parallels hypervisor:
#BUILDER_TYPES ?= vmware virtualbox parallels
BUILDER_TYPES := virtualbox
Add libvirt box definition:
PARALLELS_BOX_FILES := $(foreach box_filename, $(PARALLELS_BOX_FILENAMES), $(PARALLELS_BOX_DIR)/$(box_filename))
LIBVIRT_BOX_DIR ?= box/libvirt
LIBVIRT_TEMPLATE_FILENAMES = $(TEMPLATE_FILENAMES)
LIBVIRT_BOX_FILENAMES := $(LIBVIRT_TEMPLATE_FILENAMES:.json=$(BOX_SUFFIX))
LIBVIRT_BOX_FILES := $(foreach box_filename, $(LIBVIRT_BOX_FILENAMES), $(LIBVIRT_BOX_DIR)/$(box_filename))
BOX_FILES := $(LIBVIRT_BOX_FILES)
Using qemu for building the templates:
#box/virtualbox/%$(BOX_SUFFIX): %.json http/preseed.cfg
box/libvirt/%$(BOX_SUFFIX): %.json http/preseed.cfg
	bin/box build $< qemu
Build options:
#all: build assure deliver
all: build

build: $(BOX_FILES)
Now by make you could make out the vagrant libvirt box.
JSON, Preseeding and Scripts
Just some tips under this chapter during building.
Using Custom Mirror
Following use mirrors.aliyun.com/ubuntu for installation and use a apt-mirror proxy.
#Use mirror
d-i apt-setup/use_mirror boolean true
d-i     mirror/country          string manual
d-i mirror/protocol	string http
d-i mirror/http/hostname	string mirrors.aliyun.com
d-i mirror/http/directory	string /ubuntu
choose-mirror-bin mirror/http/proxy string http://192.168.1.69:3142/
Partition(One Partition)
Only one partition which includes all of the filesystem(no swap partition):
# Partition
d-i partman-auto/disk string /dev/vda
d-i partman-auto/method string regular
d-i partman-basicfilesystems/no_swap boolean false
d-i partman-auto/expert_recipe string root :: 1000 50 -1 ext4 \
     $primary{ } $bootable{ } method{ format } \
     format{ } use_filesystem{ } filesystem{ ext4 } \
     mountpoint{ / } \
    .
d-i partman-auto/choose_recipe select root
d-i partman/choose_partition select Finish partitioning and write changes to disk
d-i partman/confirm boolean true
d-i partman/confirm_write_new_label boolean true
d-i partman/choose_partition select finish
d-i partman/confirm boolean true
d-i partman/confirm_nooverwrite boolean true
Permit Root Login In
Change the default configuration of /etc/ssh/sshd_config via:
d-i preseed/late_command string \
in-target sed -i 's/PermitRootLogin.*/PermitRootLogin yes/g' /etc/ssh/sshd_config
Root Password
We can set the encrypted password or plain secret for root:
# Root password, either in clear text
#d-i passwd/root-password password engine
#d-i passwd/root-password-again password engine
# or encrypted using an MD5 hash.
d-i passwd/root-password-crypted password gowguowueogahwehoehjwouweouhow
d-i user-setup/allow-password-weak boolean true
d-i passwd/make-user boolean true  #Set true so we could make oridinary user.
While the encryted password could be generated via:
using openssl passwd:
$ openssl passwd -1 "password here"
Using grub-crypt (you will be prompted to enter a password after running the command):
$ grub-crypt --md5
Packer’s json configuration
The json configuration for importing qemu:
    {
      "boot_command": [
        "{{ user `boot_command_prefix` }}",
        "/install/vmlinuz noapic ",
        "initrd=/install/initrd.gz ",
        "file=/floppy/{{ user `preseed` }} ",
        "debian-installer=en_US auto locale=en_US kbd-chooser/method=us ",
        "hostname={{ user `hostname` }} ",
        "grub-installer/bootdev=/dev/vda<wait> ",
        "fb=false debconf/frontend=noninteractive ",
        "keyboard-configuration/modelcode=SKIP keyboard-configuration/layout=USA ",
        "keyboard-configuration/variant=USA console-setup/ask_detect=false ",
        "passwd/user-fullname={{ user `ssh_fullname` }} ",
        "passwd/user-password={{ user `ssh_password` }} ",
        "passwd/user-password-again={{ user `ssh_password` }} ",
        "passwd/username={{ user `ssh_username` }} ",
        "-- <enter>"
      ],
      "disk_size": "{{ user `disk_size` }}",
      "floppy_files": [
        "http/{{ user `preseed` }}"
      ],
      "boot_wait": "10s",
      "headless": "{{ user `headless` }}",
      "iso_checksum": "{{ user `iso_checksum` }}",
      "iso_checksum_type": "{{ user `iso_checksum_type` }}",
      "iso_urls": [
        "{{ user `iso_path` }}/{{ user `iso_name` }}",
        "{{ user `iso_url` }}"
      ],
      "output_directory": "output-{{ user `vm_name` }}-qemu-iso",
      "shutdown_command": "echo '{{ user `ssh_password` }}'|sudo -S shutdown -P now",
      "ssh_password": "{{ user `ssh_password` }}",
      "ssh_username": "{{ user `ssh_username` }}",
      "ssh_wait_timeout": "10000s",
      "type": "qemu",
      "format": "qcow2",
      "disk_interface": "virtio",
      "accelerator": "kvm",
      "vm_name": "{{user `vm_name`}}"
    },
Post-processors for generating vhd:
  "post-processors": [
    {
      "output": "box/vhd/{{user `vm_name`}}-{{user `cm`}}{{user `cm_version`}}-{{user `version`}}",
      "type": "vhd"
    }
Post-postcessors for generating box file:
  "post-processors": [
    {
      "keep_input_artifact": false,
      "output": "box/{{.Provider}}/{{user `vm_name`}}-{{user `cm`}}{{user `cm_version`}}-{{user `version`}}.box",
      "type": "vagrant",
      "vagrantfile_template": "{{ user `vagrantfile_template` }}"
    }
  ],
In some system which have lower memory, packer building will fail, because it will generating large
file under /tmp directory, so we have to change the default PAKCER TMP via:
$ mkdir ./tmp
$ export PACKER_TMP=./tmp
By setting up the TMP file we could do building without any error.
scripts
Network Manager Start Manually
By setting following commands:
$ sudo echo "manual" | sudo tee /etc/init/network-manager.override
$ sudo /bin/sed -i "\$i sudo start network-manager" /etc/rc.local
Upgrade
For avoiding signature error, do following:
# avoiding hashchecksum error.
rm -rf /var/lib/apt/lists/*

# apt-get update does not actually perform updates, it just downloads and indexes the list of packages
apt-get -y update
apt-get -y upgrade
hvc0 terminal
XenServer use hvc0 for tty, so we have to manually configure its login:
# Fix bug, no hvc0, then you won't get tty1 working under vnc
    echo 'start on stopped rc RUNLEVEL=[2345] and (' > /etc/init/hvc0.conf
    echo 'not-container or' >> /etc/init/hvc0.conf
    echo 'container CONTAINER=lxc or' >> /etc/init/hvc0.conf
    echo 'container CONTAINER=lxc-libvirt)' >> /etc/init/hvc0.conf
    echo 'stop on runlevel [!2345]' >> /etc/init/hvc0.conf
    echo 'respawn' >> /etc/init/hvc0.conf
    echo 'exec /sbin/getty -L hvc0 9600 linux' >> /etc/init/hvc0.conf
After these modifications, now we could generate vhd file or vagrant-libvirt box files using Makefile.
