Dec 22, 2016
TechnologyAdd additional ssh keys
Adding new keys into the deployed system:
# echo 'ssh-rsa AAAAB3Nza....... key@host' | update-ssh-keys -a core
Write files
Take /etc/environment file for example:
core@coreos1 ~ $ cat /usr/share/oem/cloud-config.yml
#cloud-config
write_files:
    - path: /etc/environment
      permissions: 0644
      content: |
        COREOS_PUBLIC_IPV4=172.17.8.201
        COREOS_PRIVATE_IPV4=172.17.8.201
Add User
Also add in the file /usr/share/oem/cloud-config.yml, like following:
users:
  - name: "dash"
    passwd: "xxxxxxxxxxxxxxxxxx"
    groups:
      - "sudo"
      - "docker"
    ssh-authorized-keys:
      - "ssh-rsa ADD ME"
Password could be generated via openssl -1 "YourPasswd"
Use Ansible
Install via:
$ sudo ansible-galaxy install defunctzombie.coreos-bootstrap
$ sudo vim /etc/ansible/roles/defunctzombie.coreos-bootstrap/files/bootstrap.sh
if [[ -e $HOME/pypy-5.6-linux_x86_64-portable.tar.bz2 ]]; then
  tar -xjf $HOME/pypy-5.6-linux_x86_64-portable.tar.bz2
  #rm -rf $HOME/pypy-$PYPY_VERSION-linux64.tar.bz2
else
  wget -O - https://bitbucket.org/pypy/pypy/downloads/pypy-$PYPY_VERSION-linux64.tar.bz2 |tar -xjf -
fi

rm -rf pypy
mv -n pypy-5.6-linux_x86_64-portable pypy
Cause the old version 5.1.0 will have problems, we replace it with 5.6.
Create playbook and inventory file:
$ vim site.yml
- hosts: coreos
  gather_facts: False
  roles:
    - defunctzombie.coreos-bootstrap
$ vim inventory
[coreos]
172.17.8.221
172.17.8.222
172.17.8.223

[coreos:vars]
ansible_ssh_user=core
ansible_python_interpreter=/home/core/bin/python
$ ansible-playbook -i inventory site.yml
$ ansible -i inventory all -m ping
Dec 21, 2016
Technologyfleetctl Configuration
Cluster Status
fleetctl list-machines will display all of the nodes in cluster:
core@coreos1 ~ $ fleetctl list-machines
MACHINE		IP		METADATA
bea5741d...	172.17.8.203	-
dd464e69...	172.17.8.202	-
f22aee5d...	172.17.8.201	-
fleetctl list-units will list all of the services in cluster:
core@coreos1 ~ $ fleetctl list-units
UNIT	MACHINE	ACTIVE	SUB
Nodes Jumping
Use ssh-keygen for generating the id_rsa.pub, and add them into other
nodes’s /home/core/.ssh/authorized_keys.
Start the ssh-agent via:
$ eval `ssh-agent`
$ ssh-add /home/core/.ssh/id_rsa
$ fleetctl ssh dd464e69
List the added ssh key via:
$ ssh-add  -l
2048 SHA256:w7OM8b6ximc9/lTgaB5gWpHK6xuf22IE37Of113yfJA /home/core/.ssh/id_rsa (RSA)
Then you could use fleetctl ssh dd464e69 for jumping to 172.17.8.202.
Or execute command like following:
 $ fleetctl ssh dd464e69 cat /etc/hostname
coreos2
Start First Fleet Unit
In core1 node, do following operation:
$ cp /etc/systemd/system/hello.service ./
$ vim hello.service
$ fleetctl start ./hello.service
Your hello.service should be like this:
[Unit]
Description=Hello World
After=docker.service
Requires=docker.service

[Service]
TimeoutStartSec=0
ExecStartPre=-/bin/docker kill busybox1
ExecStartPre=-/bin/docker rm busybox1
ExecStart=/bin/docker run --name busybox1 busybox /bin/sh -c "while true; do
echo Hello World; sleep 1; done"
ExecStop="/bin/docker kill busybox1"

[X-Fleet]
X-Conflicts=hello*.service
Mainly the same as systemd’s configuration, but replace the last part to
X-Fleet.
Start the unit via:
core@coreos1 ~ $ fleetctl start ./hello.service
Unit hello.service inactive
Unit hello.service launched on bea5741d.../172.17.8.203
core@coreos1 ~ $ fleetctl list-units
UNIT		MACHINE				ACTIVE	SUB
hello.service	bea5741d.../172.17.8.203	active	running
In node3(172.17.8.203), you could use systemctl list-units for finding the
service named hello.service.
Service Migration
Step1: Login to hello.service machine.
Step2: Reboot this node.
Step3: View current units has been migrated to new node.
Step4: List the avaiable machines.
core@coreos1 ~ $ fleetctl ssh hello.service
Last login: Wed Dec 21 10:24:15 UTC 2016 from 172.17.8.201 on pts/1
CoreOS stable (1185.5.0)
core@coreos3 ~ $ systemctl reboot
core@coreos3 ~ $ core@coreos1 ~ $
core@coreos1 ~ $ fleetctl list-units
UNIT		MACHINE				ACTIVE	SUB
hello.service	dd464e69.../172.17.8.202	active	running
core@coreos1 ~ $ fleetctl list-machines
MACHINE		IP		METADATA
dd464e69...	172.17.8.202	-
f22aee5d...	172.17.8.201	-
Destroy Service
If you want to destroy the service, do following:
core@coreos1 ~ $ fleetctl list-unit-files
UNIT		HASH	DSTATE		STATE		TARGET
hello.service	09bb151	launched	launched
dd464e69.../172.17.8.202
core@coreos1 ~ $ fleetctl destroy hello.service
Destroyed hello.service
core@coreos1 ~ $ fleetctl list-unit-files
UNIT	HASH	DSTATE	STATE	TARGET
Dec 21, 2016
TechnologyLocal Discovery Service
Take a look at the yaml configuration file:
  etcd2:
    # generate a new token for each unique cluster from
https://discovery.etcd.io/new?size=3
    # specify the initial size of your cluster with ?size=X
    discovery: https://discovery.etcd.io/4add2186302763c8876afd1684ca06fe
This means all of you coreos nodes should reach the internet, what if we
deploy a coreos cluster offline? We need to deploy a local discovery service.
ArchLinux etcd2 Example
Download the etcd v2.3.7 and extract it to specified directory via :
$ curl -L \
https://github.com/coreos/etcd/releases/download/v2.3.7/etcd-v2.3.7-linux-amd64.tar.gz \
-o etcd-v2.3.7-linux-amd64.tar.gz
$ tar xzvf etcd-v2.3.7-linux-amd64.tar.gz
Create a customized systemd item like following, you should change the etcd
executable file to your own positioni, also specify your own data-dir:
$ sudo mkdir -p /var1/Nov14/etcd/etcd-v2.3.7-linux-amd64/data
$ sudo vim /usr/lib/systemd/system/myetcd.service
[Unit]
Description=myownetcd
After=multi-user.service

[Service]
ExecStart=/var1/Nov14/etcd/etcd-v2.3.7-linux-amd64/etcd
--data-dir=/var1/Nov14/etcd/etcd-v2.3.7-linux-amd64/data
--name=single-etcd-service  --listen-client-urls
'http://0.0.0.0:2379,http://0.0.0.0:4001' --advertise-client-urls
'http://0.0.0.0:2379,http://0.0.0.0:4001'
Restart=always
StandardOutput=syslog
StandardError=syslog
SyslogIdentifier=myownetcd

[Install]
WantedBy=multi-user.target
Start and enable the service:
$ sudo systemctl enable myetcd.service
$ sudo systemctl start myetcd.service
Test etcd
Very simple test:
$ ./etcdctl set mykey "this is awesome"
$ ./etcdctl get mykey
this is awesome
Create own discovery
Use uuidgen for generating a new uuid:
$ uuidgen
557a2133-88f3-41d2-9b27-9fd4081f7b41
Use this new generated uuid for generating a 3-node cluster:
$ curl -X PUT \
http://172.17.8.1:4001/v2/keys/557a2133-88f3-41d2-9b27-9fd4081f7b41/_config/size \
-d value=3
Now you could examine the generated etcd items:
$ /var1/Nov14/etcd/etcd-v2.3.7-linux-amd64/etcdctl ls --recursive /
/mykey
/557a2133-88f3-41d2-9b27-9fd4081f7b41
Use your own discovery
Change the definition in yaml file:
    #discovery: https://discovery.etcd.io/4add2186302763c8876afd1684ca06fe
    discovery: http://172.17.8.1:4001/v2/keys/557a2133-88f3-41d2-9b27-9fd4081f7b41
Now re-create the coreOS cluster, you will see the coreOS cluster could
work properly again.
Start First Docker
Enable registry-mirror in coreOS:
# echo 'DOCKER_OPTS="--registry-mirror=http://1a653205.m.daocloud.io"' >> /run/flannel_docker_opts.env
# systemctl restart docker
# docker pull busybox
Now write the hello.service definition:
# vim /etc/systemd/system/hello.service
[Unit]
Description=Hello World
After=docker.service
Requires=docker.service

[Service]
TimeoutStartSec=0
ExecStartPre=-/bin/docker kill busybox1
ExecStartPre=-/bin/docker rm busybox1
ExecStart=/bin/docker run --name busybox1 busybox /bin/sh -c "while true; do echo Hello World; sleep 1; done"
ExecStop="/bin/docker kill busybox1"
ExecStopPost="/bin/docker rm busybox1"

[Install]
WantedBy=multi-user.target
Start and enable the service via:
# systemctl start hello.service
# systemctl enable hello.service
Trouble-Shooting
Reset your etcd2 database:
$ sudo systemctl stop fleetd
$ sudo systemctl stop etcd2
$ sudo rm -rf /var/lib/etcd2/*
$ sudo rm -rf /etc/systemd/system/etcd*
$ sudo reboot
Then your etcd2 will be re-initialized.
Dec 20, 2016
TechnologyPreparation
Create image file via:
$ sudo mkdir corecluster
$ cd corecluster
$ qemu-img create -f qcow2 coreos1.qcow2 30G
$ qemu-img create -f qcow2 coreos2.qcow2 30G
$ qemu-img create -f qcow2 coreos3.qcow2 30G
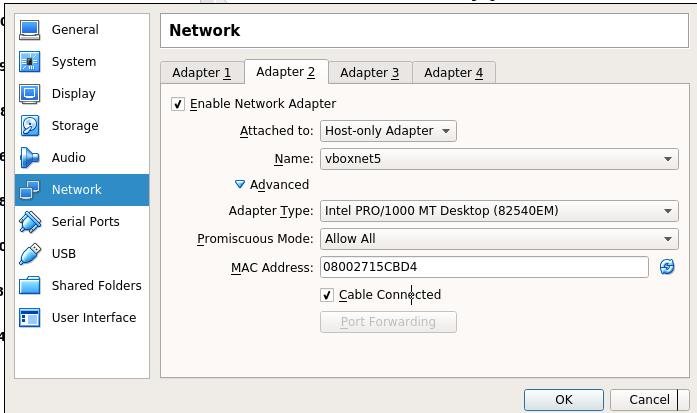
Create a network named 172.17.8.1/24, dhcp disabled.
Since the vnet interface is occupied via virtualbox, switches to virtualbox
installation.
Two Ethernet cards:
Start from CD:
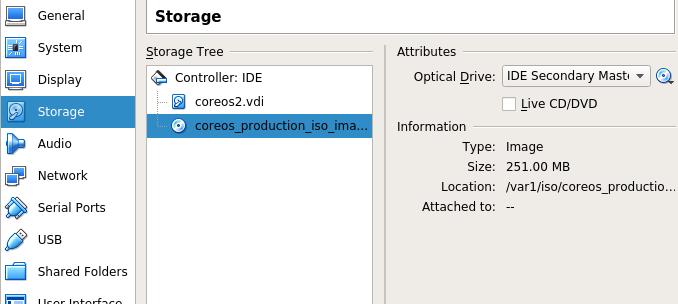
Installation File Preparation
For saving time, we use local installation repository, download the
installation images via:
$ $ git clone https://github.com/coreos/coreos-baremetal
# Make a copy of example files
$ cp -R coreos-baremetal/examples .
# Download the CoreOS image assets referenced in the target profile.
$ ./coreos-baremetal/scripts/get-coreos stable 1185.5.0 ./examples/assets
Then Copy installation image and sig file into the webserver:
$ cd /YourWebServerDirectory/1185.5.0
$ ls
coreos_production_image.bin.bz2  coreos_production_image.bin.bz2.sig
YAML Definition
Refers to coreos-vagrant project:
$ git clone https://github.com/coreos/coreos-vagrant.git`
$ cat user-data
The configuration of the yaml is listed as following:
First get the token via:
$ curl https://discovery.etcd.io/new?size=3
https://discovery.etcd.io/xxxxxxxxxxxxxxxxxxxxxxxxx
#cloud-config
hostname: coreos1
coreos:
  etcd2:
    # generate a new token for each unique cluster from https://discovery.etcd.io/new?size=3
    # specify the initial size of your cluster with ?size=X
    discovery: https://discovery.etcd.io/xxxxxxxxxxxxxxxxxxx
    advertise-client-urls: http://172.17.8.201:2379,http://172.17.8.201:4001
    initial-advertise-peer-urls: http://172.17.8.201:2380
    # listen on both the official ports and the legacy ports
    # legacy ports can be omitted if your application doesn't depend on them
    listen-client-urls: http://0.0.0.0:2379,http://0.0.0.0:4001
    listen-peer-urls: http://172.17.8.201:2380,http://172.17.8.201:7001
  fleet:
    public-ip: "172.17.8.201"
  flannel:
    interface: "172.17.8.201"
  units:
    - name: etcd2.service
      command: start
    - name: fleet.service
      command: start
    - name: flanneld.service
      drop-ins:
      - name: 50-network-config.conf
        content: |
          [Service]
          ExecStartPre=/usr/bin/etcdctl set /coreos.com/network/config '{ "Network": "10.1.0.0/16" }'
      command: start
    - name: static.network
      content: |
        [Match]
        Name=enp0s8
        [Network]
        Address=172.17.8.201/24
        Gateway=172.17.8.1
        DNS=172.17.8.1
    - name: docker-tcp.socket
      command: start
      enable: true
      content: |
        [Unit]
        Description=Docker Socket for the API

        [Socket]
        ListenStream=2375
        Service=docker.service
        BindIPv6Only=both

        [Install]
        WantedBy=sockets.target
users:
  - name: core
    ssh-authorized-keys:
      - ssh-rsa "ADD ME"
  - groups:
      - sudo
      - docker
For coreos2 node, simply replace the ip address from 172.17.8.201 to 172.17.8.202, etc.
Installation
Install it via:
# coreos-install -d /dev/sda -b http://YourWebServer -c ./YourYamlFile.yaml -v
After a while, the installation will finish.
Repeat this step in 3 nodes.
Verification
Login into any of the core machine in cluster:
core@coreos1 ~ $ etcdctl cluster-health
member f934a5ba1eca1ea is healthy: got healthy result from http://172.17.8.201:2379
member 23798f79754d53b7 is healthy: got healthy result from http://172.17.8.203:2379
member 5acdd34e67ade1d7 is healthy: got healthy result from http://172.17.8.202:2379
cluster is healthy
Dec 15, 2016
Technology参考了http://container-solutions.com/continuous-delivery-with-docker-on-mesos-in-less-than-a-minute/
Nodejs程序
app.js程序如下:
// Load the http module to create an http server.
var http = require('http');

// Configure our HTTP server to respond with Hello World to all requests.
var server = http.createServer(function (request, response) {
  response.writeHead(200, {"Content-Type": "text/plain"});
  response.end("Hello World");
});

// Listen on port 8000, IP defaults to "0.0.0.0"
server.listen(8000);

// Put a friendly message on the terminal
console.log("Server running at http://127.0.0.1:8000/");
配置文件package.json如下:
{
  "name": "hello-world",
  "description": "hello world",
  "version": "0.0.1",
  "private": true,
  "dependencies": {
    "express": "3.x"
  },
  "scripts": {"start": "node app.js"}
}
创建容器的Dockerfile定义如下:
FROM google/nodejs

WORKDIR /app
ADD package.json /app/
RUN npm install
ADD . /app

EXPOSE 8000
CMD []
ENTRYPOINT ["/nodejs/bin/npm", "start"]
于是我们可以编译出自定义的容器镜像:
$ docker build -t my_nodejs_image .
$ docker run -p 8000:8000 my_nodejs_image
这时候访问http://localhost:8000即可看到APP有hello world的输出。
引入Jenkins
获取docker的group id:
# cat /etc/group | grep -i docker
docker:x:998:vagrant
定义Dockerfile, 注意我们这里有998的替代:
FROM jenkins

MAINTAINER ContainerSolutions

USER root
#TODO the group ID for docker group on my Ubuntu is 125, therefore I can only
# run docker commands if I have same group id inside.
# Otherwise the socket file is not accessible.
RUN groupadd -g 998 docker; usermod -a -G docker jenkins
USER jenkins
编译docke镜像:
# docker build -t dash/jenkins_with_docker .
# docker images | grep dash
dash/jenkins_with_docker                 latest              6dc4c6263f78
25 seconds ago      712 MB
创建docker-compose.yml文件:
jenkins:
  image: dash/jenkins_with_docker
  volumes:
    - jenkins-stuff:/var/jenkins_home
    - .:/var/jenkins_data
    - /var/run/docker.sock:/var/run/docker.sock
    - /usr/bin/docker:/usr/bin/docker
  ports:
    - "8081:8080"
registry:
  image: registry
  environment:
    - STORAGE_PATH=/registry
  volumes:
    - registry-stuff:/registry
  ports:
    - "5000:5000"
现在运行docker-compose up,并检查服务状态,
如果之前已经运行过,则需要删除以前的卷,docker volume rm jenkins-stuff
root@ci:~# netstat -anp | grep 5000
tcp6       0      0 :::5000                 :::*                    LISTEN
1983/docker-proxy
root@ci:~# netstat -anp | grep 8081
tcp6       0      0 :::8081                 :::*                    LISTEN
1917/docker-proxy
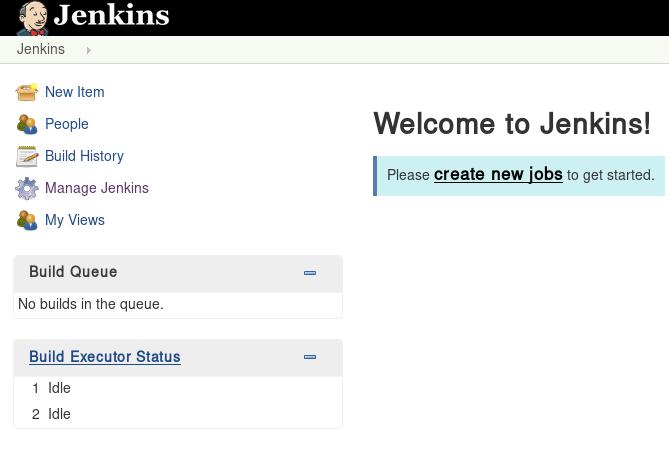
可以通过访问http://localhost:8081来查看jenkins界面。

获取密码的步骤如下:
# docker ps | grep -i dash
CONTAINER ID        IMAGE                      COMMAND
CREATED              STATUS              PORTS
NAMES
dashcompose_registry_1
74aeca2d56c5        dash/jenkins_with_docker   "/bin/tini -- /usr/lo"   About
a minute ago   Up About a minute   50000/tcp, 0.0.0.0:8081->8080/tcp
dashcompose_jenkins_1
# docker exec -it 74aeca2d56c5 /bin/bash
jenkins@74aeca2d56c5:/$ cat /var/jenkins_home/secrets/initialAdminPassword
e8902ae0e7d84cc6848fb79cf7e64538
选择不添加任何插件,直接进入到jenkins.
查看已经添加的卷的详细信息:
# docker volume ls
DRIVER              VOLUME NAME
local
049c2b4d14069f74ded6ed1286694a7a43b391aac5345f63fdb23b6c0a453d32
local
8ad894e25c1fd64b229bd4cb777ea37895b15acfeeee9e4de1cb07ef7e1e1649
local
9033c8aa23972d703e54aed1647516577866aff738929f09e4070106b24a5edf
local
f8c0327e154ceb284e9444fba4dfa53b7d92651c9fce44611d98873adb1e5051
local               jenkins-stuff
local               registry-stuff
# docker volume inspect jenkins-stuff
[
    {
        "Name": "jenkins-stuff",
        "Driver": "local",
        "Mountpoint": "/var/lib/docker/volumes/jenkins-stuff/_data",
        "Labels": null,
        "Scope": "local"
    }
]
可以看到我们添加的卷挂载的目录, 那么建立以下的目录:
$ sudo mkdir /var/lib/docker/volumes/jenkins-stuff/_data/workspace/dockerbuild
创建两个脚本,一个用来编译,一个用来推送已经编译好的docker镜像:
# cat build.sh
#!/bin/bash

if [ -z "${1}" ]; then
   version="latest"
else
   version="${1}"
fi

cd nodejs_app
docker build -t localhost:5000/containersol/nodejs_app:${version} .
cd ..
# cat push.sh
#!/bin/bash

if [ -z "${1}" ]; then
   version="latest"
else
   version="${1}"
fi

docker push localhost:5000/containersol/nodejs_app:"${version}"
同样将我们的app拷贝到这个目录下,目录树如下:
# tree
.
├── build.sh
├── nodejs_app
│   ├── app.js
│   ├── Dockerfile
│   └── package.json
└── push.sh

1 directory, 5 files
Jenkins里新建的project中,build选项如下:
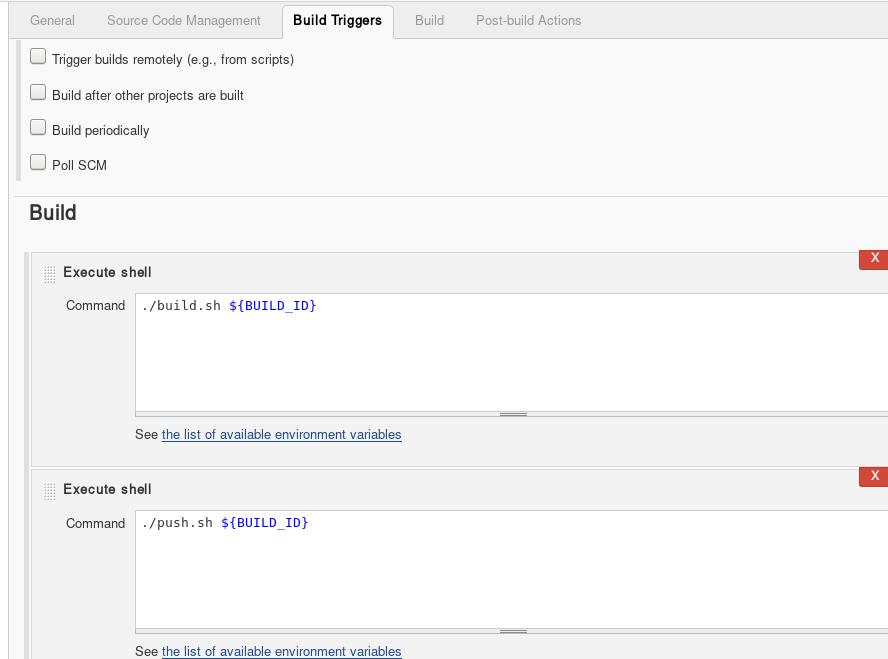
现在触发编译,直接点击build now,则可以看到每一次执行的build中的console out.
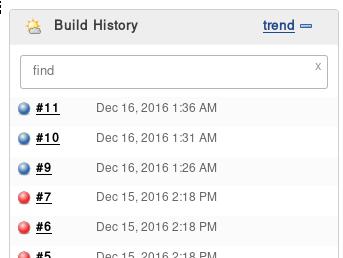
编译完毕后,可以看到docker镜像库中新添加的镜像:
# docker images
REPOSITORY                               TAG                 IMAGE ID            CREATED             SIZE
localhost:5000/containersol/nodejs_app   10                  18462939f95d        11 minutes ago      502 MB
localhost:5000/containersol/nodejs_app   11                  18462939f95d        11 minutes ago      502 MB
localhost:5000/containersol/nodejs_app   9                   c163d485bce3        13 minutes ago      502 MB
验证方法则是手动执行该镜像的实例,例如我们修改app.js:
# vim app.js
// Load the http module to create an http server.
var http = require('http');

// Configure our HTTP server to respond with Hello World to all requests.
var server = http.createServer(function (request, response) {
  response.writeHead(200, {"Content-Type": "text/plain"});
  response.end("Hello World , build me now!");
});
触发build并验证后,可以看到输出为:
# curl http://127.0.0.1:8000
Hello World , build me now!
TBD
可以映射jenkins默认编译目录为某个本地目录,或者在Jenkins容器配置文件中
指定好其编译目录。
可以将jenkins与git结合。
如果需要用mesos来自动deploy app,可以参考:
http://container-solutions.com/continuous-delivery-with-docker-on-mesos-in-less-than-a-minute-part-2/
