Dec 29, 2016
TechnologyAIM
Using python for fetching back some blog articles and convert them into pdf
files, send it to some specified mailbox.
Preparation
The script depends on python library:
- feedparser
- pdfkit
Install them via:
$ sudo pip install feedparser
$ sudo pip install pdfkit
pdfkit depends on wkhtmltopdf, install it on ubuntu via:
$ sudo apt-get install -y wkhtmltopdf
Configure wkhtmltopdf, because in vps we don’t have X Window:
# apt-get install -y ttf-wqy-zenhei xvfb
# echo 'xvfb-run --server-args="-screen 0, 1024x768x24" /usr/bin/wkhtmltopdf $*' > /usr/bin/wkhtmltopdf.sh
# chmod 777 /usr/bin/wkhtmltopdf.sh
# ln -s /usr/bin/wkhtmltopdf.sh /usr/local/bin/wkhtmltopdf
# which wkhtmltopdf
/usr/local/bin/wkhtmltopdf
Script
The python script is listed as following:
import sys
import pdfkit
import feedparser
reload(sys);
sys.setdefaultencoding("utf8")

options = {
    'page-size': 'Letter',
    'margin-top': '0.75in',
    'margin-right': '0.75in',
    'margin-bottom': '0.75in',
    'margin-left': '0.75in',
    'encoding': "UTF-8",
    'custom-header' : [
        ('Accept-Encoding', 'gzip')
    ],
    'cookie': [
        ('cookie-name1', 'cookie-value1'),
        ('cookie-name2', 'cookie-value2'),
    ],
    'no-outline': None
}

htmlhead = """
<html>
    <meta http-equiv="Content-Type" content="text/html; charset=UTF-8">
    <head>
            <title>BlogList</title>
    </head>
<body>
"""

htmltail = """
</body>
</html>
"""

Article = htmlhead


d = feedparser.parse('https://feeds.feedburner.com/letscorp/aDmw')

for post in d.entries:
    # Post Title
    #print post.title
    Article += "<h2>" + post.title + "</h2>"
    # Post Content
    #print post.content[0].value.rsplit('span', 2)[0][:-4]
    #Article += post.content[0].value.rsplit('span', 2)[0][:-4]
    Article += post.content[0].value

Article += htmltail
print Article
#pdfkit.from_string(Article, 'output.pdf', options=options)
Unfortunately the last line won’t work, cause we are working under terminal,
we use the wrapped wkhtmltopdf, so we comment it, and redirect our output into
a html file, manually convert from html to pdf.
Usage
Output pdf via following command:
$ python fetch.py>fetch.html
$ wkhtmltopdf fetch.html output.pdf
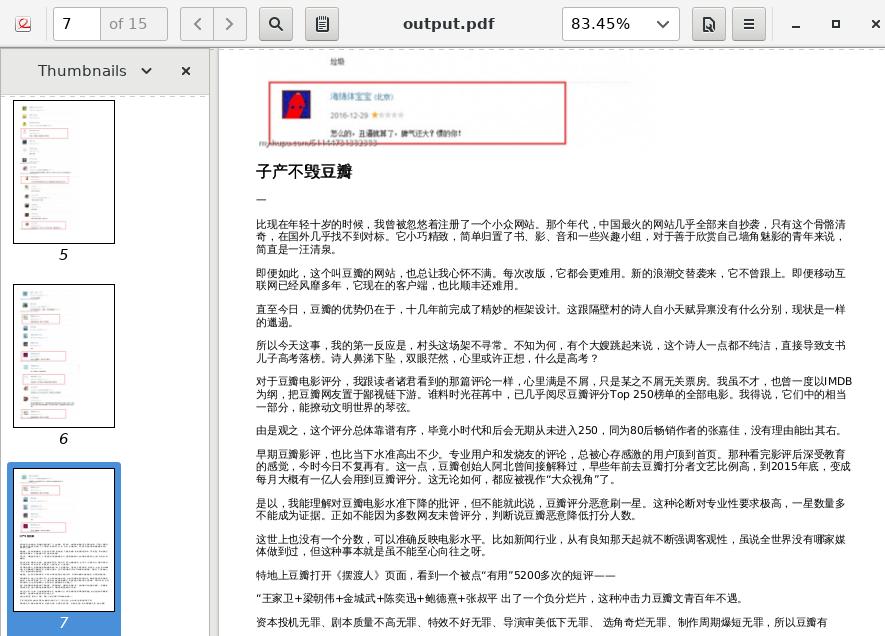
The generated output.pdf contains the latest 10 articles in blog, like
following screenshot image:
Further Works
- Could it fetch more blog items via rss?
- Crontab for sending out pdf as attached files to specified email box?
- Judgement from date?
- Less size of pdf file(shriking the image size)?
- Use CSS for beautify this output pdf?
Dec 26, 2016
Technology先决条件
CoreOS安装iso: coreos_production_iso_image.iso.
https://coreos.com/os/docs/latest/booting-with-iso.html
VirtualBox.
https://www.virtualbox.org/wiki/Downloads
硬盘安装介质, 放置于某web服务器根目录下(这里的根目录是/var/download):
$ pwd
/var/download/1185.5.0
$ ls
coreos_production_image.bin.bz2  coreos_production_image.bin.bz2.sig
准备硬盘安装介质,需要通过coreos-baremetal项目,从./examples/assets下拷贝相应文件到web服务器根目录下:
 $ git clone https://github.com/coreos/coreos-baremetal
# Make a copy of example files
$ cp -R coreos-baremetal/examples .
# Download the CoreOS image assets referenced in the target profile.
$ ./coreos-baremetal/scripts/get-coreos stable 1185.5.0 ./examples/assets
网络配置
三个CoreOS节点IP配置
coreos1: 172.17.8.221
coreos2: 172.17.8.222
coreos3: 172.17.8.223
etcd discovery Server IP: 172.17.8.1.
Virtualbox网络配置如下:
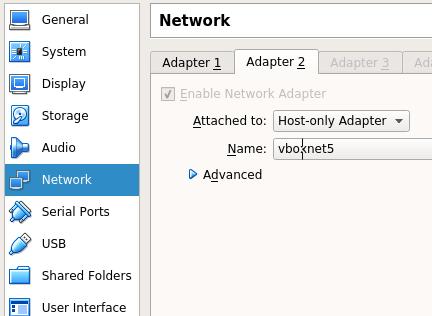
第一块网卡接入到NAT网络,第二块网卡接入到Host-only网络,这也就是在下面的Cloudinit文件中
需要定义的Name=enp0s8字段。
Discovery Server配置
实际上这个Server是运行etcd2的一个物理机,接入172.17.8.0/24网络,为简单起见我们使用运行VirtualBox
的Linux主机(运行ArchLinux).
具体的步骤可以参考:
http://purplepalmdash.github.io/blog/2016/12/21/trycoreos2/
Cloudinit文件
YAML(Yet Another Markup Language).
用coreos1的cloudinit文件为例:
#cloud-config
hostname: coreos1
coreos:
  etcd2:
    # generate a new token for each unique cluster from https://discovery.etcd.io/new?size=3
    # specify the initial size of your cluster with ?size=X
    discovery: http://172.17.8.1:4001/v2/keys/1cce733b-3e02-4855-8df0-52fdd6ec635a
    advertise-client-urls: http://172.17.8.221:2379,http://172.17.8.221:4001
    initial-advertise-peer-urls: http://172.17.8.221:2380
    # listen on both the official ports and the legacy ports
    # legacy ports can be omitted if your application doesn't depend on them
    listen-client-urls: http://0.0.0.0:2379,http://0.0.0.0:4001
    listen-peer-urls: http://172.17.8.221:2380,http://172.17.8.221:7001
  fleet:
    public-ip: "172.17.8.221"
  units:
    - name: etcd2.service
      command: start
    - name: fleet.service
      command: start
    - name: static.network
      content: |
        [Match]
        Name=enp0s8
        [Network]
        Address=172.17.8.221/24
        Gateway=172.17.8.1
        DNS=172.17.8.1
    - name: docker-tcp.socket
      command: start
      enable: true
      content: |
        [Unit]
        Description=Docker Socket for the API

        [Socket]
        ListenStream=2375
        Service=docker.service
        BindIPv6Only=both

        [Install]
        WantedBy=sockets.target
users:
  - name: core
    ssh-authorized-keys:
      - ssh-rsa "ADD ME"
  - groups:
      - sudo
      - docker
对coreos2和coreos3节点,只需要替换对应的IP地址定义,如:coreos2只需要把IP从172.17.8.221换成172.17.8.222.
ssh-rsa部分是需要预注入的ssh key, 可以通过ssh-keygen生成.
CoreOS安装
用光盘启动三台虚拟机,默认将进入到shell,在coreos1节点上,通过以下命令安装CoreOS:
$ coreos-install -d /dev/sda -b http://YourWebServer -c ./cloud-init1.yaml -v
同样安装其他两个节点, 因为预置了ssh-key,可以在该节点上直接登入三台CoreOS机器。
安装好的机器上,默认启动了etcd和docker, 可以通过etcdctl cluster-health来验证etcd正常运行。
Kubernetes配置选项
这里参考https://coreos.com/kubernetes/docs/latest/getting-started.html
MASTER_HOST=no default
ETCD_ENDPOINTS=no default
POD_NETWORK=10.2.0.0/16
SERVICE_IP_RANGE=10.3.0.0/24
K8S_SERVICE_IP=10.3.0.1
DNS_SERVICE_IP=10.3.0.10

########################################
FLANNELD_IFACE=${ADVERTISE_IP}
FLANNELD_ETCD_ENDPOINTS=${ETCD_ENDPOINTS}

Example: 172.17.8.221
FLANNELD_IFACE=172.17.8.221
FLANNELD_ETCD_ENDPOINTS=http://172.17.8.221:2379

ETCD_SERVER
http://172.17.8.221:2379
etcd2配置
在所有节点上,更改etcd2监听地址:
/etc/systemd/system/etcd2.service.d/40-listen-address.conf
[Service]
Environment=ETCD_LISTEN_CLIENT_URLS=http://0.0.0.0:2379
Environment=ETCD_ADVERTISE_CLIENT_URLS=http://${PUBLIC_IP}:2379
生成Kubernetes TLS
使用下列命令生成Kubernetes master节点和worker节点上所需使用的签名:
$ mkdir openssl
$ cd openssl
$ openssl genrsa -out ca-key.pem 2048
$ openssl req -x509 -new -nodes -key ca-key.pem -days 10000 -out ca.pem -subj "/CN=kube-ca"
$ openssl genrsa -out apiserver-key.pem 2048
$ openssl req -new -key apiserver-key.pem -out apiserver.csr -subj "/CN=kube-apiserver" -config openssl.cnf
$ openssl x509 -req -in apiserver.csr -CA ca.pem -CAkey ca-key.pem -CAcreateserial -out apiserver.pem -days 365 -extensions v3_req -extfile openssl.cnf
$ openssl genrsa -out coreos2-worker-key.pem 2048
$ openssl genrsa -out coreos3-worker-key.pem 2048
$ openssl req -new -key coreos3-worker-key.pem -out coreos3-worker.csr -subj "/CN=coreos3" -config coreos3-worker-openssl.cnf
$ openssl req -new -key coreos2-worker-key.pem -out coreos2-worker.csr -subj "/CN=coreos2" -config coreos2-worker-openssl.cnf
$ openssl x509 -req -in coreos2-worker.csr -CA ca.pem -CAkey ca-key.pem -CAcreateserial -out coreos2-worker.pem -days 365 -extensions v3_req -extfile coreos2-worker-openssl.cnf
$ openssl x509 -req -in coreos3-worker.csr -CA ca.pem -CAkey ca-key.pem -CAcreateserial -out coreos3-worker.pem -days 365 -extensions v3_req -extfile coreos3-worker-openssl.cnf
$ openssl genrsa -out admin-key.pem 2048
$ openssl req -new -key admin-key.pem -out admin.csr -subj "/CN=kube-admin"
$ openssl x509 -req -in admin.csr -CA ca.pem -CAkey ca-key.pem -CAcreateserial -out admin.pem -days 365
其中,master上使用的openssl.cnf文件定义如下:
[req]
req_extensions = v3_req
distinguished_name = req_distinguished_name
[req_distinguished_name]
[ v3_req ]
basicConstraints = CA:FALSE
keyUsage = nonRepudiation, digitalSignature, keyEncipherment
subjectAltName = @alt_names
[alt_names]
DNS.1 = kubernetes
DNS.2 = kubernetes.default
DNS.3 = kubernetes.default.svc
DNS.4 = kubernetes.default.svc.cluster.local
IP.1 = 10.3.0.1
IP.2 = 172.17.8.221
wokernode1, 即coreos2上使用的定义文件,coreos2-worker-openssl.cnf:
[req]
req_extensions = v3_req
distinguished_name = req_distinguished_name
[req_distinguished_name]
[ v3_req ]
basicConstraints = CA:FALSE
keyUsage = nonRepudiation, digitalSignature, keyEncipherment
subjectAltName = @alt_names
[alt_names]
IP.1 = 172.17.8.222
coreos3与coreos2定义文件的唯一区别在于:
- IP.1 = 172.17.8.222
+ IP.1 = 172.17.8.223
Kubernetes Master节点
TLS配置
拷贝生成的openssl目录到每个节点,在master节点(coreos1)上,拷贝master相关的鉴权文件到/etc/kubernetes/ssl目录下:
# mkdir -p /etc/kubernetes/ssl
# cd /etc/kubernetes/ssl
# cp /home/core/openssl/ca.pem  ./
# cp /home/core/openssl/apiserver.pem ./
# cp /home/core/openssl/apiserver-key.pem ./
# chmod 600 *
# chown root:root *
Flannel网络配置
Flannel提供了一个软件定义的overlay网络,用于转发流量到pods,或从pods转发流量到外部网络.
# mkdir -p /etc/flannel/
# vim /etc/flannel/options.env
FLANNELD_IFACE=172.17.8.221
FLANNELD_ETCD_ENDPOINTS=http://172.17.8.221:2379
# mkdir -p /etc/systemd/system/flanneld.service.d/
# vim /etc/systemd/system/flanneld.service.d/40-ExecStartPre-symlink.conf
[Service]
ExecStartPre=/usr/bin/ln -sf /etc/flannel/options.env /run/flannel/options.env
# mkdir -p /etc/systemd/system/docker.service.d/
# vim /etc/systemd/system/docker.service.d/40-flannel.conf
[Unit]
Requires=flanneld.service
After=flanneld.service
[Service]
EnvironmentFile=/etc/kubernetes/cni/docker_opts_cni.env
# mkdir -p /etc/kubernetes/cni/
# vim /etc/kubernetes/cni/docker_opts_cni.env
DOCKER_OPT_BIP=""
DOCKER_OPT_IPMASQ=""
# mkdir -p /etc/kubernetes/cni/net.d/10-flannel.conf
# vim /etc/kubernetes/cni/net.d/10-flannel.conf
{
    "name": "podnet",
    "type": "flannel",
    "delegate": {
        "isDefaultGateway": true
    }
}
创建kubelet单元
服务文件定义如下:
/etc/systemd/system/kubelet.service
[Service]
Environment=KUBELET_VERSION=v1.5.1_coreos.0
Environment="RKT_OPTS=--uuid-file-save=/var/run/kubelet-pod.uuid \
  --volume var-log,kind=host,source=/var/log \
  --mount volume=var-log,target=/var/log \
  --volume dns,kind=host,source=/etc/resolv.conf \
  --mount volume=dns,target=/etc/resolv.conf"
ExecStartPre=/usr/bin/mkdir -p /etc/kubernetes/manifests
ExecStartPre=/usr/bin/mkdir -p /var/log/containers
ExecStartPre=-/usr/bin/rkt rm --uuid-file=/var/run/kubelet-pod.uuid
ExecStart=/usr/lib/coreos/kubelet-wrapper \
  --api-servers=http://127.0.0.1:8080 \
  --register-schedulable=false \
  --cni-conf-dir=/etc/kubernetes/cni/net.d \
  --network-plugin=cni \
  --container-runtime=docker \
  --allow-privileged=true \
  --pod-manifest-path=/etc/kubernetes/manifests \
  --hostname-override=172.17.8.221 \
  --cluster_dns=10.3.0.10 \
  --cluster_domain=cluster.local
ExecStop=-/usr/bin/rkt stop --uuid-file=/var/run/kubelet-pod.uuid
Restart=always
RestartSec=10

[Install]
WantedBy=multi-user.target
创建kube-apiserver Pod
定义文件如下:
# mkdir -p /etc/kubernetes/manifests/
# vim /etc/kubernetes/manifests/kube-apiserver.yaml
apiVersion: v1
kind: Pod
metadata:
  name: kube-apiserver
  namespace: kube-system
spec:
  hostNetwork: true
  containers:
  - name: kube-apiserver
    image: quay.io/coreos/hyperkube:v1.5.1_coreos.0
    command:
    - /hyperkube
    - apiserver
    - --bind-address=0.0.0.0
    - --etcd-servers=http://172.17.8.221:2379
    - --allow-privileged=true
    - --service-cluster-ip-range=10.3.0.0/24
    - --secure-port=443
    - --advertise-address=172.17.8.221
    - --admission-control=NamespaceLifecycle,LimitRanger,ServiceAccount,DefaultStorageClass,ResourceQuota
    - --tls-cert-file=/etc/kubernetes/ssl/apiserver.pem
    - --tls-private-key-file=/etc/kubernetes/ssl/apiserver-key.pem
    - --client-ca-file=/etc/kubernetes/ssl/ca.pem
    - --service-account-key-file=/etc/kubernetes/ssl/apiserver-key.pem
    - --runtime-config=extensions/v1beta1/networkpolicies=true
    - --anonymous-auth=false
    livenessProbe:
      httpGet:
        host: 127.0.0.1
        port: 8080
        path: /healthz
      initialDelaySeconds: 15
      timeoutSeconds: 15
    ports:
    - containerPort: 443
      hostPort: 443
      name: https
    - containerPort: 8080
      hostPort: 8080
      name: local
    volumeMounts:
    - mountPath: /etc/kubernetes/ssl
      name: ssl-certs-kubernetes
      readOnly: true
    - mountPath: /etc/ssl/certs
      name: ssl-certs-host
      readOnly: true
  volumes:
  - hostPath:
      path: /etc/kubernetes/ssl
    name: ssl-certs-kubernetes
  - hostPath:
      path: /usr/share/ca-certificates
    name: ssl-certs-host
创建kube-proxy Pod
定义文件如下:
# vim /etc/kubernetes/manifests/kube-proxy.yaml
apiVersion: v1
kind: Pod
metadata:
  name: kube-proxy
  namespace: kube-system
spec:
  hostNetwork: true
  containers:
  - name: kube-proxy
    image: quay.io/coreos/hyperkube:v1.5.1_coreos.0
    command:
    - /hyperkube
    - proxy
    - --master=http://127.0.0.1:8080
    securityContext:
      privileged: true
    volumeMounts:
    - mountPath: /etc/ssl/certs
      name: ssl-certs-host
      readOnly: true
  volumes:
  - hostPath:
      path: /usr/share/ca-certificates
    name: ssl-certs-host
创建kube-controller-manager Pod
定义文件如下:
# vim /etc/kubernetes/manifests/kube-controller-manager.yaml
apiVersion: v1
kind: Pod
metadata:
  name: kube-controller-manager
  namespace: kube-system
spec:
  hostNetwork: true
  containers:
  - name: kube-controller-manager
    image: quay.io/coreos/hyperkube:v1.5.1_coreos.0
    command:
    - /hyperkube
    - controller-manager
    - --master=http://127.0.0.1:8080
    - --leader-elect=true
    - --service-account-private-key-file=/etc/kubernetes/ssl/apiserver-key.pem
    - --root-ca-file=/etc/kubernetes/ssl/ca.pem
    resources:
      requests:
        cpu: 200m
    livenessProbe:
      httpGet:
        host: 127.0.0.1
        path: /healthz
        port: 10252
      initialDelaySeconds: 15
      timeoutSeconds: 15
    volumeMounts:
    - mountPath: /etc/kubernetes/ssl
      name: ssl-certs-kubernetes
      readOnly: true
    - mountPath: /etc/ssl/certs
      name: ssl-certs-host
      readOnly: true
  hostNetwork: true
  volumes:
  - hostPath:
      path: /etc/kubernetes/ssl
    name: ssl-certs-kubernetes
  - hostPath:
      path: /usr/share/ca-certificates
    name: ssl-certs-host
创建kube-scheduler Pod
定义文件如下:
# vim /etc/kubernetes/manifests/kube-scheduler.yaml
apiVersion: v1
kind: Pod
metadata:
  name: kube-scheduler
  namespace: kube-system
spec:
  hostNetwork: true
  containers:
  - name: kube-scheduler
    image: quay.io/coreos/hyperkube:v1.5.1_coreos.0
    command:
    - /hyperkube
    - scheduler
    - --master=http://127.0.0.1:8080
    - --leader-elect=true
    resources:
      requests:
        cpu: 100m
    livenessProbe:
      httpGet:
        host: 127.0.0.1
        path: /healthz
        port: 10251
      initialDelaySeconds: 15
      timeoutSeconds: 15
启动服务
通过以下命令来启动master节点上的服务:
# systemctl daemon-reload
# curl -X PUT -d "value={\"Network\":\"10.2.0.0/16\",\"Backend\":{\"Type\":\"vxlan\"}}" "http://172.17.8.221:2379/v2/keys/coreos.com/network/config"
# systemctl start flanneld
# systemctl enable flanneld
# systemctl start kubelet
# systemctl enable kubelet
创建namespace
首先确保Kubernetes API可用:
$ curl http://127.0.0.1:8080/version
{
  "major": "1",
  "minor": "5",
  "gitVersion": "v1.5.1+coreos.0",
  "gitCommit": "cc65f5321f9230bf9a3fa171155c1213d6e3480e",
  "gitTreeState": "clean",
  "buildDate": "2016-12-14T04:08:28Z",
  "goVersion": "go1.7.4",
  "compiler": "gc",
  "platform": "linux/amd64"
}
使用以下命令创建命名空间:
# curl -H "Content-Type: application/json" -XPOST -d'{"apiVersion":"v1","kind":"Namespace","metadata":{"name":"kube-system"}}' "http://127.0.0.1:8080/api/v1/namespaces"
# curl -s localhost:10255/pods | jq -r '.items[].metadata.name'
kube-apiserver-172.17.8.221
kube-controller-manager-172.17.8.221
kube-proxy-172.17.8.221
kube-scheduler-172.17.8.221
Kubernetes Worker节点
TLS配置
以coreos2为例:
# mkdir -p /etc/kubernetes/ssl
# cd /etc/kubernetes/ssl
# cp /home/core/openssl/ca.pem  ./
# cp /home/core/openssl/coreos2-worker.pem ./
# cp /home/core/openssl/coreos2-worker-key.pem ./
# chmod 600 *
# chown root:root *
# ln -s coreos2-worker.pem worker.pem
# ln -s coreos2-worker-key.pem worker-key.pem
Flannel配置
配置如下:
# mkdir -p /etc/flannel/
# vim /etc/flannel/options.env
FLANNELD_IFACE=172.17.8.222
FLANNELD_ETCD_ENDPOINTS=http://172.17.8.222:2379
# mkdir -p /etc/systemd/system/flanneld.service.d/
# vim /etc/systemd/system/flanneld.service.d/40-ExecStartPre-symlink.conf
[Service]
ExecStartPre=/usr/bin/ln -sf /etc/flannel/options.env /run/flannel/options.env
# mkdir -p /etc/systemd/system/docker.service.d/
# vim /etc/systemd/system/docker.service.d/40-flannel.conf
[Unit]
Requires=flanneld.service
After=flanneld.service
[Service]
EnvironmentFile=/etc/kubernetes/cni/docker_opts_cni.env
# mkdir -p /etc/kubernetes/cni/
# vim /etc/kubernetes/cni/docker_opts_cni.env
DOCKER_OPT_BIP=""
DOCKER_OPT_IPMASQ=""
# mkdir -p /etc/kubernetes/cni/net.d/10-flannel.conf
# vim /etc/kubernetes/cni/net.d/10-flannel.conf
{
    "name": "podnet",
    "type": "flannel",
    "delegate": {
        "isDefaultGateway": true
    }
}
Kubelet单元
配置文件如下:
# vim /etc/systemd/system/kubelet.service
[Service]
Environment=KUBELET_VERSION=v1.5.1_coreos.0
Environment="RKT_OPTS=--uuid-file-save=/var/run/kubelet-pod.uuid \
  --volume dns,kind=host,source=/etc/resolv.conf \
  --mount volume=dns,target=/etc/resolv.conf \
  --volume var-log,kind=host,source=/var/log \
  --mount volume=var-log,target=/var/log"
ExecStartPre=/usr/bin/mkdir -p /etc/kubernetes/manifests
ExecStartPre=/usr/bin/mkdir -p /var/log/containers
ExecStartPre=-/usr/bin/rkt rm --uuid-file=/var/run/kubelet-pod.uuid
ExecStart=/usr/lib/coreos/kubelet-wrapper \
  --api-servers=https://172.17.8.221:443 \
  --cni-conf-dir=/etc/kubernetes/cni/net.d \
  --network-plugin=cni \
  --container-runtime=docker \
  --register-node=true \
  --allow-privileged=true \
  --pod-manifest-path=/etc/kubernetes/manifests \
  --hostname-override=172.17.8.222 \
  --cluster_dns=10.3.0.10 \
  --cluster_domain=cluster.local \
  --kubeconfig=/etc/kubernetes/worker-kubeconfig.yaml \
  --tls-cert-file=/etc/kubernetes/ssl/worker.pem \
  --tls-private-key-file=/etc/kubernetes/ssl/worker-key.pem
ExecStop=-/usr/bin/rkt stop --uuid-file=/var/run/kubelet-pod.uuid
Restart=always
RestartSec=10

[Install]
WantedBy=multi-user.target
kube-proxy Pod
配置文件如下:
# vim /etc/kubernetes/manifests/kube-proxy.yaml
apiVersion: v1
kind: Pod
metadata:
  name: kube-proxy
  namespace: kube-system
spec:
  hostNetwork: true
  containers:
  - name: kube-proxy
    image: quay.io/coreos/hyperkube:v1.5.1_coreos.0
    command:
    - /hyperkube
    - proxy
    - --master=https://172.17.8.221:443
    - --kubeconfig=/etc/kubernetes/worker-kubeconfig.yaml
    securityContext:
      privileged: true
    volumeMounts:
    - mountPath: /etc/ssl/certs
      name: "ssl-certs"
    - mountPath: /etc/kubernetes/worker-kubeconfig.yaml
      name: "kubeconfig"
      readOnly: true
    - mountPath: /etc/kubernetes/ssl
      name: "etc-kube-ssl"
      readOnly: true
  volumes:
  - name: "ssl-certs"
    hostPath:
      path: "/usr/share/ca-certificates"
  - name: "kubeconfig"
    hostPath:
      path: "/etc/kubernetes/worker-kubeconfig.yaml"
  - name: "etc-kube-ssl"
    hostPath:
      path: "/etc/kubernetes/ssl"
kubeconfig
配置文件如下:
# vim /etc/kubernetes/worker-kubeconfig.yaml
apiVersion: v1
kind: Config
clusters:
- name: local
  cluster:
    certificate-authority: /etc/kubernetes/ssl/ca.pem
users:
- name: kubelet
  user:
    client-certificate: /etc/kubernetes/ssl/worker.pem
    client-key: /etc/kubernetes/ssl/worker-key.pem
contexts:
- context:
    cluster: local
    user: kubelet
  name: kubelet-context
current-context: kubelet-context
启动服务
通过以下命令启动服务:
# systemctl daemon-reload
# systemctl start flanneld
# systemctl start kubelet
# systemctl enable flanneld
# systemctl enable kubelet
检查服务状态:
# systemctl status kubelet.service
kubectl配置
首先下载最新的kubectl程序:
# curl -O https://storage.googleapis.com/kubernetes-release/release/v1.5.1/bin/linux/amd64/kubectl
# chmod +x kubectl
# mv kubectl /usr/local/bin/kubectl
配置命令如下:
# cd YourDir/openssl/
# kubectl config set-cluster default-cluster --server=https://172.17.8.221 --certificate-authority=./ca.pem
# kubectl config set-credentials default-admin --certificate-authority=./ca.pem --client-key=./admin-key.pem --client-certificate=./admin.pem
# kubectl config set-context default-system --cluster=default-cluster --user=default-admin
# kubectl config use-context default-system
验证:
# kubectl get nodes
NAME           STATUS                     AGE
172.17.8.221   Ready,SchedulingDisabled   1d
172.17.8.222   Ready                      1d
172.17.8.223   Ready                      1d
# kubectl get pods --all-namespaces
插件安装
DNS插件
dns-addon.yml文件定义如下:
apiVersion: v1
kind: Service
metadata:
  name: kube-dns
  namespace: kube-system
  labels:
    k8s-app: kube-dns
    kubernetes.io/cluster-service: "true"
    kubernetes.io/name: "KubeDNS"
spec:
  selector:
    k8s-app: kube-dns
  clusterIP: 10.3.0.10
  ports:
  - name: dns
    port: 53
    protocol: UDP
  - name: dns-tcp
    port: 53
    protocol: TCP


---


apiVersion: v1
kind: ReplicationController
metadata:
  name: kube-dns-v20
  namespace: kube-system
  labels:
    k8s-app: kube-dns
    version: v20
    kubernetes.io/cluster-service: "true"
spec:
  replicas: 1
  selector:
    k8s-app: kube-dns
    version: v20
  template:
    metadata:
      labels:
        k8s-app: kube-dns
        version: v20
      annotations:
        scheduler.alpha.kubernetes.io/critical-pod: ''
        scheduler.alpha.kubernetes.io/tolerations:
'[{"key":"CriticalAddonsOnly", "operator":"Exists"}]'
    spec:
      containers:
      - name: kubedns
        image: gcr.io/google_containers/kubedns-amd64:1.8
        resources:
          limits:
            memory: 170Mi
          requests:
            cpu: 100m
            memory: 70Mi
        livenessProbe:
          httpGet:
            path: /healthz-kubedns
            port: 8080
            scheme: HTTP
          initialDelaySeconds: 60
          timeoutSeconds: 5
          successThreshold: 1
          failureThreshold: 5
        readinessProbe:
          httpGet:
            path: /readiness
            port: 8081
            scheme: HTTP
          initialDelaySeconds: 3
          timeoutSeconds: 5
        args:
        - --domain=cluster.local.
        - --dns-port=10053
        ports:
        - containerPort: 10053
          name: dns-local
          protocol: UDP
        - containerPort: 10053
          name: dns-tcp-local
          protocol: TCP
      - name: dnsmasq
        image: gcr.io/google_containers/kube-dnsmasq-amd64:1.4
        livenessProbe:
          httpGet:
            path: /healthz-dnsmasq
            port: 8080
            scheme: HTTP
          initialDelaySeconds: 60
          timeoutSeconds: 5
          successThreshold: 1
          failureThreshold: 5
        args:
        - --cache-size=1000
        - --no-resolv
        - --server=127.0.0.1#10053
        - --log-facility=-
        ports:
        - containerPort: 53
          name: dns
          protocol: UDP
        - containerPort: 53
          name: dns-tcp
          protocol: TCP
      - name: healthz
        image: gcr.io/google_containers/exechealthz-amd64:1.2
        resources:
          limits:
            memory: 50Mi
          requests:
            cpu: 10m
            memory: 50Mi
        args:
        - --cmd=nslookup kubernetes.default.svc.cluster.local 127.0.0.1
          >/dev/null
        - --url=/healthz-dnsmasq
        - --cmd=nslookup kubernetes.default.svc.cluster.local 127.0.0.1:10053
          >/dev/null
        - --url=/healthz-kubedns
        - --port=8080
        - --quiet
        ports:
        - containerPort: 8080
          protocol: TCP
      dnsPolicy: Default
启动该插件:
$ kubectl create -f dns-addon.yml
$ kubectl get pods --namespace=kube-system | grep kube-dns-v20
测试dns是否工作?
创建一个临时的Pod,在里面进行一次DNS查询,Pod描述文件如下:
$ vim busybox.yaml
apiVersion: v1
kind: Pod
metadata:
  name: busybox
  namespace: default
spec:
  containers:
  - image: busybox
    command:
      - sleep
      - "3600"
    imagePullPolicy: IfNotPresent
    name: busybox
  restartPolicy: Always
创建该服务:
$ kubectl create -f busybox.yaml
pod "busybox" created
$ kubectl exec busybox -- nslookup kubernetes
Server:    10.3.0.10
Address 1: 10.3.0.10 kube-dns.kube-system.svc.cluster.local

Name:      kubernetes
Address 1: 10.3.0.1 kubernetes.default.svc.cluster.local
$ kubectl get pods
NAME      READY     STATUS    RESTARTS   AGE
busybox   1/1       Running   0          <invalid>
由此得知该dns正常工作。
dashboard
配置文件有两个,一个是rc定义文件kube-dashboard-rc.yaml:
apiVersion: v1
kind: ReplicationController
metadata:
  name: kubernetes-dashboard-v1.4.1
  namespace: kube-system
  labels:
    k8s-app: kubernetes-dashboard
    version: v1.4.1
    kubernetes.io/cluster-service: "true"
spec:
  replicas: 1
  selector:
    k8s-app: kubernetes-dashboard
  template:
    metadata:
      labels:
        k8s-app: kubernetes-dashboard
        version: v1.4.1
        kubernetes.io/cluster-service: "true"
      annotations:
        scheduler.alpha.kubernetes.io/critical-pod: ''
        scheduler.alpha.kubernetes.io/tolerations:
'[{"key":"CriticalAddonsOnly", "operator":"Exists"}]'
    spec:
      containers:
      - name: kubernetes-dashboard
        image: gcr.io/google_containers/kubernetes-dashboard-amd64:v1.4.1
        resources:
          limits:
            cpu: 100m
            memory: 50Mi
          requests:
            cpu: 100m
            memory: 50Mi
        ports:
        - containerPort: 9090
        livenessProbe:
          httpGet:
            path: /
            port: 9090
          initialDelaySeconds: 30
          timeoutSeconds: 30
另一个是service定义文件kube-dashboard-svc.yaml:
apiVersion: v1
kind: Service
metadata:
  name: kubernetes-dashboard
  namespace: kube-system
  labels:
    k8s-app: kubernetes-dashboard
    kubernetes.io/cluster-service: "true"
spec:
  selector:
    k8s-app: kubernetes-dashboard
  ports:
  - port: 80
    targetPort: 9090
创建rc和service:
$ kubectl create -f kube-dashbard-rc.yaml
$ kubectl create -f kube-dashbard-svc.yaml
建立一个转发,从而可以在本地访问kubernetes dashboard:
$ kubectl get pods --namespace=kube-system
$ kubectl port-forward kubernetes-dashboard-v1.4.1-SOME-ID 9090
--namespace=kube-system
现在访问http://127.0.0.1:9090则可以直接访问到kubernetes dashboard.
或者,转发到特定端口:
$ kubectl port-forward kubernetes-dashboard-xxxxx 9081:9090
则访问http://127.0.0.1:9081即可访问到kube-ui.
heapster监控
heapster controller的定义文件如下:
apiVersion: extensions/v1beta1
kind: Deployment
metadata:
  name: heapster-v1.2.0
  namespace: kube-system
  labels:
    k8s-app: heapster
    kubernetes.io/cluster-service: "true"
    version: v1.2.0
spec:
  replicas: 1
  selector:
    matchLabels:
      k8s-app: heapster
      version: v1.2.0
  template:
    metadata:
      labels:
        k8s-app: heapster
        version: v1.2.0
      annotations:
        scheduler.alpha.kubernetes.io/critical-pod: ''
        scheduler.alpha.kubernetes.io/tolerations:
'[{"key":"CriticalAddonsOnly", "operator":"Exists"}]'
    spec:
      containers:
        - image: gcr.io/google_containers/heapster:v1.2.0
          name: heapster
          livenessProbe:
            httpGet:
              path: /healthz
              port: 8082
              scheme: HTTP
            initialDelaySeconds: 180
            timeoutSeconds: 5
          command:
            - /heapster
            - --source=kubernetes.summary_api:''
        - image: gcr.io/google_containers/addon-resizer:1.6
          name: heapster-nanny
          resources:
            limits:
              cpu: 50m
              memory: 92160Ki
            requests:
              cpu: 50m
              memory: 92160Ki
          env:
            - name: MY_POD_NAME
              valueFrom:
                fieldRef:
                  fieldPath: metadata.name
            - name: MY_POD_NAMESPACE
              valueFrom:
                fieldRef:
                  fieldPath: metadata.namespace
          command:
            - /pod_nanny
            - --cpu=80m
            - --extra-cpu=0.5m
            - --memory=140Mi
            - --extra-memory=4Mi
            - --threshold=5
            - --deployment=heapster-v1.2.0
            - --container=heapster
            - --poll-period=300000
            - --estimator=exponential
heapster-service的定义文件如下:
kind: Service
apiVersion: v1
metadata:
  name: heapster
  namespace: kube-system
  labels:
    kubernetes.io/cluster-service: "true"
    kubernetes.io/name: "Heapster"
spec:
  ports:
    - port: 80
      targetPort: 8082
  selector:
    k8s-app: heapster
创建controller及暴露服务:
$ kubectl create -f heapster-controller.yaml
$ kubectl create -f heapster-service.yaml
查看集群信息:
$ kubectl cluster-info
Kubernetes master is running at https://172.17.8.221
Heapster is running at
https://172.17.8.221/api/v1/proxy/namespaces/kube-system/services/heapster
KubeDNS is running at
https://172.17.8.221/api/v1/proxy/namespaces/kube-system/services/kube-dns
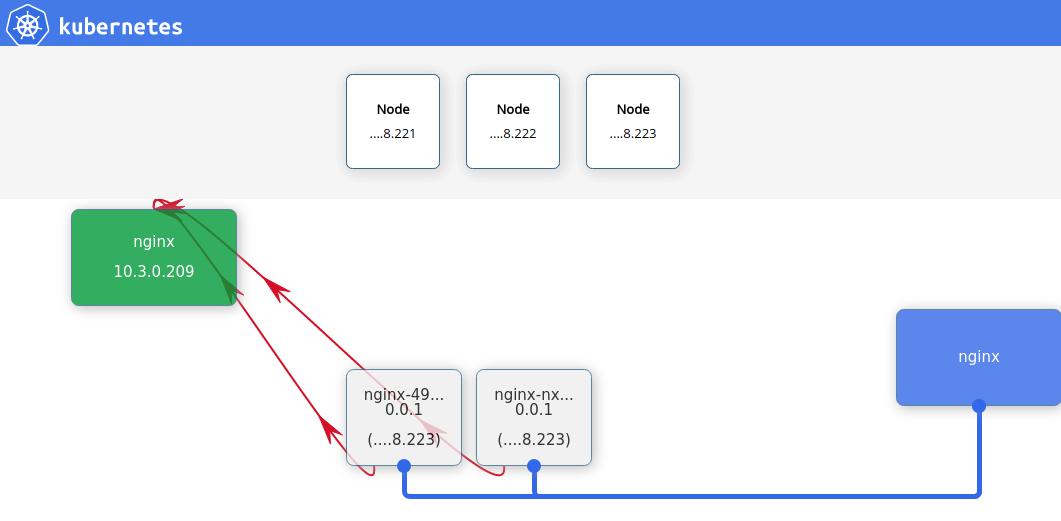
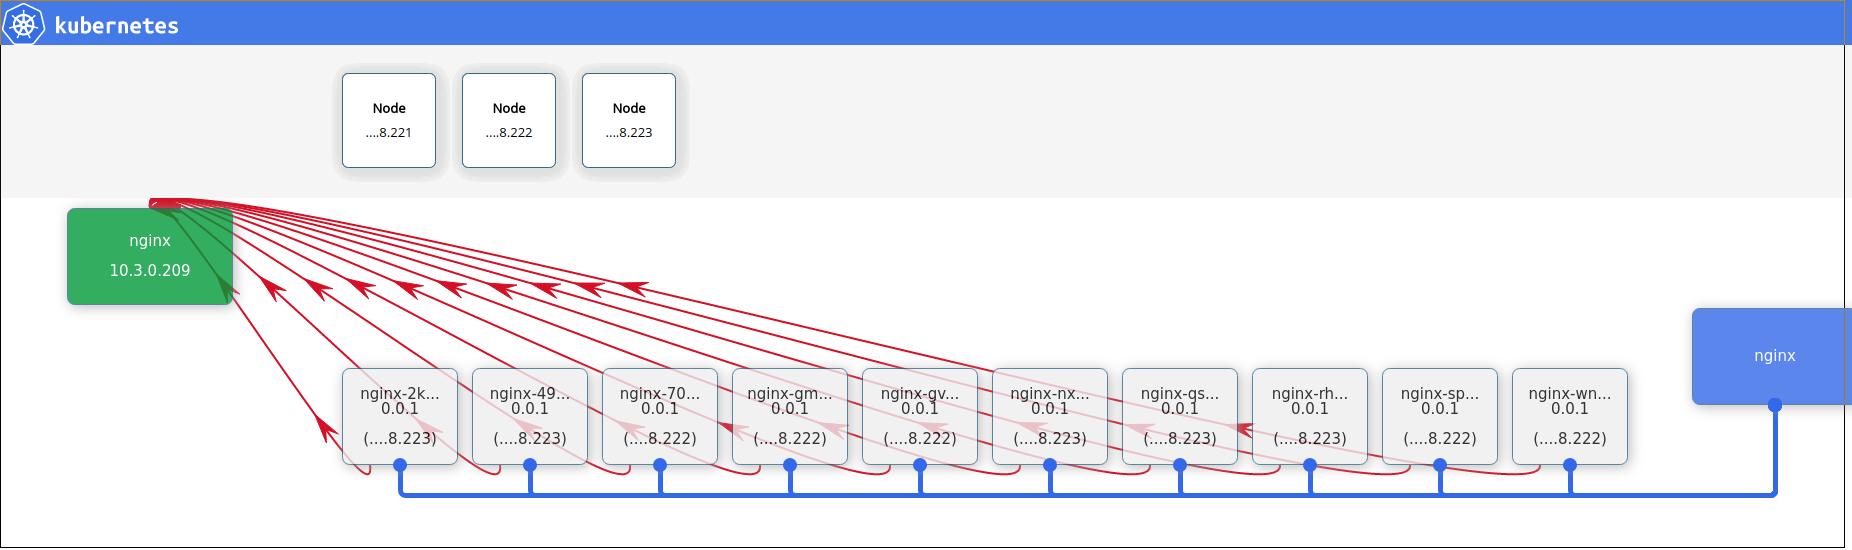
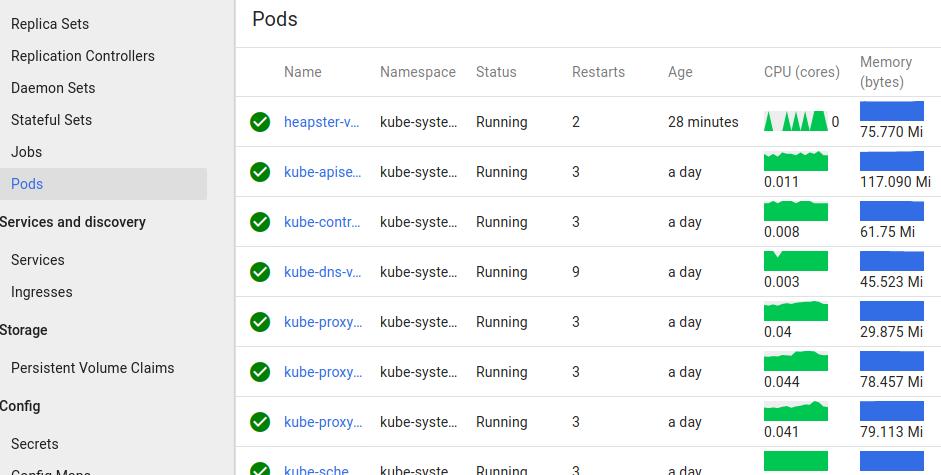
可以看到Heapster已经启动,而在kubernetes dashboard上此刻就可以看到监控信息了.

Dec 23, 2016
Technology这几天一直在把玩CoreOS,
主要参考的是DigitalOcean上的tutorial以及《CoreOS实践之路》这本书,
奈何文章离如今年代已经久远,一直搭建不成功. 几经周折后终于在一篇guideline
的指导下把负载均衡的服务跑通,这里是搭建该服务的步骤和心得。
参考网址:
http://blog.dixo.net/2015/02/load-balancing-with-coreos/
架构图
该网址中列举的的架构图如下:
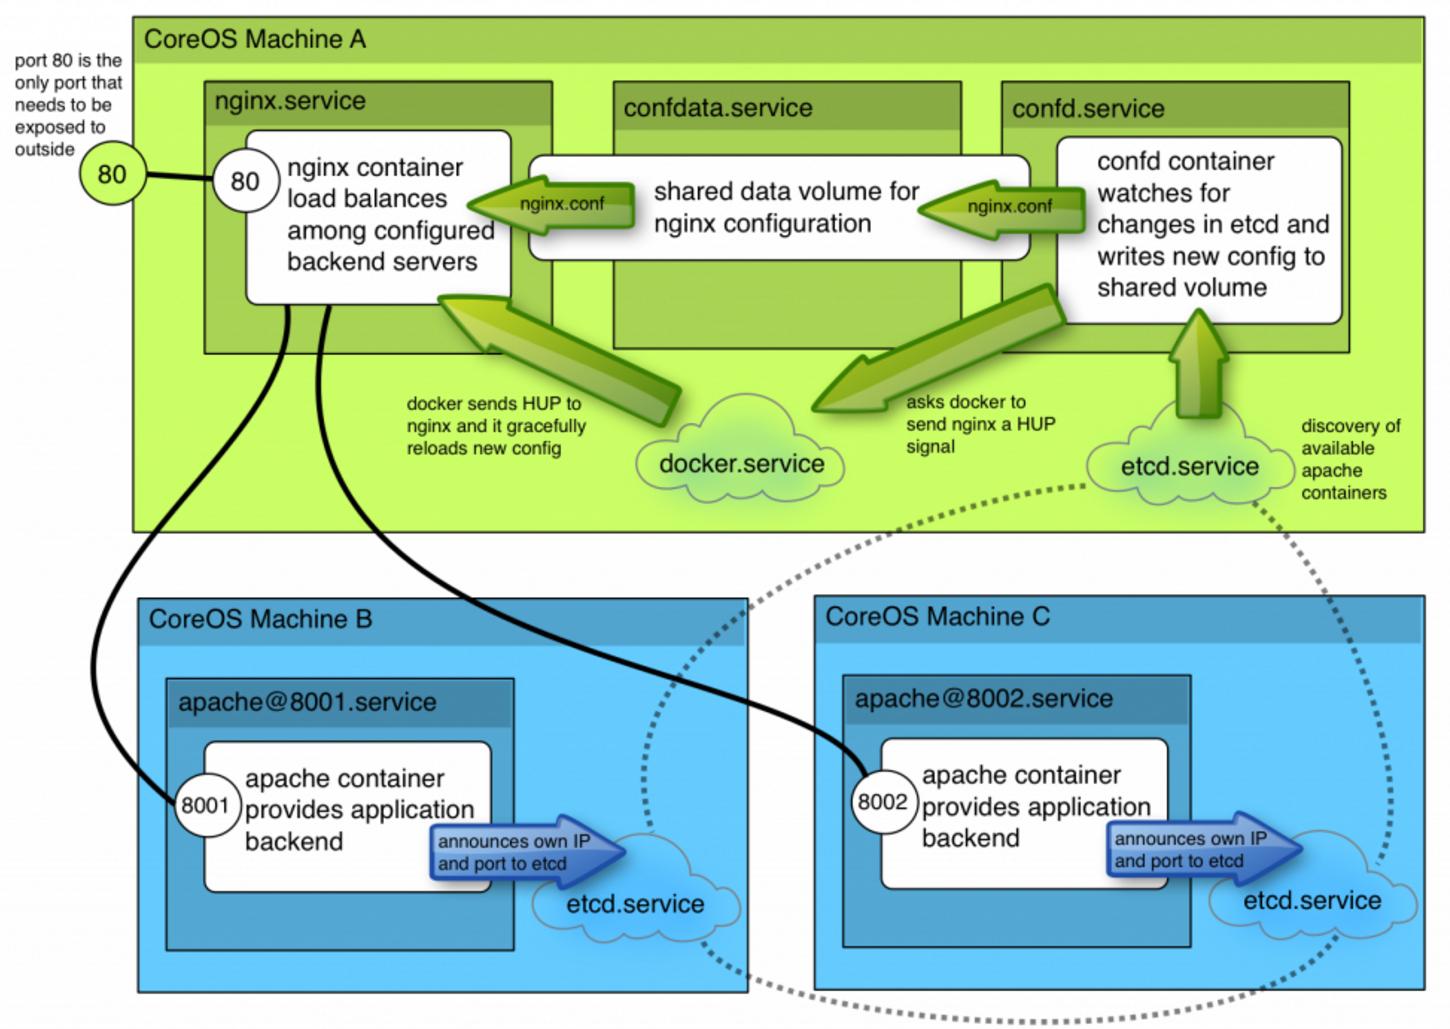
刚开始看到这个图是有点发蒙的,这里简单说一下操作步骤,与图中一一对应.
CoreOS Machine B和Core Machine C是两个CoreOS系统节点,位于其上分别
运行了两个apache容器,B上的容器监听8001端口,C上的容器监听8002端口。- 两个apache容器将自身的IP和端口发布到etcd服务(etcd.service).
CoreOS Machine A上运行了三个单元,分别是nginx服务、confdata服务、confd服务.
其中nginx服务在配置好的负载均衡后端上分发http请求。confdata服务主要用于
为nginx配置文件共享数据卷。confd服务查看etcd中元数据的变化,根据这些变化
在共享数据卷中写入新的配置文件.- 详细说明一下confd的作用,A. 发现coreos集群中可用的apache容器. B. 实时生成
nginx.conf文件,并将此文件写入到共享存储. C. 写入完成后,通知docker给nginx发送
一个HUP信号. D. Docker发送HUP信号给nginx容器后,容器将重新加载其配置文件。
以上就是我对架构图的解读。接下来将一步步来实现这个负载均衡。
先决条件
一个3节点的CoreOS集群
有效的/etc/environment文件(有时候需要手动生成)
相关的容器(制作流程见后)
容器镜像制作
Apache容器
在某台安装好Docker的机器上,或者直接在CoreOS节点机上,运行:
$ docker run -i -t ubuntu:14.04 /bin/bash
# apt-get update
# apt-get install apache2
# sudo bash
# echo "<h1>Running from Docker on CoreOS</h1>" > /var/www/html/index.html
# exit
现在开始打包容器:
$ docker ps -l
$ docker commit  container_ID dash/apache
$ docker save dash/apache>myapache.tar
将生成的tar文件分发到所有CoreOS节点上,使用docker load<./myapache.tar加载之.
nginx容器
直接使用官方的nginx:latest即可
nginx-lb容器
使用Dockerfile生成:
$ vim Dockerfile
FROM ubuntu:14.04

RUN apt-get update && \
    DEBIAN_FRONTEND=noninteractive apt-get -y install curl && \
    curl -o /usr/bin/confd -L https://github.com/kelseyhightower/confd/releases/download/v0.7.1/confd-0.7.1-linux-amd64 && \
    chmod 755 /usr/bin/confd  && curl -sSL http://acs-public-mirror.oss-cn-hangzhou.aliyuncs.com/docker-engine/internet | sh -

ADD etc/confd/ /etc/confd

CMD /usr/bin/confd -interval=60 -node=http://$COREOS_PRIVATE_IPV4:4001
编译方法为sudo docker build -t myconfd .
而后的打包和解包方法同上。奇怪的是,我制作的镜像到最后居然无法启动,所以直接pull
了作者制作的镜像:
$ sudo docker pull lordelph/confd-demo
创建apache服务
创建apache.service配置文件如下:
$ vim apache.service
[Unit]
Description=Basic web service port %i
After=docker.service
Requires=docker.service

[Service]
EnvironmentFile=/etc/environment
ExecStartPre=-/usr/bin/docker kill apache-%i
ExecStartPre=-/usr/bin/docker rm apache-%i
ExecStartPre=/usr/bin/etcdctl set /test/apache-%i ${COREOS_PRIVATE_IPV4}:%i
ExecStart=/usr/bin/docker run --rm --name apache-%i -p ${COREOS_PRIVATE_IPV4}:%i:80 dash/apache  /usr/sbin/apache2ctl -D FOREGROUND
ExecStop=/usr/bin/etcdctl rm /test/apache-%i
ExecStop=/usr/bin/docker stop -t 3 apache-%i
这里要说明的几点是: 在创建该服务前将清空该节点上所有的同名容器运行历史,并在etcd中设置
一个键值为/test/apache-%i的数据条目。关闭该服务则停止容器的运行,并删除该键值.
COREOS_PRIVATE_IPV4这个值由/etc/environment中给出,因而事先需要
在每个节点上核查是否存在该值:
core@coreos1 ~/lb $ cat /etc/environment
COREOS_PUBLIC_IPV4=172.17.8.201
COREOS_PRIVATE_IPV4=172.17.8.201
apache-%i里的端口参数可以在启动时给定, %i占位符将被@后的值所代替。创建服务步骤如下:
$ ln -s apache.service apache@8001.service
$ ln -s apache.service apache@8002.service
$ fleetctl start apache@8001.service
$ fleetctl start apache@8002.service
查看运行的服务单元:
$ fleetctl list-units
UNIT			MACHINE				ACTIVE	SUB
apache@8001.service	bea5741d.../172.17.8.203	active	running
apache@8002.service	dd464e69.../172.17.8.202	active	running
检查etcd中新添加的值:
$ etcdctl ls /test
/test/apache-8001
/test/apache-8002
key对应的value:
$ etcdctl get /test/apache-8001
172.17.8.203:8001
confd数据卷
用于创建confd数据卷的service定义文件如下:
$ vim confdata.service
[Unit]
Description=Configuration Data Volume Service
After=docker.service
Requires=docker.service

[Service]
EnvironmentFile=/etc/environment

#we aren't a normal service, we just need to ensure that a data volume
#exists, and create one if it doesn't
Type=oneshot
RemainAfterExit=yes

ExecStartPre=-/usr/bin/docker rm conf-data
ExecStart=/usr/bin/docker run -v /etc/nginx --name conf-data nginx echo "created new data container"
这里的技巧在于oneshot属性,它告知systemd我们只希望该服务运行且只运行一次。RemainAfterExit告诉
服务正常退出,因而我们可以在正常推出的服务上使用它创建的数据卷。
运行该服务:
$ fleetctl start confdata.service
$ fleetctl list-units
UNIT			MACHINE				ACTIVE	SUB
apache@8001.service	bea5741d.../172.17.8.203	active	running
apache@8002.service	dd464e69.../172.17.8.202	active	running
confdata.service	f22aee5d.../172.17.8.201	active	exited
可以使用以下一系列命令检查我们生成的数据卷, 注意要使用root才能看到该卷里的实际内容:
$ docker volume ls
DRIVER              VOLUME NAME
local               c19a35d3db97340272f5d191b166710f6fbb1d717225d9762417fa51c7a56b1f
core@coreos1 ~/lb $ docker volume inspect c19a35d3db97340272f5d191b166710f6fbb1d717225d9762417fa51c7a56b1f
[
    {
        "Name": "c19a35d3db97340272f5d191b166710f6fbb1d717225d9762417fa51c7a56b1f",
        "Driver": "local",
        "Mountpoint": "/var/lib/docker/volumes/c19a35d3db97340272f5d191b166710f6fbb1d717225d9762417fa51c7a56b1f/_data",
        "Labels": null
    }
]
core@coreos1 ~/lb $ sudo bash
coreos1 lb # cd /var/lib/docker/volumes/c19a35d3db97340272f5d191b166710f6fbb1d717225d9762417fa51c7a56b1f/_data
coreos1 _data # ls
conf.d  fastcgi_params  koi-utf  koi-win  mime.types  modules  nginx.conf  scgi_params  uwsgi_params  win-utf
confd服务
confd.service文件定义如下:
$ vim confd.service
[Unit]
Description=Configuration Service

#our data volume must be ready
After=confdata.service
Requires=confdata.service


[Service]
EnvironmentFile=/etc/environment


#kill any existing confd
ExecStartPre=-/usr/bin/docker kill %n
ExecStartPre=-/usr/bin/docker rm %n

#preload container...this ensures we fail if our registry is down and we can't
#obtain the build we're expecting

#we need to provide our confd container with the IP it can reach etcd
#on, the docker socket so it send HUP signals to nginx, and our data volume
ExecStart=/usr/bin/docker run --rm \
  -e COREOS_PRIVATE_IPV4=${COREOS_PRIVATE_IPV4} \
  -v /var/run/docker.sock:/var/run/docker.sock \
  --volumes-from=conf-data \
  --name %n \
  lordelph/confd-demo

ExecStop=/usr/bin/docker stop -t 3 %n
Restart=on-failure

[X-Fleet]
#we need to be on the same machine as confdata.service
MachineOf=confdata.service
注意,我们这里直接使用了网页中作者制作的镜像,指定了conf-data数据卷(--volumes-from=conf-data).
$ fleetctl list-units
UNIT			MACHINE				ACTIVE	SUB
apache@8001.service	bea5741d.../172.17.8.203	active	running
apache@8002.service	dd464e69.../172.17.8.202	active	running
confd.service		f22aee5d.../172.17.8.201	active	running
confdata.service	f22aee5d.../172.17.8.201	active	exited
检查配置文件是否被更新:
coreos1 _data # grep -A6 'upstream backend' ./nginx.conf
    upstream backend {

            server 172.17.8.202:8002;

            server 172.17.8.203:8001;

    }
coreos1 _data # pwd
/var/lib/docker/volumes/c19a35d3db97340272f5d191b166710f6fbb1d717225d9762417fa51c7a56b1f/_data
或者直接进入容器检查:
# docker run --rm -ti --volumes-from=conf-data nginx \
# grep -A6 'upstream backend' /etc/nginx/nginx.conf
    upstream backend {

            server 172.17.8.101:8001;

            server 172.17.8.102:8002;

    }
nginx服务
这个服务很简单,定义文件如下:
$ vim nginx.service
[Unit]
Description=Nginx Service
After=confd.service

#we won't want it to require the service - that would stop us restarting
#it, which is safe
#Requires=confd.service

[Service]
EnvironmentFile=/etc/environment
ExecStartPre=-/usr/bin/docker kill %n
ExecStartPre=-/usr/bin/docker rm %n
#ExecStartPre=/usr/bin/docker pull nginx
ExecStart=/usr/bin/docker run --name %n -p 80:80 --volumes-from=conf-data nginx
ExecStop=/usr/bin/docker stop -t 3 %n
Restart=on-failure

[X-Fleet]
#we need to be on the same machine as confdata
MachineOf=confdata.service
这个服务被定义为只能在运行了confdata.service的机器上运行,实际上因为我们为了使用
conf-data数据卷。
启动并检查服务:
$ fleetctl start nginx.service
$ fleetctl list-units
UNIT			MACHINE				ACTIVE	SUB
apache@8001.service	bea5741d.../172.17.8.203	active	running
apache@8002.service	dd464e69.../172.17.8.202	active	running
confd.service		f22aee5d.../172.17.8.201	active	running
confdata.service	f22aee5d.../172.17.8.201	active	exited
nginx.service		f22aee5d.../172.17.8.201	active	running
测试
打开浏览器,访问172.17.8.201,即可看到apache服务的页面。
可以使用tcpdump来查看流量走向,然而需要安装toolbox: /usr/bin/toolbox.