May 8, 2024
TechnologyThe default networking bridge incusbr0 enabled the dhcp by default, that’s not good for using dhcpd service in containers, so I have to remove the default behavior of the incusbr0, and add a new behavior for it.
Directly delete the bridge will get an error:
$ incus network delete incusbr0
Error: The network is currently in use
Show this network’s usage:
$ incus network show incusbr0
config:
  ipv4.address: 10.147.148.1/24
  ipv4.nat: "true"
  ipv6.address: none
description: ""
name: incusbr0
type: bridge
used_by:
- /1.0/instances/fogincuschinese
- /1.0/instances/foginlxc
- /1.0/profiles/default
managed: true
status: Created
locations:
- none
Edit its profile:
$ incus profile edit default
config: {}
description: Default Incus profile
devices:
-  eth0:
-    name: eth0
-    network: incusbr0
-    type: nic
  root:
    path: /
    pool: default
    type: disk
name: default
used_by:
- /1.0/instances/foginlxc
- /1.0/instances/fogincuschinese
Now you could delete this networking via:
$ incus network delete incusbr0
Network incusbr0 deleted
RE-create the networking via following command(dhcpv4/v6 disabled):
$ incus network create incusbr0 ipv4.dhcp=false ipv6.dhcp=false ipv4.address=10.147.148.1/24
Network incusbr0 created
Check this networking:
$ ip a show incusbr0
10: incusbr0: <NO-CARRIER,BROADCAST,MULTICAST,UP> mtu 1500 qdisc noqueue state DOWN group default qlen 1000
    link/ether 00:16:3e:c9:c4:e6 brd ff:ff:ff:ff:ff:ff
    inet 10.147.148.1/24 scope global incusbr0
       valid_lft forever preferred_lft forever
    inet6 fd42:1515:fb8e:9dab::1/64 scope global
       valid_lft forever preferred_lft forever
RE-Add the networking profile into default:
$ incus profile edit default
...
description: Default Incus profile
devices:
+  eth0:
+    name: eth0
+    network: incusbr0
+    type: nic
  root:
...
Re-lauch the previously stopped container instance:
$ incus start fogincuschinese
$ incus list
+-----------------+---------+-----------------------+-----------------------------------------------+-----------+-----------+
|      NAME       |  STATE  |         IPV4          |                     IPV6                      |   TYPE    | SNAPSHOTS |
+-----------------+---------+-----------------------+-----------------------------------------------+-----------+-----------+
| fogincuschinese | RUNNING | 10.147.148.100 (eth0) | fd42:1515:fb8e:9dab:216:3eff:fef3:8307 (eth0) | CONTAINER | 0         |
+-----------------+---------+-----------------------+-----------------------------------------------+-----------+-----------+
Until now you could enable the dhcpd in container and then use forwarding rules for redirect to host.
Final command:
incus network create incusbr0 ipv4.dhcp=false ipv4.address=10.147.148.1/24 ipv4.nat=true ipv6.address=none
Apr 28, 2024
TechnologyBridge ways:
Create incus instance:
$ incus launch images:debian/12 fogserver
$ incus list
+-----------+---------+----------------------+-----------------------------------------------+-----------+-----------+
|   NAME    |  STATE  |         IPV4         |                     IPV6                      |   TYPE    | SNAPSHOTS |
+-----------+---------+----------------------+-----------------------------------------------+-----------+-----------+
| fogserver | RUNNING | 10.238.20.219 (eth0) | fd42:9396:9aca:8842:216:3eff:fe04:5da6 (eth0) | CONTAINER | 0         |
+-----------+---------+----------------------+-----------------------------------------------+-----------+-----------+
Configure the incus instance:
dash@hope:~$ incus exec fogserver bash
root@fogserver:~# vi /etc/apt/sources.list
root@fogserver:~# cat /etc/apt/sources.list
# Generated by distrobuilder
deb http://mirrors.ustc.edu.cn/debian bookworm main
deb http://mirrors.ustc.edu.cn/debian bookworm-updates main
deb http://mirrors.ustc.edu.cn/debian-security/ bookworm-security main
root@fogserver:~# apt update -y && apt install -y git
Fetch the source code:
root@fogserver:~# git clone https://github.com/fogproject/fogproject.git fogproject-master

Cloning into 'fogproject-master'...
remote: Enumerating objects: 158214, done.
remote: Counting objects: 100% (4216/4216), done.
remote: Compressing objects: 100% (1073/1073), done.
remote: Total 158214 (delta 3135), reused 4011 (delta 3023), pack-reused 153998
Receiving objects: 100% (158214/158214), 848.89 MiB | 14.41 MiB/s, done.
Resolving deltas: 100% (112946/112946), done.
root@fogserver:~# du -hs fogproject-master/
890M	fogproject-master/
Using fogserver in container is not a good idea.
Apr 28, 2024
Technology1. Install/Configuration
Import keyring:
mkdir -p /etc/apt/keyrings/
curl -fsSL https://pkgs.zabbly.com/key.asc -o /etc/apt/keyrings/zabbly.asc
update repository and install inpus:
apt update -y
apt install -y incus
 apt install -y incus-ui-canonical
incus config set core.https_address :8443
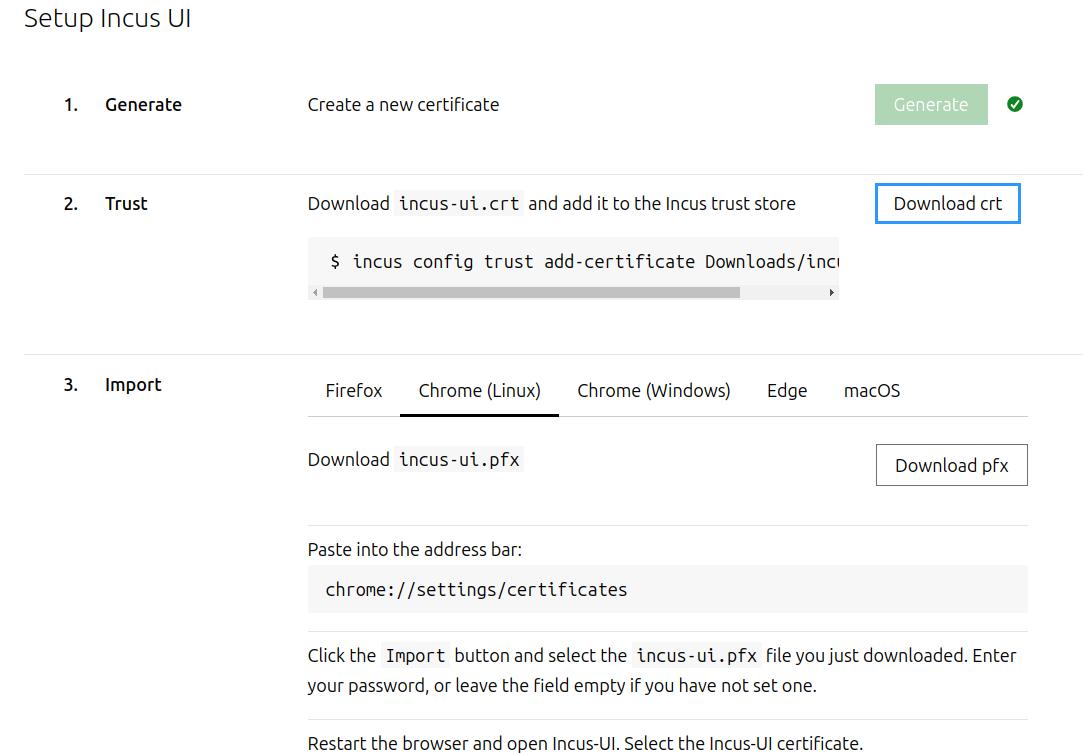
Generate cert file in browser:

In incus server:
root@hope:~# cp /home/dash/Downloads/incus-ui.crt ./Downloads/
root@hope:~# incus config trust add-certificate Downloads/incus-ui.crt
In browser:

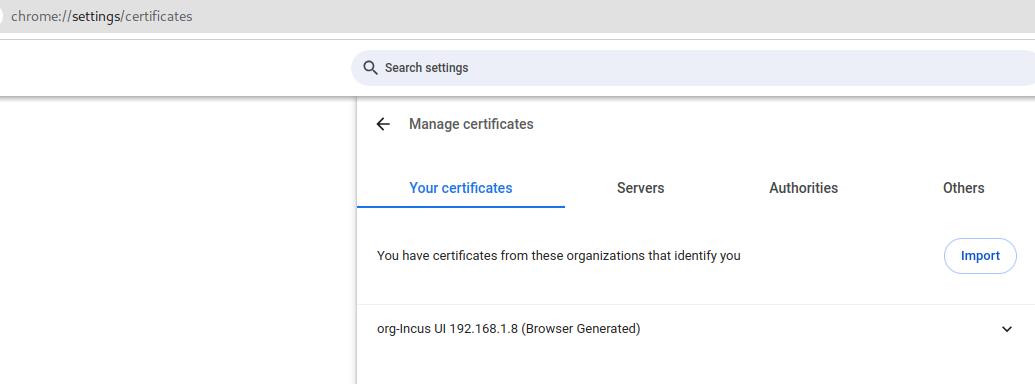
The import file should be:

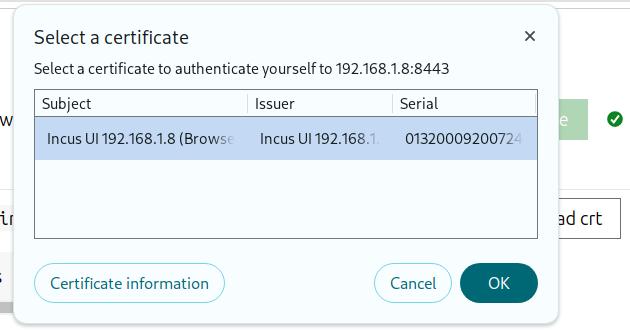
Then back to browser windows, confirm the imported cert:

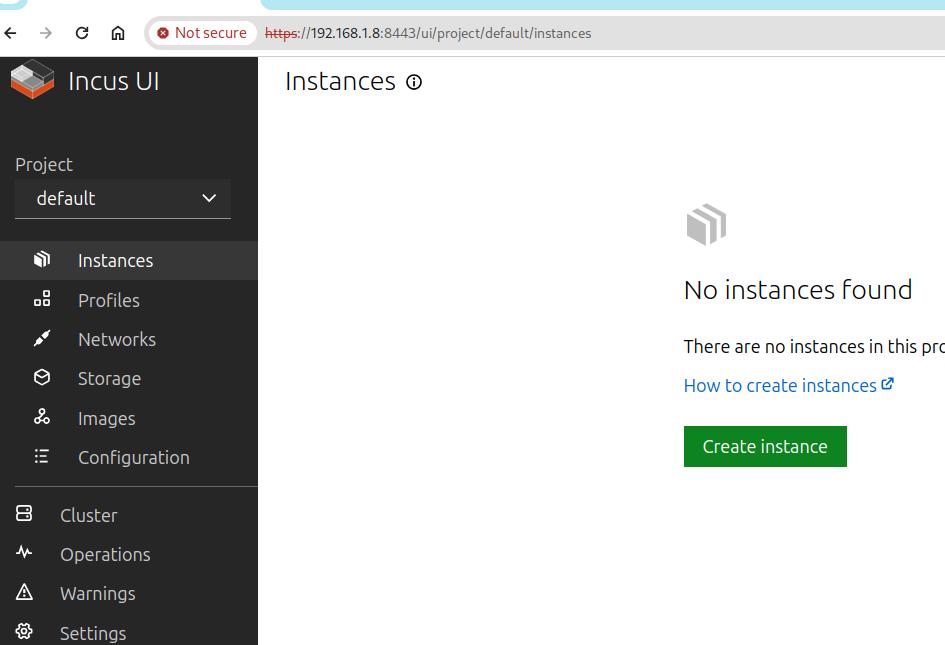
Your UI would be looks like:

Add your user into incus group:
sudo adduser dash incus-admin
Init the incus:
$ incus admin init
Would you like to use clustering? (yes/no) [default=no]:
Do you want to configure a new storage pool? (yes/no) [default=yes]:
Name of the new storage pool [default=default]:
Name of the storage backend to use (dir, lvm, lvmcluster, btrfs) [default=btrfs]: dir
Would you like to create a new local network bridge? (yes/no) [default=yes]:
What should the new bridge be called? [default=incusbr0]:
What IPv4 address should be used? (CIDR subnet notation, “auto” or “none”) [default=auto]:
What IPv6 address should be used? (CIDR subnet notation, “auto” or “none”) [default=auto]:
Would you like the server to be available over the network? (yes/no) [default=no]:
Would you like stale cached images to be updated automatically? (yes/no) [default=yes]: no
Would you like a YAML "init" preseed to be printed? (yes/no) [default=no]:
Create the first instance:
incus launch images:ubuntu/22.04 first
Finally we could remove lxd:
$ sudo snap remove lxd
2. images
list image:
$ incus image list
+-------+--------------+--------+----------------------------------------+--------------+-----------+-----------+----------------------+
| ALIAS | FINGERPRINT  | PUBLIC |              DESCRIPTION               | ARCHITECTURE |   TYPE    |   SIZE    |     UPLOAD DATE      |
+-------+--------------+--------+----------------------------------------+--------------+-----------+-----------+----------------------+
|       | 8b2691953577 | no     | Debian bookworm amd64 (20240424_05:24) | x86_64       | CONTAINER | 94.50MiB  | 2024/04/28 02:09 UTC |
+-------+--------------+--------+----------------------------------------+--------------+-----------+-----------+----------------------+
|       | 479d8812eada | no     | Ubuntu jammy amd64 (20240427_07:42)    | x86_64       | CONTAINER | 120.93MiB | 2024/04/28 01:55 UTC |
+-------+--------------+--------+----------------------------------------+--------------+-----------+-----------+----------------------+
incus remote show images repositories:
$ incus remote list
+-----------------+------------------------------------+---------------+-------------+--------+--------+--------+
|      NAME       |                URL                 |   PROTOCOL    |  AUTH TYPE  | PUBLIC | STATIC | GLOBAL |
+-----------------+------------------------------------+---------------+-------------+--------+--------+--------+
| images          | https://images.linuxcontainers.org | simplestreams | none        | YES    | NO     | NO     |
+-----------------+------------------------------------+---------------+-------------+--------+--------+--------+
| local (current) | unix://                            | incus         | file access | NO     | YES    | NO     |
+-----------------+------------------------------------+---------------+-------------+--------+--------+--------+
search images:
$ incus image list images: bookworm
+--------------------------------+--------------+--------+----------------------------------------+--------------+-----------------+-----------+----------------------+
|             ALIAS              | FINGERPRINT  | PUBLIC |              DESCRIPTION               | ARCHITECTURE |      TYPE       |   SIZE    |     UPLOAD DATE      |
+--------------------------------+--------------+--------+----------------------------------------+--------------+-----------------+-----------+----------------------+
| debian/12 (7 more)             | 2b5e45154f58 | yes    | Debian bookworm amd64 (20240424_05:24) | x86_64       | VIRTUAL-MACHINE | 349.13MiB | 2024/04/24 00:00 UTC |
+--------------------------------+--------------+--------+----------------------------------------+--------------+-----------------+-----------+----------------------+
| debian/12 (7 more)             | 8b2691953577 | yes    | Debian bookworm amd64 (20240424_05:24) | x86_64       | CONTAINER       | 94.50MiB  | 2024/04/24 00:00 UTC |
+--------------------------------+--------------+--------+----------------------------------------+--------------+-----------------+-----------+----------------------+
| debian/12/arm64 (3 more)       | dbba0a514259 | yes    | Debian bookworm arm64 (20240424_05:24) | aarch64      | CONTAINER       | 91.50MiB  | 2024/04/24 00:00 UTC |
+--------------------------------+--------------+--------+----------------------------------------+--------------+-----------------+-----------+----------------------+
| debian/12/arm64 (3 more)       | e2fc3247a569 | yes    | Debian bookworm arm64 (20240424_05:24) | aarch64      | VIRTUAL-MACHINE | 338.21MiB | 2024/04/24 00:00 UTC |
+--------------------------------+--------------+--------+----------------------------------------+--------------+-----------------+-----------+----------------------+
....
launch:
incus launch -p default -p bridgeprofile images:debian/12 kissdebian
Apr 25, 2024
TechnologyFrom Makefile:
O ?= ./build
......
$O/bootx64.efi: $O/chainload/loader.efi $O/vmlinuz $O/initrd.cpio.xz
	$O/chainload/unify-kernel $@ \
		linux=$O/vmlinuz \
		initrd=$O/initrd.cpio.xz \
		cmdline=config/cmdline-5.4.117.txt
file content:
kkk@kkk:~/safeboot-loader$ ls build/chainload/loader.efi
build/chainload/loader.efi
kkk@kkk:~/safeboot-loader$ file build/chainload/loader.efi
build/chainload/loader.efi: PE32+ executable (EFI application) x86-64 (stripped to external PDB), for MS Windows
kkk@kkk:~/safeboot-loader$ ls build/chainload/loader.efi  -l -h
-rwxrwxr-x 1 idv idv 52K  4月 18 14:32 build/chainload/loader.efi
kkk@kkk:~/safeboot-loader$ vim build/chainload/loader.efi
kkk@kkk:~/safeboot-loader$ ls build/vmlinuz
build/vmlinuz
kkk@kkk:~/safeboot-loader$ ls build/vmlinuz  -l -h
-rw-rw-r-- 1 idv idv 2.5M  4月 18 10:12 build/vmlinuz
kkk@kkk:~/safeboot-loader$ ls build/initrd.cpio.xz -l -h
-rw-rw-r-- 1 idv idv 13M  4月 18 14:32 build/initrd.cpio.xz
kkk@kkk:~/safeboot-loader$ ls config/cmdline-5.4.117.txt
config/cmdline-5.4.117.txt
kkk@kkk:~/safeboot-loader$ cat config/cmdline-5.4.117.txt
earlyprintk=serial,ttyS0,115200 console=tty0 console=ttyS0,115200 noefi acpi=of
Apr 24, 2024
TechnologyAdd custom menu after the default menu:
root@vhdboot:/boot/efi/grub# diff grub.cfg grub.cfg.backback
2664,2666d2663
< if [ -e $vt_plugin_path/ventoy/ventoy_grub.cfg ]; then
<     source $vt_plugin_path/ventoy/ventoy_grub.cfg
< fi
2675,2679c2672,2675
<     source $vt_plugin_path/ventoy/ventoy_grub.cfg
<     #menuentry "$NO_ISO_MENU (Press enter to reboot ...)" {
<     #    echo -e "\n    Rebooting ... "
<     #    reboot
<     #}
---
>     menuentry "$NO_ISO_MENU (Press enter to reboot ...)" {
>         echo -e "\n    Rebooting ... "
>         reboot
>     }
Ventoy configuration files:
root@vhdboot:/boot/efi/grub# cat /mnt8/ventoy/ventoy.json
{
    "control": [
	            { "VTOY_MENU_LANGUAGE": "zh_CN" },
		            { "VTOY_MENU_TIMEOUT": "3" },
        { "VTOY_DEFAULT_SEARCH_ROOT": "/HHHISO1" }
    ]
}
root@vhdboot:/boot/efi/grub# cat /mnt8/ventoy/ventoy_grub.cfg
menuentry 'Ubuntu' --class ubuntu --class gnu-linux --class gnu --class os $menuentry_id_option 'gnulinux-simple-d68c23a7-3d0b-4113-9127-8dac01ec1b29' {
	insmod gzio
	insmod part_gpt
	insmod ext2
	set root='hd0,gpt3'
	if [ x$feature_platform_search_hint = xy ]; then
	  search --no-floppy --fs-uuid --set=root --hint-bios=hd0,gpt3 --hint-efi=hd0,gpt3 --hint-baremetal=ahci0,gpt3  d68c23a7-3d0b-4113-9127-8dac01ec1b29
	else
	  search --no-floppy --fs-uuid --set=root d68c23a7-3d0b-4113-9127-8dac01ec1b29
	fi
	linux	/boot/vmlinuz-6.5.0-28-generic root=UUID=d68c23a7-3d0b-4113-9127-8dac01ec1b29 ro  quiet splash $vt_handoff
	initrd	/boot/initrd.img-6.5.0-28-generic
}

menuentry "Boot Windows10" {
    set my_vhd_path="/HHHISO/win10.vhdx"

    if search -n -s vdiskhd -f "$my_vhd_path"; then
        vhdboot_common_func "($vdiskhd)$my_vhd_path"
    else
        echo "$my_vhd_path not found"
    fi
}

menuentry "Boot Windows11" {
    set my_vhd_path="/HHHISO/win11.vhdx"

    if search -n -s vdiskhd -f "$my_vhd_path"; then
        vhdboot_common_func "($vdiskhd)$my_vhd_path"
    else
        echo "$my_vhd_path not found"
    fi
}


menuentry 'Arch(linuxloop)' --class 'arch' {
	rmmod tpm
	img_path="/home/test/arch.img"
	img_uuid="6ab60fa1-d874-4b84-99d9-8ac0230f0303"
	search --no-floppy --set=root --file "${img_path}"
	loopback loop "${img_path}"
	linuxloops_args="rdinit=/linuxloops img_path=${img_path} img_uuid=${img_uuid}"
	export linuxloops_args
	if [ -f (loop,2)/grub2/grub.cfg ]; then
		configfile (loop,2)/grub2/grub.cfg
	else
		configfile (loop,2)/grub/grub.cfg
	fi
}


