Mar 3, 2017
LinuxTips1. CloudStack Issue
On ubuntu1404/1604, the template should enable HVM.
Its partition size should less than the primary storage size.
Password reset issue: Ubuntu1604, failed.
Ubuntu14.04 startup too slow, because of ntp, remove it sudo update-rc.d -f ntp remove
2. Ubuntu16.04 cloudstack-pass issue
The reset-password script is located as
/etc/init.d/cloud-set-guest-password, then we could do following
configurations:
Remove the services via:
# update-rc.d -f cloud-set-guest-password remove
# cp /etc/init.d/cloud-setup-guest-password /usr/bin/
# chmod 777 /usr/bin/cloud-setup-guest-password
Before because you set update-rc.d cloud-set-guest-password defaults 98, so
first you should remove it.
Then Create a systemd service as /lib/systemd/system/cloudpassword.service:
[Unit]
Description=cloudpass container

[Service]
Type=idle
Restart=always
ExecStart=/usr/bin/cloud-set-guest-password
ExecStop=/usr/bin/echo hello

[Install]
WantedBy=multi-user.target
Enable the service via:
# systemctl enable cloudpassword
After the network is online:
# systemctl enable systemd-networkd-wait-online.service
The steps could refers to another article.
3. XenServer Timezone
Switch to UTC time:
# cp /usr/share/zoneinfo/UTC /etc/localtime
4. Gitbook serve ports
Listening on other ports:
$ gitbook --port 14001 serve
5. Quickstart For ShadowSocks
Install and configuration steps are listed as following(Ubuntu16.04):
# apt-get install python-pip
# pip install --upgrade pip
# pip install shadowsocks
# touch /etc/shadowsocks.json
{
"server":"1xx.xxx.xxx.xxx",
"server_port":19175,
"local_address":"127.0.0.1",
"local_port":1080,
"password":"XXXXXXXXXXXXXXXXXXXXXXx",
"timeout":300,
"method":"aes-256-cfb",
"fast_open":false
}
# vim /etc/rc.local
ssserver -c /etc/shadowsocks.json -d start
Now you could continue to configure your shadowsocks client side.
6. MariaDB In Docker
Connect to existing docker-composed mariadb instance via following command:
sudo docker run -it -v /var/download/sbt/lili:/var/lib/mysql --link mariadb:mymariadb --net lilimarleen_default mariadb:latest /bin/bash
root@5d7eadc81b9e:/# mysql -h172.18.0.3 -P3306 -uroot -pexample
Welcome to the MariaDB monitor.  Commands end with ; or \g.
Your MariaDB connection id is 35
Server version: 10.1.20-MariaDB-1~jessie mariadb.org binary distribution

Copyright (c) 2000, 2016, Oracle, MariaDB Corporation Ab and others.

Type 'help;' or '\h' for help. Type '\c' to clear the current input statement.

MariaDB [(none)]> \q
Bye
-v is for using local volume for restoring aims.
--link is for linking to existing instance.
-net could be get via docker net list.
7. cdn speedup
For speed-up my blog, I changed the fonts/css from the template’s default
location to http://www.bootcdn.cn/?, this cdn’s speed is pretty good, the
speed has been greatly improved.
8. git diff
First use git log for getting all of the commit history, then you could get
the md5 for each commitment, git diff md51 md52 you could easily get the
differences.
9. qemu issue
When meeting guest has not initialize the display (yet), do following:
$ sudo qemu-system-x86_64 -net nic -net user,hostfwd=tcp::2222-:22 -hda ./test.qcow2 -boot d -cdrom /mnt/CentOS-7-x86_64-Everything-1611.iso -m 2048 --enable-kvm -vga virtio
-vga virtio solves this issue.
10. bashrc execution
Run bashrc at ArchLinux:
$ vim ~/.bash_profile
if [ -f ~/.bashrc ]; then
  . ~/.bashrc
fi
$ vim ~/.bashrc
Then all of the items in .bashrc could be executed.
11. Shared bash history
Add following lines in to ~/.bashrc:
HISTSIZE=9000
HISTFILESIZE=$HISTSIZE
HISTCONTROL=ignorespace:ignoredups

history() {
  _bash_history_sync
  builtin history "$@"
}

_bash_history_sync() {
  builtin history -a         #1
  HISTFILESIZE=$HISTSIZE     #2
  builtin history -c         #3
  builtin history -r         #4
}

PROMPT_COMMAND=_bash_history_sync
12. ArchLinux virtual network start failed
Issue:
when I start a virtual network named 'default' (created by libvirt), it occur that:
"Error starting network 'default': internal error: Failed to initialize a valid firewall backend".
Solution:
$ sudo pacman -S  ebtables dnsmasq
$ sudo systemctl restart libvirtd
then you could get your libvirtd networking work properly.
13. Network Manager Configuration
https://fedoraproject.org/wiki/Networking/Bridging
14. Enable vncserver in firewalld
Manually enable the vnc-server service, then you could use vncviewer for
connecting the vnc server in ArchLinux:
# firewall-cmd --zone=public --add-service=vnc-server
Related commands:
List services:
# firewall-cmd --zone=public --list-services
Get all of the listed services:
# firewall-cmd --get-services
Get all of the zones:
# firewall-cmd --get-active-zones
# firewall-cmd --get-zones
# firewall-cmd --get-default-zone
15. Execute mysql command
Execute like following:
mysql -u $user -p$passsword -Bse "command1;command2;....;commandn"
16. Generate the md5 encrypted passwd
Generate md5 encrypted passwd using passlib:
$ sudo pip2 install passlib
$ python2 -c "from passlib.hash import sha512_crypt; import getpass; print sha512_crypt.encrypt(getpass.getpass())"
17. Quickly setup nginx
In archlinux, do following:
$ sudo pacman -S nginx
$ sudo vim /etc/nginx/nginx.conf
        location / {
            root   /media/sdb;
            index  index.html index.htm;
	    autoindex on;
        }
$ sudo systemctl enable nginx
$ sudo systemctl start nginx
Then you could see the nginx running on your server.
18. minikube quickstart on archlinux
Install and running minikube via:
$ yaourt minikube
$ wget https://github.com/dhiltgen/docker-machine-kvm/releases/download/v0.7.0/docker-machine-driver-kvm
$ sudo mv docker-machine-driver-kvm /usr/local/bin
$ sudo chmod 777 /usr/local/bin/*
$ sudo minikube start --vm-driver kvm
$ curl -Lo kubectl https://storage.googleapis.com/kubernetes-release/release/v1.5.3/bin/linux/amd64/kubectl && chmod +x kubectl && sudo mv kubectl /usr/local/bin/
Then you could begin using minikube.
19. Golang building
When using hugo for building, the travis-ci complains:
enc.SetIndent undefined
Solved via edit the .travis.yml file
go:
-    - 1.6
+    - 1.7
Dependency on golang 1.7 solves the problem.
20. Auto start default gw
Start the default network for virsh via:
$ sudo virsh net-start default
21. ArchLinux fonts
Install fonts via:
$ sudo pacman -S adobe-source-han-sans-cn-fonts adobe-source-han-sans-tw-fonts
And mac fonts via:
$ yaourt ttf-mac-fonts
22. Detect Windows
Detect Windows via:
$ sudo apt-get install os-prober
$ sudo os-prober
$ sudo update-grub
23. Upgrade Shadowsocks
UPgrade the shadowsocks, so you could get more powerful tools..
$  pip install --upgrade pi
$ sudo pip install --upgrade shadowsocks
24. vagrant ssh
The configuration of vagrant ssh could be viewd via:
$ vagrant ssh-config
25. k8s iptables issue
Add this service named iptableslast.service, enable and start the service,
then system will run iptables once for setup the rules.
[Unit]
Description=iptables last rule

[Service]
Type=idle
Restart=on-failure
ExecStart=/sbin/iptables -P FORWARD ACCEPT
ExecStop=/usr/bin/echo hello

[Install]
WantedBy=multi-user.target
26. Install vagrant plugins(specified version)
Specified the version of plugins:
vagrant plugin install --plugin-version 0.0.37 vagrant-libvirt
27. nested kvm in CentOS7
Enable it via following commands:
[root@dlp ~]# vi /etc/modprobe.d/kvm-nested.conf
# create new
options kvm_intel nested=1
[root@dlp ~]# modprobe -r kvm_intel # unload
[root@dlp ~]# modprobe kvm_intel # reload again
[root@dlp ~]# cat /sys/module/kvm_intel/parameters/nested
Y# just enabled
28. vagrant-libvirt issue
The eth1 won’t be startup, so manually execute service network restart in
CentOS7.
29. Save/Load Docker images
https://gist.github.com/hydra1983/22b2bed38b4f5f56caa87c830c96378d
Commandline:
$ ./docker_images.sh save_images
$ ./docker_images.sh load_images
30. yum download src rpms
yum download the packages src via:
# yum install yum-utils
# yumdownloader --source mypkg
30. Quickstart VPS(CentOS6)
Lizcat, since the centos 6 won’t support docker well, switches to Ubuntu
# wget -O /etc/yum.repos.d/epel.repo http://mirrors.aliyun.com/repo/epel-6.repo
# yum install -y python-pip wget
31, Downgrade packages in archlinux
via yaourt downgrade, then downgrade the package name.
32. Issues for Gzlib
clearing the cookie, then you could login, or you won’t be logined into the
system.
33. Install haroopad
Via following steps:
解压haroopad-v0.13.1-x64.tar.gz
cd /usr/local/src
sudo mkdir haroopad
sudo tar -zxvf haroopad-v0.13.1-x64.tar.gz -C haroopad

之后会出现如下内容
control.tar.gz
data.tar.gz
debian-binary

解压 data.tar.gz,并将其子目录下边的内容拷贝到 “/” 目录下
tar zxvf data.tar.gz
sudo cp -r ./usr /

解压control.tar.gz,并赋予755权限
tar zxf control.tar.gz
chmod 755 postinst
sudo ./postinst
34. hostname without restart
Simply try hostname YourNewHostName, it could immediately change your
hostname, without a restart.
35. Make partition larger than 2T
Your should use parted rather than fdisk, cause parted could support gpt mode.
# parted /dev/sdb     #使用parted来对GPT磁盘操作,进入交互式模式
(parted) mklabel gpt   # 将MBR磁盘格式化为GPT
(parted) mkpart primary ext4 0% 100%    将所有容量分为一个主分区
(parted) p    #打印当前分区
(parted) q    #退出
36. Oracle DB Installation issue
On pdksh missing.
Solution

Solution for 11.2.0.3 64-bit (x86-64)

If you have downloaded the 11.2.0.3 media from My Oracle Support (MOS) and extracted the software to <path>/database, do the following:

Change directory to <path>/database/stage/cvu/cv/admin
Backup cvu_config cp cvu_config backup_cvu_config
Edit cvu_config and change the following line CV_ASSUME_DISTID=OEL4 to CV_ASSUME_DISTID=OEL6
Save the updated cvu_config file
Install the 11.2.0.3 software using:
<path>/database/runInstaller
cd <path>/database
./runInstaller
OUI should now perform the OEL6 prerequisite checks (which are identical to the RHEL6 prerequisite checks) and no longer report that packages elfutils-libelf-devel-0.97 and pdksh-5.2.14 are missing
37. Ansible jinja issue
Changed from
  register: check_powershell5
  when: "{{ ansible_PSVersionTable.Major|int < 5 }}"
  tags: win_powershell
to
  register: check_powershell5
  when: ansible_PSVersionTable.Major|int < 5
  tags: win_powershell
could solve the jinjia problem, when statements should not include jinja2 templating delimiters such as {{ }} or {% %}.
38. Docker dm.basesize
For building larger docker image, you have to enable dm.basesize, however
the docker’s new version have to specify more parameters, the example is
listed as:
ExecStart=/usr/bin/dockerd -s devicemapper --storage-opt dm.basesize=50G --registry-mirror=http://1a653205.m.daocloud.io -H fd://
39. Samba issue
Add samba user and set its username/passwd via:
# useradd xxx
# smbpasswd -a xxx
40. Customized ssh key for vagrant
Add following definition into the vagrantfile:
config.ssh.private_key_path = "/home/joseph/.ssh/id_rsa"
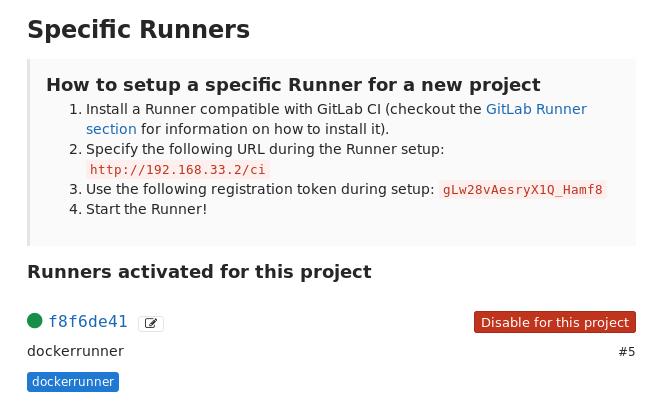
41. Manually setup runner
When the runner is not set, do enable this manually for project:
42. tar without folder prefix
You could do via following ways:
cd src/
tar czf ${topdir}/SOURCES/${PKGNAME}.tar.gz $1
cd ..
Or:
tar czf ${topdir}/SOURCES/${PKGNAME}.tar.gz -C src/ .
43. 7zip split files
Using following command:
# 7z a -tzip -v1024m secondnode
Recover:
# 7z e xxx.zip.001
44. rhel download
http://linuxfly.org/post/659/
hald introduction:
https://systembash.com/disabling-the-hald-addon-storage-service-on-centosredhat/
The hald – Hardware Access Layer Daemon – runs several processes in order to keep track of what hardware is installed on your system. This includes polling USB Drives and ‘hot-swap’ devices to check for changes along with a host of other tasks.

You might see it running on your system as follows:

2474 ? S 0:00 \_ hald-runner
2481 ? S 0:00 \_ hald-addon-acpi: listening on acpid socket /var/run/acpid.socket
2487 ? S 0:00 \_ hald-addon-keyboard: listening on /dev/input/event0
2495 ? S 41:47 \_ hald-addon-storage: polling /dev/hdc

If your system is static and the devices do not change, you can actually disable this service using a policy entry.

Create a file in your policy directory, for example /etc/hal/fdi/policy/99-custom.fdi. Add the text:
Solved(completely disable hald):
https://zhuqy.wordpress.com/2011/04/07/disable-the-hald-addon-storage-completely/

<?xml version="1.0" encoding="UTF-8"?>

<deviceinfo version="0.2">
	<device>
		<match key="storage.removable" bool="true">
			<remove key="info.addons" type="strlist">hald-addon-storage</remove>
		</match>
	</device>
</deviceinfo>
46. vagrant and ansible
After created vagrant, use ansible the following way:
$ ansible --private-key=~/.vagrant.d/insecure_private_key -u vagrant ...
for testing module ping/command, etc.
47. clean deb pkgs
via apt-get clean, then you could get the clean directory.
https://www.digitalocean.com/community/tutorials/how-to-deploy-wordpress-with-shipyard-on-ubuntu-14-04
Startup:
https://juejin.im/entry/588940fc2f301e0069b2397d
49. Cowsay fortune
Add following items in your ~/.zshrc, then cowsay will always say blablabla:
if [ -x /usr/bin/cowsay -a -x /usr/bin/fortune ]; then
    fortune | cowsay
fi
50. EDRAW
Good software for drawing pictures.
51. graphviz
http://dockone.io/article/2495
52. Memory Checking
http://blog.csdn.net/beckdon/article/details/36174925
use last reboot for checking the reboot reason.
use cat /var/log/messages | more for knowing the detailed reason.
53. virsh net-autostart
Previously I found my virsh network default won’t startup automatically, so I
add one tips in ~/.config/awesome/rc.lua, but yesterday I found one tip for
adding the default network auto-start:
$ sudo virsh net-autostart default
So from now on my default networking for libvirt will start automatically
every time.
54. Capture with filename in xclip
I changed my mycapscr to following, so I could save 3 seconds for each
screenshot.
scrot -s '%Y_%m_%d_%H_%M_%S_$wx$h.jpg' -e 'mv $f ~/capscr/'
ls -lt ~/capscr | sed -n 2p | awk {'print $9'} | xclip -r
55. Convert from vagrant to kvm
First you have to find the vmdk files of vagrant, then convert it from vmdk to
qcow2:
$ sudo qemu-img convert -f vmdk -O qcow2 box-disk001.vmdk gitlab.qcow2
The gitlab.qcow2 is the one you want, enjoy it.
56. QuickStart For DCE
Install your own dce:
# gzip -dc dce-2.6.0.tar.gz | docker load
# bash -c "$(docker run --rm daocloud.io/daocloud/dce:2.6.0 install)"
57. vimdiff horizon
Press ctrl+w, then J
58. apt-get specify version
First you should use apt-cache policy xxxx to get all of the possible
version of this software, then, you specify the version in following command
like:
# sudo apt-get install gparted=0.16.1-1
59. qemu-kvm location in centos
In /usr/libexec/qemu-kvm.
60. Setup hostname
via nmtui in centos7 you could setup the hostname in centos7.
61. libvirt static IP
Via virsh net-dumpxml>abc.xml ; vim abc.xml; virsh net-define abc.xml, you
could edit your xml like following:
<ip address="192.168.122.1" netmask="255.255.255.0">
  <dhcp>
    <range start="192.168.122.100" end="192.168.122.254" />
    <host mac="00:16:3e:77:e2:ed" name="foo.example.com" ip="192.168.122.10" />
    <host mac="00:16:3e:3e:a9:1a" name="bar.example.com" ip="192.168.122.11" />
  </dhcp>
</ip>
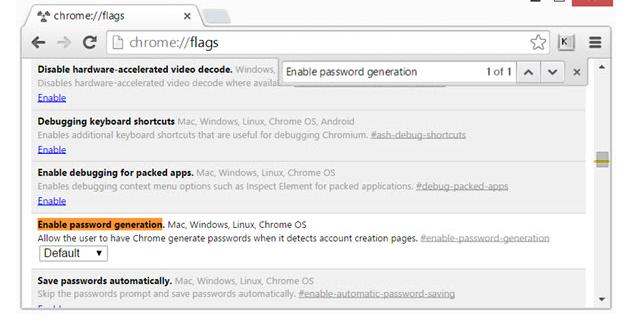
62. chromium passwd generator
64. rancheros set registry
Set the parameter of docker via following command:
$ sudo ros config get rancher.docker.insecure_registry
$ sudo ros config set rancher.docker.insecure_registry ["192.168.124.211:8088"]
more detailed parameters could be found at:
http://rancher.com/docs/os/v1.0/en/configuration/docker/
65. canary build/test
In software testing, a canary is a push of programming code changes to a small group of end users who are unaware that they are receiving new code. Because the canary is only distributed to a small number of users, its impact is relatively small and changes can be reversed quickly should the new code prove to be buggy. Canary tests, which are often automated, are run after testing in a sandbox environment has been completed.
Real meaning:
煤矿工人过去带着金丝雀下井。这种鸟对危险气体的敏感度超过人。如果金丝雀死了,矿工便知道井下有危险气体,需要撤离。」
原来 Canary build 是这个意思
66. docker cp
Directly copy from container to host via:
# docker cp 0a63783b716a:/root/d /tmp/
67. xrdp display error
When some window displayed error, using 24-bit color.
68. e-sata and udev
For using e-sata and udiskie, you have to change the following for using
properly:
➜  rules.d pwd
/etc/udev/rules.d
➜  rules.d cat 99-udisks2.rules
# UDISKS_FILESYSTEM_SHARED
# ==1: mount filesystem to a shared directory (/media/VolumeName)
# ==0: mount filesystem to a private directory (/run/media/$USER/VolumeName)
# See udisks(8)
ENV{ID_FS_USAGE}=="filesystem|other|crypto", ENV{UDISKS_FILESYSTEM_SHARED}="1"
Thus your disk will be mounted under in /media rather than in
/run/media/xxx, this means your directoy will be seemed as shared, so your
libvirt daemon will access it properly.
69. dashboard issue
dashbaord v1.6.2 has a bug that you could not get heapster info.
t is solved. This is a cluster issue. In 1.6.2 dashboard was building wrong path to heapster and there was always the same error that health check to heapster was failing because dashboard could not access it.
70. Write bat issues
Change new line from unix to windows:
# unix2dos xxxx
Change filename from UTF-8 to GBK:
# convmv -f zh_CN.UTF-8 -t GBK -r --notest ./
Change file content from UTF-8 to GBK:
# enca -L zh_CN -x GBK *
Refers to :
http://blog.csdn.net/a280606790/article/details/8504133
71. gitlab change ip
When changing ip in gitlab server, do following steps:
The correct place in an Omnibus install is:

/etc/gitlab/gitlab.rb
    external_url 'http://gitlab.example.com'
Finally, you'll need to execute sudo gitlab-ctl reconfigure and sudo gitlab-ctl restart so the changes apply.
72. Changing IP using bat
Read from the file, and generate the bat file with each person’s own ip
address setting.
#!/bin/sh
while read line
do
	#echo $line
	NAME=`echo $line|awk {'print $1'}`
#	echo $NAME
	IP=`echo $line|awk {'print $4'}`
#	echo $IP
	ORG=`echo $line|awk {'print $2'}`
#	echo $ORG
        echo -n 'netsh interface ipv4 delete dnsservers "本地连接" all'>${NAME}_${ORG}.bat
	echo 'netsh interface ipv4 set address name="本地连接" static 192.168.103.'${IP} '255.255.255.0 192.168.103.1'>>${NAME}_${ORG}.bat
done<inhuajing.txt
73. Windows uptime
View windows uptime via:
systeminfo
74. Timezone change in CentOS
Via following commands:
# timedatectl set-timezone America/Chicago
Verify new settings by typing the following two commands:
# date
# ls -l /etc/localtime
75. Forwarding to vm traffic
In host machine, do following, then you could forwarding the traffic from host
machine 2222 to vm(192.168.122.203)‘s 22 port.
$sudo iptables -t nat -A PREROUTING -p tcp --dport 2222 -j DNAT --to-destination 192.168.122.203:22
$sudo iptables -t nat -A POSTROUTING -p tcp --dport 22 -d 192.168.122.203 -j SNAT --to 192.168.122.1
76. Install htpasswd
Install htpasswd in archlinux via yaourt apache-tools.
77. Write back to Write Through
Via following command:

78. archlinux offline
https://bbs.archlinux.org/viewtopic.php?id=229502
79. git
git file too large


