Jun 22, 2017
Technology背景
内网工作环境下,无法联网安装软件,所以需要制作rhel6的docker镜像,用于离线安装、验证、部署等过程。
准备
需要准备一台基于virtualbox的rhel65虚拟机。
一台安装了docker的Centos7或者ubuntu的物理机。
rhel65安装光盘.
步骤
启动rhel65虚拟机,将rhel65的iso挂载到virtualbox虚拟机上.
登录到虚拟机后,执行以下命令:
# mkdir -p /mnt/rhel6-repo
# mount /dev/sr0 /mnt/rhel6-repo
# mkdir /root/rhel6-root
# rpm --root /root/rhel6-root/ --initdb
# rpm --root /root/rhel6-root/ -ivh /mnt/rhel6-repo/Packages/redhat-release-server-6Server-6.5.0.1.el6.x86_64.rpm
# cd /root/rhel6-root/
# cd etc/yum.repos.d
# rm -f *.repo
# vim rhel6.repo
[rhel6]
baseurl=file:///mnt/rhel6-repo
enabled=1
gpgcheck=0
# rpm --root /root/rhel6-root --import /mnt/rhel6-repo/RPM-GPG-KEY-redhat-*
# yum -y --installroot=/root/rhel6-root install yum which vim
安装完毕后,将/root/rhel6-root目录拷贝到安装好docker的物理机,执行以下命令打包成docker镜像:
# tar -C rhel6-root/ -c . | docker import - rhel65
# docker images | grep rhel65
现在你拥有了自己的rhel65镜像,可以直接运行之。
Jun 21, 2017
TechnologyPrerequisites
From docker images Centos:6.6.
Steps
Environment Preparation
Start the docker instance:
$ sudo docker run -it centos:6.6 /bin/bash
Install the dev environment(C):
# yum install -y rpm-build rpmdevtools vim gcc tar openssh-clients
Create the macro for rpmbuild, and setup the rpm build tree:
# vim /root/.rpmmacros
%_topdir    /root/rpmbuild
# rpmdev-setuptree
C Project
Refers to:
https://blog.packagecloud.io/rpm/rpmbuild/packaging/2015/06/29/building-rpm-packages-with-rpmbuild/
Verification
Using a new docker instance, then you could verify your rpm installation and
uninstallation.
On Building wget
Refers to:
http://www.winseliu.com/blog/2016/04/04/rpm-build-your-package/
# sudo docker run -it centos:6.6 /bin/bash
# yum install -y which tree lrzsz tar gcc rpm-build which tree lrzsz tar gcc gnutls gnutls-devel
# mkdir -p /home/mywget
# cd /home/mywget
# mkdir BUILD RPMS SOURCES SPECS SRPMS
# cd /home/mywget/SOURCES
# wget wget's source code from ftp.gnu.org
eg. http://ftp.gnu.org/gnu/wget/wget-1.18.tar.gz
# rpmbuild --showrc
# rpm --eval "%{_topdir}"
# grep -i _topdir /usr/lib/rpm/rpmrc /usr/lib/rpm/redhat/rpmrc /usr/lib/rpm/macros /usr/lib/rpm/redhat/macros  | less
/usr/lib/rpm/macros:%_builddir          %{_topdir}/BUILD
/usr/lib/rpm/macros:%_rpmdir            %{_topdir}/RPMS
/usr/lib/rpm/macros:%_sourcedir         %{_topdir}/SOURCES
/usr/lib/rpm/macros:%_specdir           %{_topdir}/SPECS
/usr/lib/rpm/macros:%_srcrpmdir         %{_topdir}/SRPMS
/usr/lib/rpm/macros:%_buildrootdir              %{_topdir}/BUILDROOT
/usr/lib/rpm/macros:%_topdir            %{getenv:HOME}/rpmbuild
# cat ~/.rpmmacros
%_topdir /home/mywget/rpm
Edit the SPECS/wget.spec:
# this is a sample spec file for wget

%define _topdir /home/mywget
%define name    wget
%define release 2
%define version 1.18

%define _unpackaged_files_terminate_build 0

Summary:   GNU wget
License:   GPL
Name:      %{name}
Version:   %{version}
Release:   %{release}
Source:    %{name}-%{version}.tar.gz
Prefix:    /usr
Group:     Development/Tools

%description
The GNU wget program downloads files from the Internet using the command-line.

%prep
%setup -q

%build
./configure --sysconfdir=/etc
make

%install
make install prefix=$RPM_BUILD_ROOT/usr # or use DESTDIR=$RPM_BUILD_ROOT

%post
echo "hello world"

%preun
echo "bye"

%clean
rm -rf $RPM_BUILD_ROOT

%files
%defattr(-, root, root)
/usr/bin/wget
Build the package via:
# rpmbuild -vv -bb --clean SPECS/wget.spec
# tree
.
├── BUILD
├── BUILDROOT
├── rpm
│   ├── BUILD
│   ├── BUILDROOT
│   ├── RPMS
│   ├── SOURCES
│   ├── SPECS
│   └── SRPMS
├── RPMS
│   └── x86_64
│       ├── wget-1.18-2.x86_64.rpm
│       └── wget-debuginfo-1.18-2.x86_64.rpm
├── SOURCES
│   └── wget-1.18.tar.gz
├── SPECS
│   └── wget.spec
└── SRPMS
Verify:
#  sudo docker run -it -v /home/dash/dockerv:/mnt centos:6.6 /bin/bash
# yum localinstall -y wget-1.18-2.x86_64.rpm
Binary files packaging using rpm is also very easy to adapt.
Jun 20, 2017
Technology背景
调研RHEL6.5, 为了在vagrant环境中验证我们的修改,故创建该系统的vagrant box
准备
Virtualbox 5.1.22 r115126, vagrant 1.9.1, CentOS 7.3(host机器)
创建一台虚拟机,配置如下:
内存: 512 m
网卡: NAT, port forward: 2223 -> 22
硬盘: 40 G
声卡: 禁用
用RHEL 6.5的ISO安装系统,安装完毕之后,将自动重启。
配置
激活网络,通过配置/etc/sysconfig/network-scripts/ifcfg-eth0,
设置为boot=yes.
安装完毕后,依然插入RHEL 6.5 ISO, 将其挂载到/mnt目录,并配置本地安装源:
# mount /dev/sr0 /mnt
# vim /etc/yum.repos.d/local.repo
[local]
name=local
baseurl=file:///mnt
enabled=1
gpgcheck=0
# yum makecache&&yum install -y vim kernel-devel gcc bzip2
添加vagrant用户:
# useradd -m vagrant
# passwd vagrant
# cp /root/.bashrc /home/vagrant/.bashrc
# chmod 777 /home/vagrant/.bashrc
# chown -R vagrant /home/vagrant/.bashrc
添加vagrant用户到visudo:
# visudo
vagrant ALL=(ALL)	NOPASSWD:ALL
Defaults:vagrant	!requiretty
if you have make vagrant to be the member of %wheel, be sure to add
nopassword for this group.
预置ssh-key:
# mkdir -p /home/vagrant/.ssh
# chmod 0700 /home/vagrant/.ssh
# wget --no-check-certificate \
    https://raw.github.com/mitchellh/vagrant/master/keys/vagrant.pub \
    -O /home/vagrant/.ssh/authorized_keys
# chmod 0600 /home/vagrant/.ssh/authorized_keys
# chown -R vagrant /home/vagrant/.ssh
配置ssh登录:
# vim /etc/ssh/sshd_config
AuthorizedKeysFile .ssh/authorized_keys
Edit your /etc/default/grub. Change the line from
GRUB_CMDLINE_LINUX=""
to
GRUB_CMDLINE_LINUX="net.ifnames=0 biosdevname=0"
# grub-mkconfig -o /boot/grub/grub.cfg
Edit the network configuration:
# vim /etc/network/interfaces
auto eth0
iface eth0 inet dhcp
# chsh vagrant
/bin/bash
# cp /home/xxx/.bashrc /home/vagrant/.bashrc
# cp /home/xxx/.bash_logout /home/vagrant/.bash_logout
# cp /home/xxx/.profile /home/vagrant/.profile
# vim /home/vagrant/.profile
add
[ -z "$BASH_VERSION" ] && exec /bin/bash -l
# sudo chsh -s /bin/bash vagrant
VBoxAdditional iso
在虚拟机的界面上点击Device -> Install Guest Additional CD image, 而后:
# mount /dev/sr0 /mnt
# cd /mnt
# ./VBoxLinuxAdditions.run
压缩
使用dde命令清除空余空间:
# dd if=/dev/zero of=/EMPTY bs=1M && rm -f /EMPTY
# shutdown -h now
形成rhel vagrant包:
# vagrant package --base rhelbox
测试
安装镜像文件:
# vagrant box add package.box --name "rhel65"
# vagrant init rhel65
# vagrant up
CentOS7
First you have to copy /etc/sysconfig/network-scripts/ifcfg-enp0sxxx to
/etc/sysconfig/network-scripts/ifcfg-eth0, and edit its configuration by
replacing enp0sx to eth0, then you have to edit the grub configuration for
naming from enp0sx to eth0:
Edit your /etc/default/grub. Change the line from
GRUB_CMDLINE_LINUX=""
to
GRUB_CMDLINE_LINUX="net.ifnames=0 biosdevname=0"
Finally you make the new configuration for grub2:
# grub2-mkconfig -o /boot/grub2/grub.cfg
if you have make vagrant to be the member of %wheel, be sure to add
nopassword for this group.
Ignore VBoxAddons
Ignore synced_folder definition in Vagrantfile:
  config.vm.synced_folder "../data", "/vagrant_data",  disabled: true
  config.vm.synced_folder ".", "/vagrant", disabled: true
Update for rhel7
After changing the grub configuration, do following:
# grub2-mkconfig -o /boot/grub2/grub.cfg
Change the networking via(old one to new one):
# cd /etc/sysconfig/network-scripts/
# mv ifcfg-xxxx ifcfg-eth0
Jun 14, 2017
Technology背景
设置GitLabCI的流程。
使用两台虚拟机节点来实现GitLab服务器/GitLabCI节点, CI工作节点。
硬件配置:
GitLab服务器及CI节点: 2核3G内存。
CI工作节点: 2核2G内存。
运行系统: CentOS 7.3 X86_64
GitLab节点配置
gitlab-ce
配置gitlab-ce库及安装gitlab-ce:
# vim /etc/yum.repos.d/gitlab-ce.repo
[gitlab-ce]
name=gitlab-ce
baseurl=http://mirrors.tuna.tsinghua.edu.cn/gitlab-ce/yum/el7
repo_gpgcheck=0
gpgcheck=0
enabled=1
gpgkey=https://packages.gitlab.com/gpg.key
# yum makecache && yum install -y gitlab-ce
配置gitlab-ce并使能服务:
# gitlab-ctl reconfigure
# firewall-cmd --permanent --add-service=http
如果你的机器没有开启firewalld, 则firewalld这条命令则无需键入。
gitlab-ci-multi-runner
配置gitlab-ci-multi-runner库:
# vim /etc/yum.repos.d/gitlab-ce.repo
[gitlab-ci-multi-runner]
name=gitlab-ci-multi-runner
baseurl=http://mirrors.tuna.tsinghua.edu.cn/gitlab-ci-multi-runner/yum/el7
repo_gpgcheck=0
gpgcheck=0
enabled=1
gpgkey=https://packages.gitlab.com/gpg.key
安装gitlab-ci:
# yum makecache && yum install -y gitlab-ci-multi-runner
现在访问http://192.168.33.2,则可进入到gitlab的配置页面,设置root及用户密码.
GitLab Ci Runner节点
安装上面的gitlab-ci-multi-runner即可
安装完以后,配置如下:
# gitlab-ci-multi-runner register
配置例子如下:
# cat /etc/gitlab-runner/config.toml
concurrent = 4
check_interval = 0

[[runners]]
  name = "shellrunner"
  url = "http://192.168.33.2/ci"
  token = "0e39a08e63d4c4355e9dae4e3784ab"
  executor = "shell"
  [runners.cache]

[[runners]]
  name = "ourtester"
  url = "http://192.168.33.2/ci"
  token = "605a6900c4805efa1e52629391ac32"
  executor = "shell"
  [runners.cache]

[[runners]]
  name = "dockerrunner"
  url = "http://192.168.33.2/ci"
  token = "f8f6de41ddfe4a2dcf1e792df6c1c4"
  executor = "docker"
  [runners.docker]
    tls_verify = false
    image = "node:4.5.0"
    privileged = false
    disable_cache = false
    volumes = ["/cache","/root/m2:/root/.m2"]
    pull_policy = "if-not-present"
    shm_size = 0
  [runners.cache]
因为我们需要使用docker,所以在该节点上要安装最新版的docker:
# curl -sSL http://acs-public-mirror.oss-cn-hangzhou.aliyuncs.com/docker-engine/internet | sh -
# docker version
Client:
 Version:      17.05.0-ce
......
更新: aliyun不可用,所以换到官方源上:
# sudo yum install -y yum-utils
# sudo yum-config-manager \
    --add-repo \
    https://download.docker.com/linux/centos/docker-ce.repo
# yum install docker-ce
# docker version
Client:
 Version:	18.03.0-ce
 API version:	1.37
 Go version:	go1.9.4
 Git commit:	0520e24
 Built:	Wed Mar 21 23:09:15 2018
 OS/Arch:	linux/amd64
 Experimental:	false
 Orchestrator:	swarm
Cannot connect to the Docker daemon at unix:///var/run/docker.sock. Is the docker daemon running?
# systemctl start docker
# systemctl enable docker
配置
在project下可以找到的runner配置信息如下:
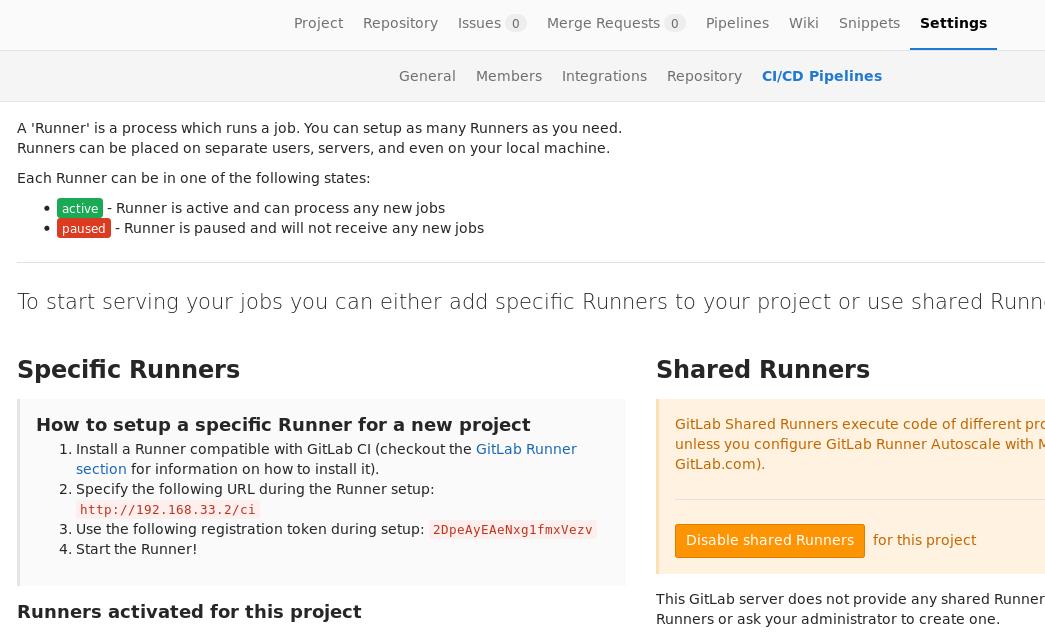
注意 Specify the following URL during the Runner setup: http://192.168.33.2/ci
和Use the following registration token during setup: 2DpeAyEAeNxg1fmxVezv
这两个和我们在上面注册runner的时候所需要填的是一样的。
创建完Project firstproject后,可以使用以下命令拷贝到本地:
# git clone git@192.168.33.2:root/firstproject.git
项目配置
创建一个.gitlab-ci.yml文件于firstproject的目录下:
image: "my3dlib:latest"
stages:
  - dependencies
  - build
  - test
  - deploy

ceres-build:
  stage: dependencies
  script:
    - export I3D_CERES_VERSION=1.11.0
    - wget --quiet http://192.168.33.1/ceres-solver-1.11.0.tar.gz
    - mkdir ceres-source ceres-build ceres-install
    - tar xvfz ceres-solver-1.11.0.tar.gz -C ceres-source --strip-components=1
    - cmake -Bceres-build -Hceres-source
    - make -j$(nproc) -C ceres-build
    - make -C ceres-build install DESTDIR=../ceres-install
    - bash .gitlab_build_files/build_ceres_debian_pkg.sh
  artifacts:
    paths:
    - i3d-ceres_*_amd64.deb
  tags:
    - dockerrunner
    #- linux,debian-jessie
cores-test:
  stage: test
  script:
    - cat /proc/cpuinfo && df -h
cores-deploy:
  stage: deploy
  script:
    - ssh-keyscan -H 192.168.33.1 >> ~/.ssh/known_hosts
    - sshpass -p xxxxx scp -P 22 i3d-ceres_*_amd64.deb dash@192.168.33.1:/tmp/
我们在这里还使用到了build_ceres_debian_pkg.sh文件,这个文件是用于编译deb包的,内容如下:
# mkdir -p .gitlab_build_files
# vim .gitlab_build_files/build_ceres_debian_pkg.sh
#! /usr/bin/env bash

fpm \
-t deb \
-s dir \
-C ceres-install \
--name "i3d-ceres" \
--version 1.11.0 \
--license "BSD" \
--vendor "ICG TU Graz" \
--category "devel" \
--architecture "amd64" \
--maintainer "Aerial Vision Group <aerial@icg.tugraz.at>" \
--url "https://aerial.icg.tugraz.at/" \
--description "Compiled Ceres solver for i3d library" \
--depends cmake \
--depends libatlas-dev \
--depends libatlas-base-dev \
--depends libblas-dev \
--depends libeigen3-dev \
--depends libgoogle-glog-dev \
--depends liblapack-dev \
--depends libsuitesparse-dev \
--verbose \
.
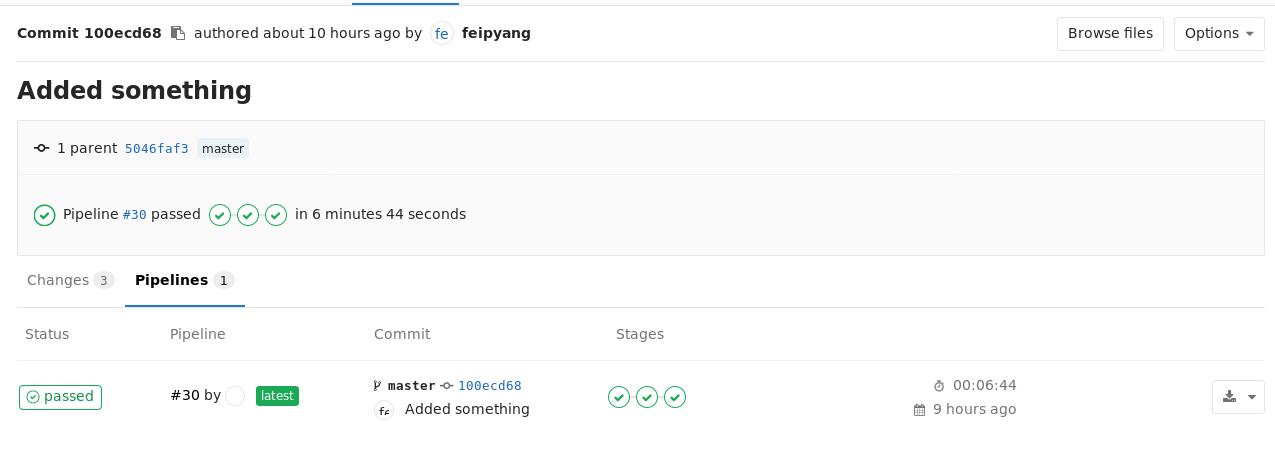
现在,每一次提交的更改,都将触发自动编译过程。
docker镜像制作
这里我们使用了my3dlib这个名称的docker镜像,镜像的制作过程如下:
# vim Dockerfile
FROM buildpack-deps:jessie
MAINTAINER Alexander Skiba <alexander.skiba@icg.tugraz.at>

ENV DEBIAN_FRONTEND noninteractive

RUN echo "deb http://mirrors.163.com/debian/ jessie main non-free contrib" > /etc/apt/sources.list && echo "deb http://mirrors.163.com/debian/ jessie-updates main non-free contrib" >> /etc/apt/sources.list && echo "deb http://mirrors.163.com/debian/ jessie-backports main non-free contrib" >> /etc/apt/sources.list && echo "deb http://mirrors.163.com/debian-security/ jessie/updates main non-free contrib" >> /etc/apt/sources.list

RUN sleep 10

RUN apt-get update && apt-get install -y --no-install-recommends \
    build-essential \
    cmake \
    freeglut3 \
    freeglut3-dev \
    gcc \
    git \
    g++ \
    libatlas-dev \
    libatlas-base-dev \
    libboost-all-dev \
    libblas-dev \
    libcgal-dev \
    libdevil-dev \
    libeigen3-dev \
    libexiv2-dev \
    libglew-dev \
    libgoogle-glog-dev \
    liblapack-dev \
    liblas-dev \
    liblas-c-dev \
    libpcl-dev \
    libproj-dev \
    libprotobuf-dev \
    libqglviewer-dev \
    libsuitesparse-dev \
    libtclap-dev \
    libtinyxml-dev \
    mlocate \
    ruby \
    ruby-dev \
    unzip \
    wget \
    sshpass \
  && apt-get clean \
  && rm -rf /var/lib/apt/lists/* \
  && gem install --no-rdoc --no-ri fpm
# docker build -t my3dlib .
经过编译以后,我们将得到my3dlib这个镜像,用于编译我们后面所需要的deb文件。
artifacts
artifacts记录了每次我们自动编译所生成的内容:
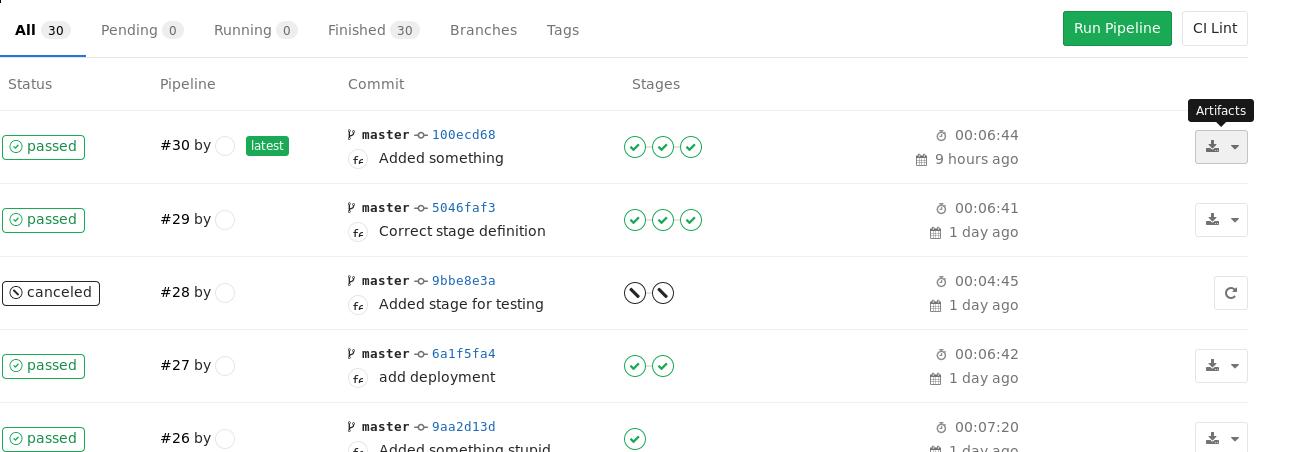
解压后即可得到deb文件。
external_url
这里记载了如果不配置实际IP地址将导致的错误.
You should configure the external_url to your specified IP address, or you
won’t successfully pulling codes into your working nodes:
$ vim /etc/gitlab/gitlab.rb
external_url 'http://192.168.33.2'
$ gitlab-ctl reconfigure
$ gitlab-ctl restart
Now you could successfully pulling codes into your working nodes.
下一步
研究gitlab ci与kubernetes的集成。
May 25, 2017
Technology昨天看到teambition上有关一键启停的描述,提到了有关GPS模块和
噪音传感器模块的表述。这就很奇怪了。
不错,把传感器和开发板衔接在一起是个很简单的活,但问题是你要
用这些数据来做什么?譬如说,噪音传感器,它会感知声音,那么这个
声音信号产生的电流值可以用来控制某个条件。一个办公室里的人说话
声音大,会不会被鉴定为噪音?而一个服务器跑满,风扇也算是噪音吧。
而GPS模块就更为诡异,不知道为什么要平白无故的添加这个模块上去,
难道是为了看一体机卖了多少台,都处于某个位置吗?而GPS模块到底
是采用室外的还是基于SIM卡的,也值得商量。
越来越像一个手机,或者说,把服务器做成像一个玩具。对此我只能表示
遗憾,好大喜功的老板和无事生非的中层,硬是鼓捣出来这么一个怪胎。
还好我已经离开了OC,回头看看这一摊烂泥,只能从心底为自己感觉
到庆幸万分。
