Jul 13, 2017
Technology测试环境
Docker常用的两种网络模式包括Bridge和Host模式,为测试这两种网络模式的性能,我们将创建以下的测试环境:
- 192.192.192.89 - 运行Docker容器的服务器, CentOS 7.3.
- 192.192.192.88 - 运行客户端的服务器, CentOS 7.3.
两台服务器之间的物理网络为万兆以太网络。
我们采用Iperfhttp://software.es.net/iperf/来测量网络带宽,iperf非常简单,也拥有足够多的特性用于测试基本的性能指标。
在服务器端,我们需要一个运行iperf3的Docker容器。 Docker的版本为17.05-ce.
测试将基于以下几个场景:
- 原始网络吞吐量
- 跨主机物理机到Docker(host模式)
- 跨主机物理机到Docker(Bridge模式)
- 同主机物理机到Docker(Bridge模式)
- 同主机Docker到Docker(Bridge模式-external)
- 同主机Docker到Docker(Bridge模式-internal)
原始网络吞吐量
首先,我们需要得到在没有任何Docker容器运行时的原始网络吞吐,在Server端运行:
[root@192.192.192.89 ~]# iperf3 -s -p 5202
Client端运行:
[root@192.192.192.88 ~]# iperf3 -c 192.192.192.89 -p 5202
运行测试后,服务器端和客户端都会返回诊断信息。我们暂时只关心其吞吐量:
-----------------------------------------------------------
Server listening on 5202
-----------------------------------------------------------
Accepted connection from 192.192.192.88, port 39682
[  5] local 192.192.192.89 port 5202 connected to 192.192.192.88 port 39684
[ ID] Interval           Transfer     Bandwidth
[  5]   0.00-1.00   sec  1.05 GBytes  9.05 Gbits/sec
[  5]   1.00-2.00   sec  1.10 GBytes  9.41 Gbits/sec
[  5]   2.00-3.00   sec  1.10 GBytes  9.41 Gbits/sec
[  5]   3.00-4.00   sec  1.10 GBytes  9.41 Gbits/sec
[  5]   4.00-5.00   sec  1.10 GBytes  9.41 Gbits/sec
[  5]   5.00-6.00   sec  1.10 GBytes  9.41 Gbits/sec
[  5]   6.00-7.00   sec  1.10 GBytes  9.41 Gbits/sec
[  5]   7.00-8.00   sec  1.10 GBytes  9.41 Gbits/sec
[  5]   8.00-9.00   sec  1.10 GBytes  9.41 Gbits/sec
[  5]   9.00-10.00  sec  1.10 GBytes  9.41 Gbits/sec
[  5]  10.00-10.04  sec  42.0 MBytes  9.39 Gbits/sec
- - - - - - - - - - - - - - - - - - - - - - - - -
[ ID] Interval           Transfer     Bandwidth
[  5]   0.00-10.04  sec  0.00 Bytes  0.00 bits/sec                  sender
[  5]   0.00-10.04  sec  11.0 GBytes  9.38 Gbits/sec                  receiver
-----------------------------------------------------------
Server listening on 5202
-----------------------------------------------------------
可以看到,在万兆交换机的网络场景下,物理机到物理机之间的网络带宽跑满了万兆交换机的极限.
跨主机物理机到Docker(host模式)
在Docker中运行iperf3相当简单,在hub.docker.com可以找到大量的打包有iperf3的镜像,我们采用:
# sudo docker pull networkstatic/iperf3
在服务器端启动侦听5203端口的docker实例:
[root@192.192.192.89 ~]# docker run --net=host -it --rm --name=iperf3-server networkstatic/iperf3 -s -p 5203
在Client端执行对应的修改,得到的结果为:
[root@192.192.192.88 ~]# iperf3 -c 192.192.192.89 -p 5203
Connecting to host 192.192.192.89, port 5203
[  4] local 192.192.192.88 port 40326 connected to 192.192.192.89 port 5203
[ ID] Interval           Transfer     Bandwidth       Retr  Cwnd
[  4]   0.00-1.00   sec  1.10 GBytes  9.43 Gbits/sec   20    625 KBytes
[  4]   1.00-2.00   sec  1.10 GBytes  9.42 Gbits/sec    0    625 KBytes
//.....
结果差不多相同: 9.40 Gbits/sec
跨主机物理机到Docker(Bridge模式)
更改为5204端口,这次使用的网络模式为Bridge模式:
[root@192.192.192.89 ~]# docker run -it --rm -p 5204:5204 --name=iperf3-server networkstatic/iperf3 -s -p 5204
在客户端不作任何修改,只更换远端端口为5204:
[root@192.192.192.88 ~]# iperf3 -c 192.192.192.89 -p 5204
Connecting to host 192.192.192.89, port 5204
[  4] local 192.192.192.88 port 53936 connected to 192.192.192.89 port 5204
[ ID] Interval           Transfer     Bandwidth       Retr  Cwnd
[  4]   0.00-1.00   sec  1.10 GBytes  9.44 Gbits/sec   15    669 KBytes
[  4]   1.00-2.00   sec  1.10 GBytes  9.42 Gbits/sec    0    682 KBytes
[  4]   2.00-3.00   sec  1.10 GBytes  9.42 Gbits/sec    0    691 KBytes
可以看到,在Bridge模式下,吞吐量也跑满了万兆网络的极限.
同主机物理机到Docker(Bridge模式)
在同一台主机上(192.192.192.89)上运行iperf,测试到Docker的吞吐量,沿用之前侦听5204的容器不变:
[root@192.192.192.89 ~]# iperf3 -c 192.192.192.89 -p 5204
Connecting to host 192.192.192.89, port 5204
[  4] local 192.192.192.89 port 46720 connected to 192.192.192.89 port 5204
[ ID] Interval           Transfer     Bandwidth       Retr  Cwnd
[  4]   0.00-1.00   sec  2.77 GBytes  23.8 Gbits/sec    0    274 KBytes
[  4]   1.00-2.00   sec  2.75 GBytes  23.6 Gbits/sec    0    274 KBytes
[  4]   2.00-3.00   sec  2.75 GBytes  23.6 Gbits/sec    0    277 KBytes
在这种模式下,网络的吞吐量几乎三倍于万兆网络,这是因为从主机到Docker实例的网络通路会走本地的回环接口(lo-loopback)接口。
同主机Docker到Docker(Bridge模式-external)
沿用侦听5204端口的容器不变,新启动一个容器,在其中运行iperf:
# iperf3 -c 192.192.192.89 -p 5204
Connecting to host 192.192.192.89, port 5204
[  4] local 172.17.0.5 port 59574 connected to 192.192.192.89 port 5204
[ ID] Interval           Transfer     Bandwidth       Retr  Cwnd
[  4]   0.00-1.00   sec  1.03 GBytes  8.84 Gbits/sec   91    228 KBytes
[  4]   1.00-2.00   sec   955 MBytes  8.01 Gbits/sec    0    229 KBytes
[  4]   2.00-3.00   sec  1.02 GBytes  8.80 Gbits/sec    0    230 KBytes
[  4]   3.00-4.00   sec   767 MBytes  6.43 Gbits/sec    0    230 KBytes
[  4]   4.00-5.00   sec   851 MBytes  7.14 Gbits/sec    0    230 KBytes
可以看到,如果直接使用物理机的IP地址和端口,则吞吐需要同时使用Bridge模式下物理网卡的吞吐,
此时网卡的物理性能下降明显。
同主机Docker到Docker(Bridge模式-internal)
为了避免使用物理机的IP地址带来的性能下降,直接使用容器内部的IP地址做iperf测试:
# iperf3 -c 172.17.0.4 -p 5204
Accepted connection from 172.17.0.5, port 39516
[  5] local 172.17.0.4 port 5204 connected to 172.17.0.5 port 39518
[ ID] Interval           Transfer     Bandwidth
[  5]   0.00-1.00   sec  2.39 GBytes  20.5 Gbits/sec
[  5]   1.00-2.00   sec  2.50 GBytes  21.5 Gbits/sec
[  5]   2.00-3.00   sec  2.50 GBytes  21.5 Gbits/sec
可以看到,在这种模式下,容器之间的通信还是基于lo(loopback)接口来做的,几乎三倍于万兆交换机的峰值速度。
结论
各次测试的对比数据整理如下:
| 物理机-物理机                           | 9.40 Gbit/sec    | 100%  |
| 跨物理机到Docker(host模式网络)          | 9.40 Gbit/sec    | 100%  |
| 跨物理机到Docker(Bridge模式网络)        | 9.40 Gbit/sec    | 100%  |
| 同主机内到Docker(Bridge模式网络)        | 23.8 Gbit/sec    | 250%  |
| 同主机Docker到Docker(Bridge模式-ex)     | 8.00 Gbit/sec    |  85%  |
| 同主机Docker到Docker(Bridge模式-int)    | 21.00 Gbit/sec   | 220%  |
结论: 在Docker运行环境中,网络的吞吐量近似于本地网络IO,基本上不会有性能损耗。需要特别注意的是,一定要避免同主机中的Docker实例彼此使用物理机IP/端口进行通信,那样会带来性能的明显下降。
Jul 4, 2017
Technology环境准备
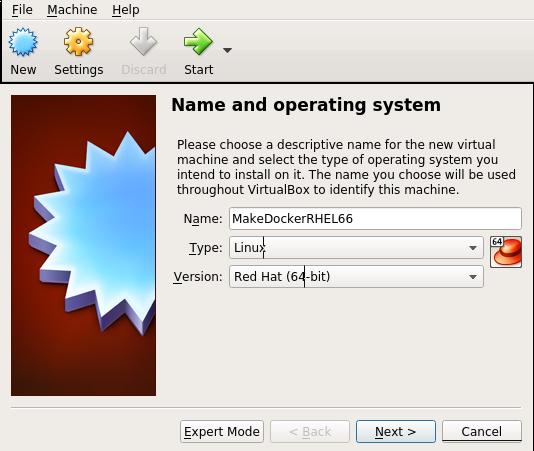
在Virtualbox(已默认安装在虚拟机上)中,创建一台新机器,如下图:
内存为1G:

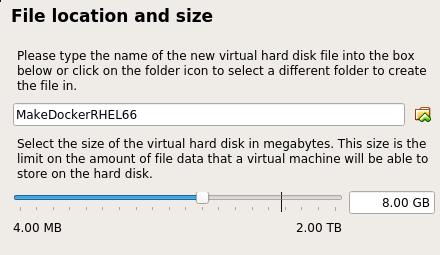
创建硬盘:

选择VDI:

Dynamically Allocated:

大小为8G:
现在点击Settings, 加载安装盘:
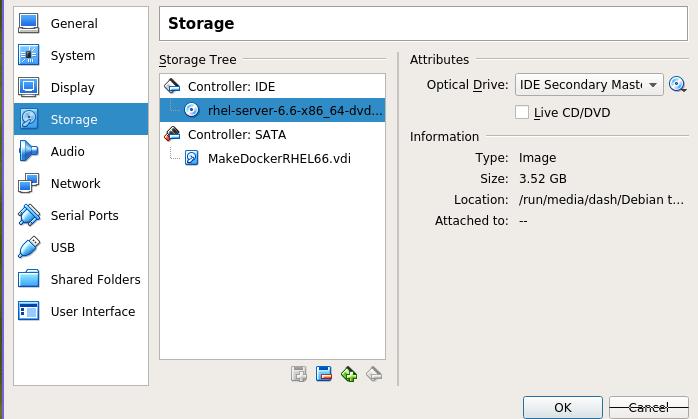
点击OK后,按Start开始安装:
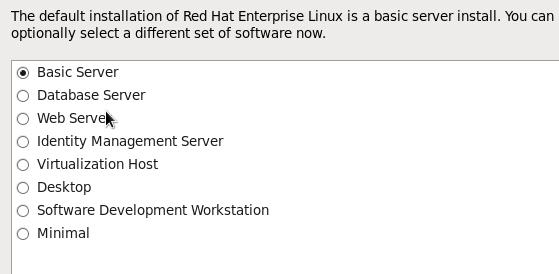
选择Basic Server,
安装完毕后重新启动系统。
点击virtualbox菜单上的Devices->Optical Devices->
,加载rhel6.6的ISO到虚拟机。
通过下列命令集合,创建rhel6.6的基础文件系统:
# mkdir -p /mnt/rhel6-repo
# mount /dev/sr0 /mnt/rhel6-repo
# mkdir /root/rhel6-root
# rpm --root /root/rhel6-root/ --initdb
# rpm --root /root/rhel6-root/ -ivh /mnt/rhel6-repo/Packages/redhat-release-server-6Server-6.6.0.2.el6.x86_64.rpm
# cd /root/rhel6-root/
# cd etc/yum.repos.d
# rm -f *.repo
# vim rhel6.repo
[rhel6]
baseurl=file:///mnt/rhel6-repo
enabled=1
gpgcheck=0
# rpm --root /root/rhel6-root --import /mnt/rhel6-repo/RPM-GPG-KEY-redhat-*
# yum -y --installroot=/root/rhel6-root install yum which vim
这时候如果直接打包成tar.gz文件,我们则拥有了一个全新的docker
rhel6.6文件根分区系统:
# tar czvf rhel6-root.tar.gz rhel6-root/
# scp ./rhel6-root.tar.gz root@xxx.xxx.xxx.xxx:/home/xxx
我们可以手动更改repo的位置,因为一旦解压开,最好从某个http服务器获得包,
而这个服务器上的目录则是原封不动的拷贝所有的ISO文件里的内容:
# vim etc/yum.repos.d/rhel6.repo
[rhel6]
baseurl=http://192.168.0.220/rhel
enabled=1
gpgcheck=0
在已经安装了Docker的机器上,可以通过如下命令来添加Docker镜像.
$ sudo tar -C rhel6-root/ -c . | sudo docker import - myrhel66
运行制作好的Docker镜像:
$  sudo docker run -it myrhel66 /bin/bash
# yum clean all && yum makecache
桌面化环境
# yum distribution-synchronization
#
Jul 2, 2017
Technology问题背景
针对某公司现有的混乱的发布、部署流程提出的一种基于Docker的应用程序部署方案。
架构
物理机+Docker运行环境+Docker-Compose编排+Docker镜像+Ansible自动化配置框架,达到开箱即用的快速部署目的。
准备
Vagrantbox基础环境
Vagrantbox基于Ubuntu Xenial(16.04), 在其上安装了docker, docker-compose:
# sudo apt-get update -y
# curl -sSL http://acs-public-mirror.oss-cn-hangzhou.aliyuncs.com/docker-engine/test/internet | sh
# sudo apt-get install docker-compose
由此构建的vagrant包含了docker运行所需要的最小条件,也就是基于最小条件,我们可以部署预定义好的docker服务。达到"开箱即用"的目的。
可以通过vagrant package打包我们建立好的vagrant环境,
由此生成的vagrant.box可以用于新建环境的分发.
测试代码
基于docker-haproxy-nginx,
这个工程将建立一个nginx与haproxy协同作用的web集群,haproxy在本机的8080端口创建服务,将服务分别转发到后端的nginx1/nginx2/nginx3服务器,我们基于此测试代码构建我们的服务框架:
# git clone git://github.com/kakakakakku/docker-haproxy-nginx.git
为模拟离线部署,手动pull回对应的docker镜像并保存之:
# sudo docker pull haproxy:1.6.4-alpine
# sudo docker pull nginx:stable-alpine
# sudo docker save haproxy:1.6.4-alpine>haproxy.tar
# sudo docker save nginx:stable-alpine>nginx.tar
ansible部署脚本
ansible部署脚本用于自动执行环境配置,在准备好基础环境和测试代码、对应的docker镜像后,我们将对应撰写相应的ansible-playbook,
用于完成一键部署。
手动部署流程
创建基于我们前面制作好的vagrantbox的虚拟机,给定一个新的IP地址,例如192.168.33.201:
# mkdir testdockerdeployment
# cd testdockerdeployment
# vagrant init Xenial64DockerCompose
# vim Vagrantfile
  config.vm.network "private_network", ip: "192.168.33.201"
# vagrant up
# vagrant ssh
手动添加两个docker镜像:
# docker load<haproxy.tar
# docker load<nginx.tar
开始服务:
# docker-compose up
# ./requests.sh
与gitlab集成
在gitlab中创建一个公有的仓库, 用于存放自动化配置:
在仓库下添加用于本地任务的local.yml:
# vim local.yml
---
- hosts: 127.0.0.1

  tasks:

  - name: update docker compose
    shell: echo "update docker compose">>/tmp/docker.log
    notify: restart docker compose

  handlers:

  - name: restart docker compose
    shell: /home/vagrant/.local/bin/docker-compose -f /var/lib/ansible/local/docker-compose.yml stop && /home/vagrant/.local/bin/docker-compose -f /var/lib/ansible/local/docker-compose.yml build && /home/vagrant/.local/bin/docker-compose -f /var/lib/ansible/local/docker-compose.yml up -d
指定作用范围:
[localhost]
127.0.0.1
通过ansible-pull来执行该仓库的定义如下:
# root ansible-pull -i /var/lib/ansible/local/inventory.ini -d /var/lib/ansible/local -U http://root@192.168.33.2/root/centraladmin_docker.git -o
自动化
自动化主要通过crontab来执行。
# vim /etc/cron.d/dockercompose-startup
@reboot /home/vagrant/.local/bin/docker-compose -f /var/lib/ansible/local/docker-compose.yml up -d
# vim /etc/cron.d/ansible-pull
*/3 * * * * root ansible-pull -i /var/lib/ansible/local/inventory.ini -d /var/lib/ansible/local -U http://root@192.168.33.2/root/centraladmin_docker.git -o >>/var/log/ansible-pull.log 2>&1
自动配置crontab
通过下面的ansible task来配置:
# vim local_ansible_pull.yml
---

- hosts: 127.0.0.1
  sudo: yes
  #remote_user: root

  vars:

    # schedule is fed directly to cron
    schedule: '*/3 * * * *'

    # User to run ansible-pull as from cron
    cron_user: root

    # File that ansible will use for logs
    logfile: /var/log/ansible-pull.log

    # Directory to where repository will be cloned
    workdir: /var/lib/ansible/local

    # Repository to check out -- YOU MUST CHANGE THIS
    # repo must contain a local.yml file at top level
    repo_url: http://root@192.168.33.2/root/centraladmin_docker.git

  tasks:

    - name: Install ansible
      apt: pkg=ansible state=installed

    - name: Create local directory to work from
      file: path={{workdir}} state=directory owner=root group=root mode=0751

    - name: Create crontab entry to clone/pull git repository
      template: src=templates/etc_cron.d_ansible-pull.j2 dest=/etc/cron.d/ansible-pull owner=root group=root mode=0644

    - name: Create crontab entry to start docker-compose at startup
      template: src=templates/etc_cron.d_dockercompose.j2 dest=/etc/cron.d/dockercompose-start owner=root group=root mode=0644

    - name: Create logrotate entry for ansible-pull.log
      template: src=templates/etc_logrotate.d_ansible-pull.j2 dest=/etc/logrotate.d/ansible-pull owner=root group=root mode=0644
Jun 30, 2017
Technology背景
在生产环境中经常面临大量卸载或迁移服务器的操作,这时候必须手动重建配置,这是一项繁琐且容易出错的工作。
部署人员可能会尝试DevOps方式(“基础设施作为代码”)管理底层设备,在迁移过程中也会尝试像Chef或Puppet这样的流行工具,但是发现它们对于简单的案例来说也是非常复杂的。
本文将介绍一个强大但简单的配置管理工具Ansible, 基于Ansible和GitLab建立出的工作流,我们可以快速对环境进行集中化部署/管理。在实际的生产环境中,基于此工作流将使运维变得更加简单、高效、可靠。
概观
Ansible
Ansible是一个用Python编写的自动化和编排工具。它通过SSH连接工作,不需要在主机上安装代理。
如果读者不了解使用公钥的无密码连接,可以参考:
Ansible的配置文件以YAML文档编写,称为"Playbook”, Playbook中可以包括用户自定义的任务和事件处理程序。举例说,在一个用于配置服务器的Playbook中,我们定义一系列用于更新配置文件的数据库服务器,而事件处理程序则在这些任务完成之后负责重新启动数据库服务。
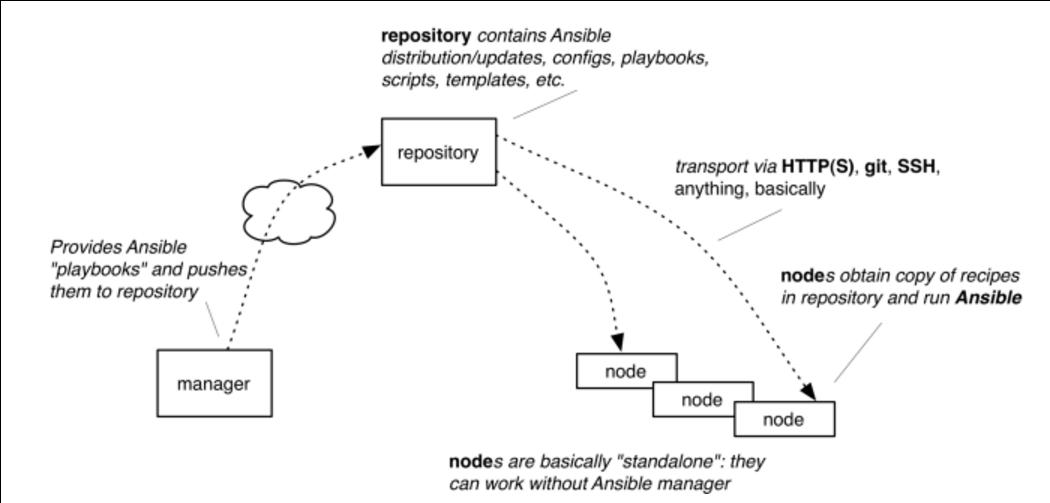
基于推送的Ansible
Ansible用于推送的架构:
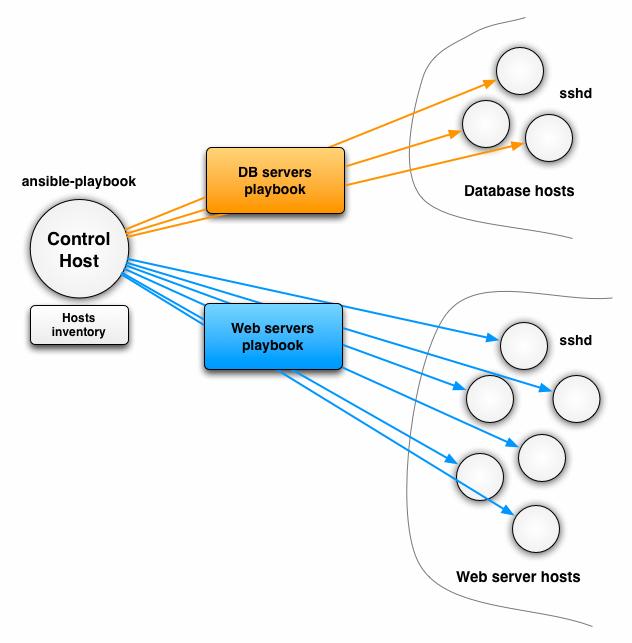
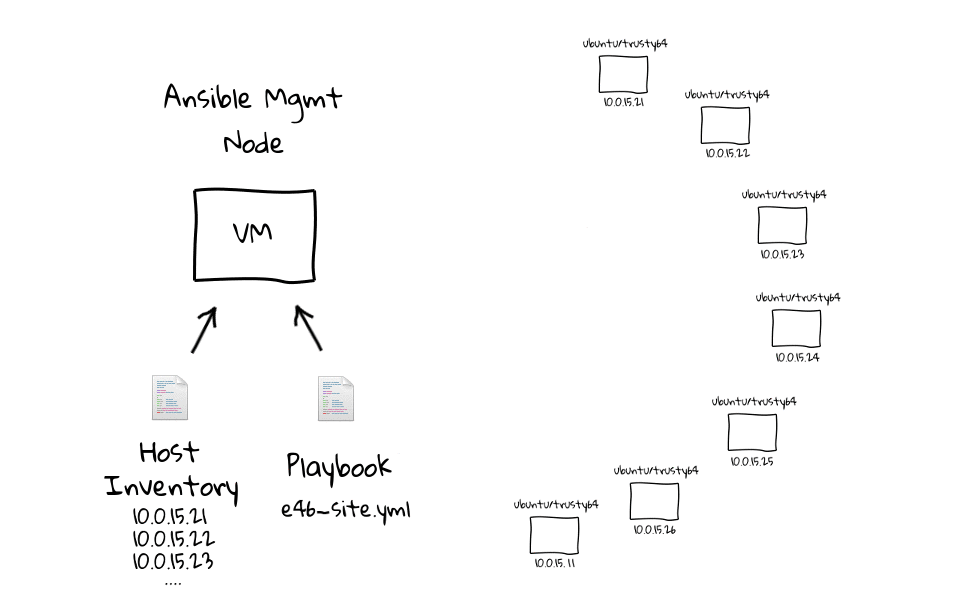
Control Host: 通常是用于管理的节点(本机),在主机上手动运行需要运行的任务,也可以基于crontab定时来做。
Ansible使用inventory文件来包含需配置的机器列表,在上图中,我们包含了两个组:
数据库服务器组和Web服务器组。inventory文件中包含了这些服务器组中的节点IP。
inventory文件也可以是动态生成的,Ansible同样提供了对动态生成的支持。
每个Playbook从inventory文件中选取一个或多个组进行配置。在上一个例子中,我们定义了一个Playbook配置和编排数据库服务器,另一个则作用于Web服务器。Playbook也可以被抽象成更高层次,因此可以将两者中比较共同的任务配置成一个作用于all节点的任务。
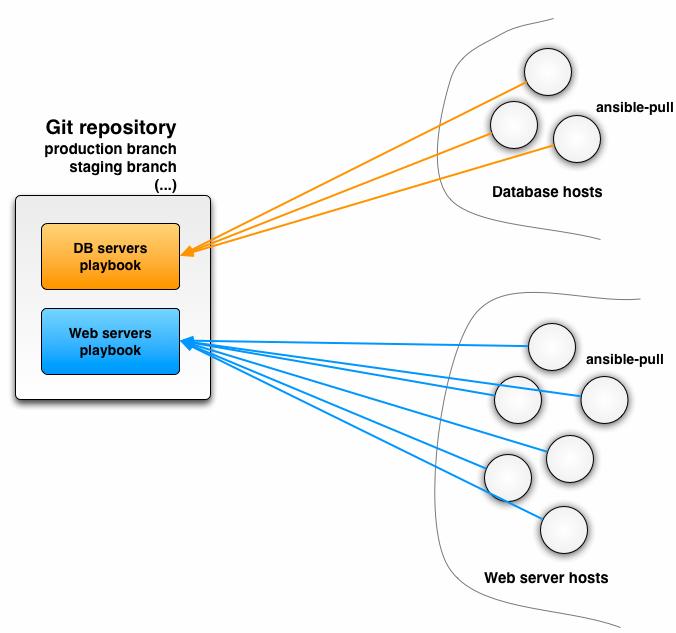
基于拉取的Ansible
使用ansible-pull命令可以开启Ansible的拉取工作方式,ansible-pull命令的执行流程如下:
- 每个主机都安装了Ansible,
- 该配置存储在Git仓库中,
- ansible-pull检出配置库在给定的分支或标记(提示:prod,staging等),
- ansible-pull 执行指定的playbook,
- 使用cronjob自动化ansible-pull进程
- 最后,针对每次配置的修改,您所要做的就是将配置更改推送到Git仓库。
GitLab
GitLab是一个利用 Ruby on Rails 开发的开源应用程序,实现一个自托管的Git项目仓库,可通过Web界面进行访问公开的或者私人项目。它拥有与Github类似的功能,能够浏览源代码,管理缺陷和注释。可以管理团队对仓库的访问,它非常易于浏览提交过的版本并提供一个文件历史库。它还提供一个代码片段收集功能可以轻松实现代码复用,便于日后有需要的时候进行查找。
GitLab可以与诸多CI(持续集成)工具协同工作,且提供了原生的GitLabCI用于持续CI和CD。
GitLab提供完整的单机/集群解决方案。
工作流讲解
环境配置
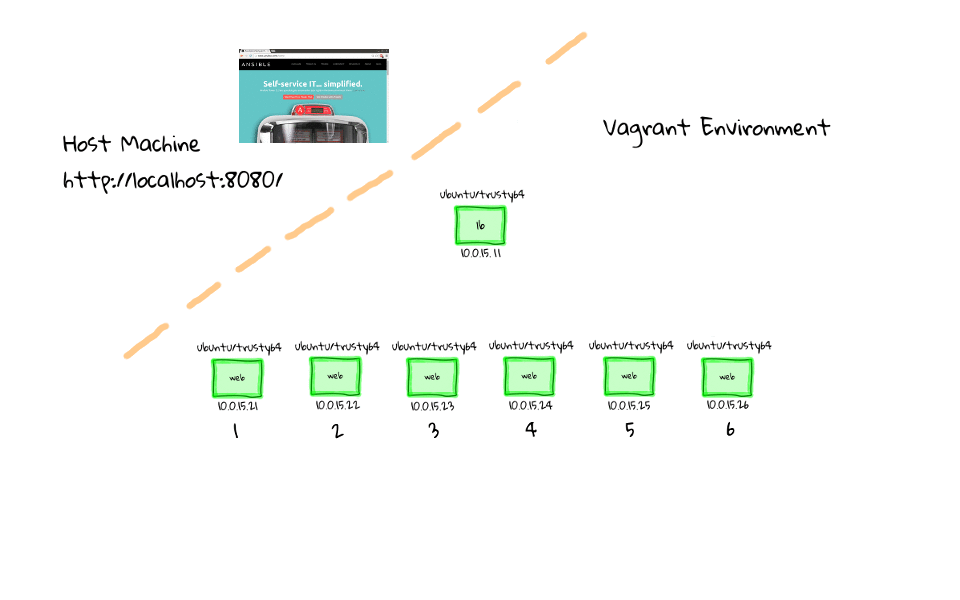
本工作流示例环境包括如下机器:
192.168.33.2, GitLab VM, 2Core 2G.
192.168.33.10, mgmt VM, 256 M内存。
192.168.33.11, lb VM, 256 M内存。
192.168.33.21, web1 VM, 256 M内存。
192.168.33.22, web2 VM, 256 M内存。
首次部署(推送)
作用范畴如下:
环境部署后,load balance引导的网站访问流如下:
此工作流基于传统的推送,因而在这里不做太多的阐述。
配置更新(拉取)
在配置好的lb, web1, web2机器上启用ansible-pull模式的指令如下:
$ ansible-pull -i /var/lib/ansible/local/inventory.ini -d /var/lib/ansible/local -U http://root@192.168.33.2/root/centraladmin_lb.git
我们可以将它安装到crontab任务中,每次定时执行:
*/3 * * * * root ansible-pull -i /var/lib/ansible/local/inventory.ini -d /var/lib/ansible/local -U http://root@192.168.33.2/root/centraladmin_lb.git -o >>/var/log/ansible-pull.log 2>&1
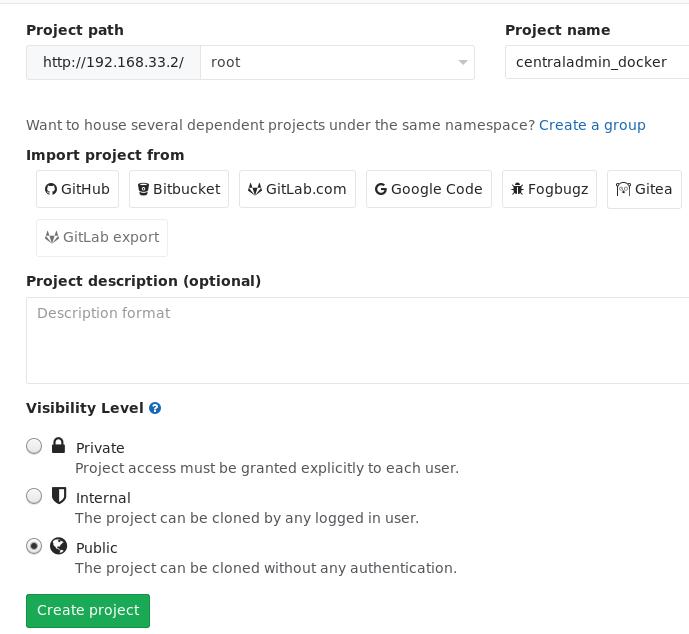
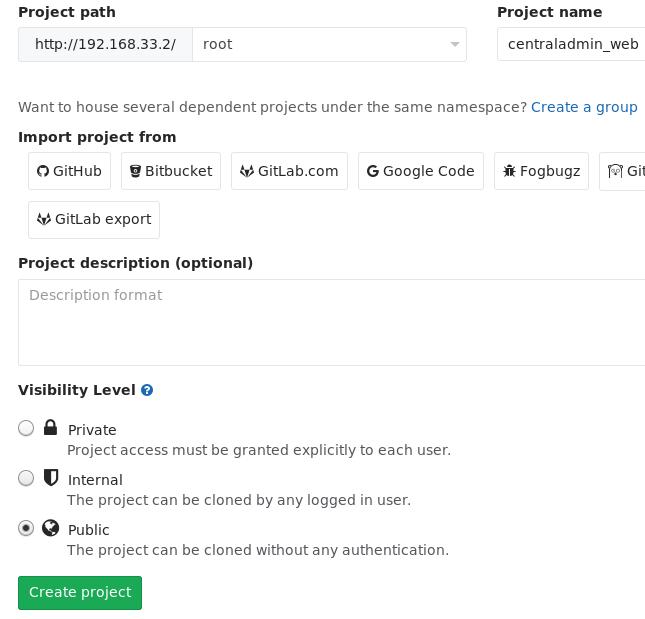
代码库维护, 举centraladmin_web为例,
创建该仓库时,我们需要制定其类型为Public才可,否则ansible-pull无法直接取回代码:
代码中,可以指定需要运行的local.yml, 在其中添加需要定制化的配置。
示例
Jun 28, 2017
TechnologyEnvironment Preparation
Create the vagrant environment via following Vagrantfile:
# -*- mode: ruby -*-
# vi : set ft=ruby :

Vagrant.configure(2) do |config|

  config.ssh.insert_key = false # Use the same insecure key provided from box for each machine
  config.vm.box = "UbuntuTrusty3G"
  config.vm.provision :shell, path: "initial.sh"
  config.vm.box_check_update = false # do not check for updates  ( not recommended , just for demo )
  config.vm.boot_timeout = 700
  #config.hostmanager.enabled = true
  config.hostmanager.enabled = false
  config.hostmanager.ignore_private_ip = false

   N = 2
   (1..N).each do |i| # do for each server i
     config.vm.define "testnode#{i}" do |config|  # do on node i
     config.vm.hostname = "testnode#{i}"
     puts " testnode#{i}  "
     config.vm.network "private_network", ip: "192.168.56.3#{i}"
     config.vm.provider "virtualbox" do |v| # virtual box configuration
       v.memory = "256"
       v.cpus = 1
        if ! File.exist?("testnode#{i}_disk_a.vdi") # create disks only once
           v.customize ['createhd', '--filename', "testnode#{i}_disk_a.vdi", '--size', 8192 ]
           #v.customize ['createhd', '--filename', "testnode#{i}_disk_b.vdi", '--size', 8192 ]
           v.customize ['storageattach', :id, '--storagectl', 'SATA', '--port', 1, '--device', 0, '--type', 'hdd', '--medium', "testnode#{i}_disk_a.vdi"]
           #v.customize ['storageattach', :id, '--storagectl', 'SATA', '--port', 2, '--device', 0, '--type', 'hdd', '--medium', "testnode#{i}_disk_b.vdi"]
        end #  create disks only once
     end # end virtual box configuration

     end # do on node i
   end # for each server i

end  # end Vagrant.configure(2)
The initial.sh could be refered to previous post, for extending the 3G’s disk into 11G(3G+8G).
Package Preparation
Via following commands:
Common packages(cron is created by default):
# apt-get -y update
# apt-get install -y git cron sshpass
lb packages:
# apt-get install -y haproxy socat
web packages:
# apt-get install -y nginx
mgmt node:
# apt-add-repository -y ppa:ansible/ansible
# apt-get install -y ansible
OK, all of the deb packages are available, so collect them and create your own deb repository via following command:
# mkdir -p /root/pkgs/
# cd /var/cache/apt/archives/
# find . | grep deb$ | xargs -I % cp % /root/pkgs/
# dpkg-scanpackages . /dev/null | gzip -9c > Packages.gz
Now upload the folder of root/pkgs to your web server, you local repository is OK now.
Be sure to ignore authentification of pkgs:
# vim /etc/apt/apt.conf.d/99myown
APT::Get::AllowUnauthenticated "true";
# vim /etc/apt/sources.list
deb http://192.168.0.220/UbuntuTrusty3G/ /
