Jul 31, 2017
TechnologyMAC Address Spoofing
First you have to cheat your remote machine via changing your own MAC address
from the origin one to the remote box address.
There are many methods in:
https://wiki.archlinux.org/index.php/MAC_address_spoofing
My method is via changing the systemd-networkd:
$ pwd
/etc/systemd/network
$ cat 00-default.link
[Match]
MACAddress=xx:xx:xx:xx:xx

[Link]
MACAddress=xx:xx:xx:xx:xx
NamePolicy=kernel database onboard slot path
After your changing, reboot your system.
Iptables Changing
Add following lines into my own iptables rules:
sudo iptables -A OUTPUT -o br0 -m state --state ESTABLISHED,RELATED -j ACCEPT
sudo iptables -A OUTPUT -o br0 -p tcp --dport 3389 -j ACCEPT
sudo iptables -A OUTPUT -o br0 -j DROP
sudo iptables -A OUTPUT -o enp0s25 -m state --state ESTABLISHED,RELATED -j ACCEPT
sudo iptables -A OUTPUT -o enp0s25 -p tcp --dport 3389 -j ACCEPT
sudo iptables -A OUTPUT -o enp0s25 -j DROP
sudo iptables -A INPUT -i br0 -m state --state ESTABLISHED,RELATED -j ACCEPT
sudo iptables -A INPUT -i br0 -p tcp --dport 3389 -j ACCEPT
sudo iptables -A INPUT -i br0 -j DROP
sudo iptables -A INPUT -i enp0s25 -m state --state ESTABLISHED,RELATED -j ACCEPT
sudo iptables -A INPUT -i enp0s25 -p tcp --dport 3389 -j ACCEPT
sudo iptables -A INPUT -i enp0s25 -j DROP
Now use the rdesktop for viewing the remote desktop, I could get in touch
with the remote machine desktop, now I won’t changing the screen for viewing
the remote machine, saving many times.
Iptables Save Permenant
Edit the service definition files:
# vim /etc/iptables/iptables.rules
*filter
:INPUT DROP [0:0]
:FORWARD ACCEPT [0:0]
:OUTPUT ACCEPT [251:34691]
-A OUTPUT -o br0 -m state --state ESTABLISHED,RELATED -j ACCEPT
-A OUTPUT -o br0 -p tcp --dport 3389 -j ACCEPT
-A OUTPUT -o br0 -j DROP
-A OUTPUT -o enp0s25 -m state --state ESTABLISHED,RELATED -j ACCEPT
-A OUTPUT -o enp0s25 -p tcp --dport 3389 -j ACCEPT
-A OUTPUT -o enp0s25 -j DROP
-A INPUT -i br0 -m state --state ESTABLISHED,RELATED -j ACCEPT
-A INPUT -i br0 -p tcp --dport 3389 -j ACCEPT
-A INPUT -i br0 -j DROP
-A INPUT -i enp0s25 -m state --state ESTABLISHED,RELATED -j ACCEPT
-A INPUT -i enp0s25 -p tcp --dport 3389 -j ACCEPT
-A INPUT -i enp0s25 -j DROP
COMMIT
Enable the service :
# sudo systemctl enable iptables.service
This method won’t work properly, because libvirtd also add some rules.
Finally I have to add the scripts in my awesome startup scripts.
Iptables Recovery
Recover the default iptables rules via:
sudo iptables -D OUTPUT -o br0 -m state --state ESTABLISHED,RELATED -j ACCEPT
sudo iptables -D OUTPUT -o br0 -p tcp --dport 3389 -j ACCEPT
sudo iptables -D OUTPUT -o br0 -j DROP
sudo iptables -D OUTPUT -o enp0s25 -m state --state ESTABLISHED,RELATED -j ACCEPT
sudo iptables -D OUTPUT -o enp0s25 -p tcp --dport 3389 -j ACCEPT
sudo iptables -D OUTPUT -o enp0s25 -j DROP
sudo iptables -D INPUT -i br0 -m state --state ESTABLISHED,RELATED -j ACCEPT
sudo iptables -D INPUT -i br0 -p tcp --dport 3389 -j ACCEPT
sudo iptables -D INPUT -i br0 -j DROP
sudo iptables -D INPUT -i enp0s25 -m state --state ESTABLISHED,RELATED -j ACCEPT
sudo iptables -D INPUT -i enp0s25 -p tcp --dport 3389 -j ACCEPT
sudo iptables -D INPUT -i enp0s25 -j DROP
Jul 31, 2017
TechnologyOn This Book
Borrowed from lab, written via a janpanese author.
 This article will record the reading tips on Chapter 2(libvirtd related).
Network Configuration
Edit the netoworking definition xml:
$ cat internal.xml
<network>
	<name>internal</name>
	<bridge name='virbr8'/>
</network>
$  cat external.xml
<network>
	<name>external</name>
	<bridge name='virbr9'/>
</network>
Define the networking via following commands:
$ sudo virsh net-define external.xml
Network external defined from external.xml

$ sudo virsh net-autostart external
Network external marked as autostarted

$ sudo virsh net-start external
Network external started

$ libvirt sudo virsh net-list
 Name                 State      Autostart     Persistent
----------------------------------------------------------
 default              active     no            yes
 external             active     yes           yes
 internal             active     yes           yes
 kubernetes           active     yes           yes
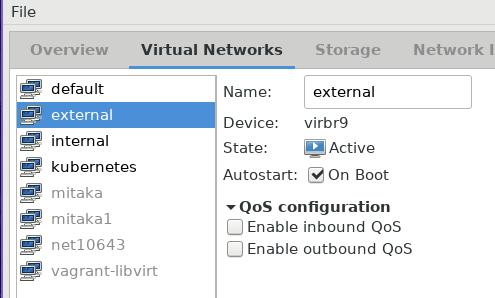
View the configuration in virt-manager:
Jul 27, 2017
TechnologyProblem

Reason
This is because hugo upgrade to a new version 0.25.1, while this new version
won’t give the default value of date in newly created markdown file.
Solution
Edit the themes/hyde-a/archetypes/default.md, add following items:
+++
title = ""
date = "{{ .Date }}"
description = ""
keywords = ["Linux"]
categories = ["Technology"]
+++
Now you could re-new your configuration, and then your blog will acts OK.
Jul 27, 2017
Technology目的
根据用户自定义配置,自动从ISO安装出整个系统。
准备材料
RHEL 6.6安装光盘, x86_64版本。
自定义kickstart文件,用于自定义分区/用户/密码/安装包等
红帽系列操作系统(用于制作光盘镜像,已验证Redhat7.3)
步骤
- 创建目录用于挂载安装光盘和自定义光盘,
其中
/media/bootiso用于挂载安装光盘,
/media/bootisoks用于存放自定义光盘内容:
$ mkdir -p /media/bootiso /media/bootisoks
- 拷贝安装内容到自定义光盘目录:
$ sudo mount -t iso9660 -o loop DVD.iso /media/bootiso
$ cp -r /media/bootiso/* /media/bootisoks/
$ chmdo -R u+w /media/bootisoks
$ cp /media/bootiso/.discinfo /media/bootisoks
$ cp /media/bootiso/.discinfo /media/bootisoks/isolinux
- 拷贝自定义的ks文件到isolinux目录下:
$ cp YourKickStartFile.ks /media/bootisoks/isolinux
- 配置引导选项:
$ vim /media/bootisoks/isolinux.cfg
initrd=initrd.img ks=cdrom:/isolinux/ks.cfg
- 创建ISO文件:
# mkisofs -r -T -V "MYISONAME" -b isolinux/isolinux.bin -c isolinux/boot.cat
-no-emul-boot -boot-load-size 4 -boot-info-table -o ../boot.iso .
经历此五个步骤以后,即可得到我们定制好的ISO,用此ISO即可安装出我们自定义好的系统.
kickstart示例文件:
安装了基本桌面、中文支持等。
#platform=x86, AMD64, or Intel EM64T
#version=DEVEL
# Firewall configuration
firewall --disabled
# Install OS instead of upgrade
install
# Use network installation
#url --url="http://10.7.7.2/CentOS"
cdrom
# Root password
rootpw --iscrypted xxxxxxxxxxxxxxxxxxxx
# System authorization information
auth  --useshadow  --passalgo=sha512
# Use graphical install
graphical
firstboot --disable
# System keyboard
keyboard us
# System language
lang en_US
# SELinux configuration
selinux --disabled
# Installation logging level
logging --level=info

# System timezone
timezone  Asia/Hong_Kong
# System bootloader configuration
bootloader --location=mbr
# Clear the Master Boot Record
zerombr
# Partition clearing information
clearpart --all
# Disk partitioning information
part swap --fstype="swap" --size=1024
part / --asprimary --fstype="ext4" --grow --size=1

%packages
@basic-desktop
@chinese-support
@internet-browser
@x11
-ibus-table-cangjie
-ibus-table-erbi
-ibus-table-wubi

%end
其中rootpw以后的字段可以通过以下命令得到:
$ openssl passwd -1 "Your_Password_Here"
ks.cfg的另一种构建方法
在安装完的每一台机器上,都可以看到/root/ana…ks文件,编辑此文件即可得到我们定制化的kickstart配置。
Jul 21, 2017
TechnologyItems
Working items on one-click deployment of oracle database.
Ansible-Playbooks
Based on:
https://github.com/nkadbi/oracle-db-12c-vagrant-ansible
Refers to:
https://blog.dbi-services.com/vagrant-up-get-your-oracle-infrastructure-up-and-running/
https://blog.dbi-services.com/part2-vagrant-up-get-your-oracle-infrastructure-up-an-running/
Username/Password:
System: oracle/welcome1
Database: sys/oracle
Linux Client
Yaourt has the linux client for accessing oracle Db:
https://aur.archlinux.org/packages/oracle-sqldeveloper/
Installing method:
Download the file from oracle.com
Create Database
Create database using following command:
[vagrant@dbserver1 ~]$ su - oracle
Password:
-bash-4.2$ sqlplus "/as sysdba"
Now you got the shell like SQL>, you could input the sql in this shell:
Run `1_create_user_and_tablespace_dash.sql`
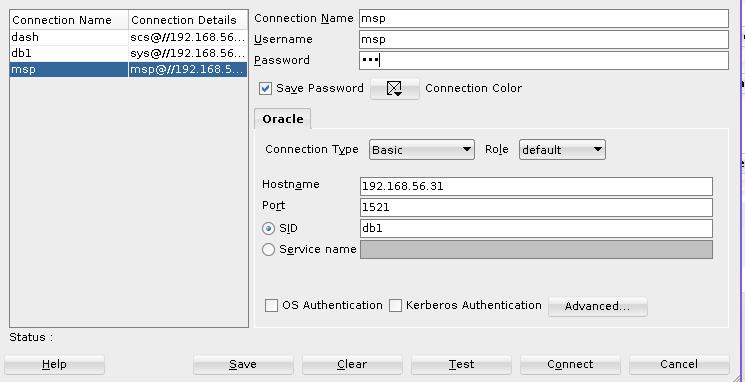
The first step will create the database user, then you could login into the
database using this user, using SQL Devloper for login and execute the
command:
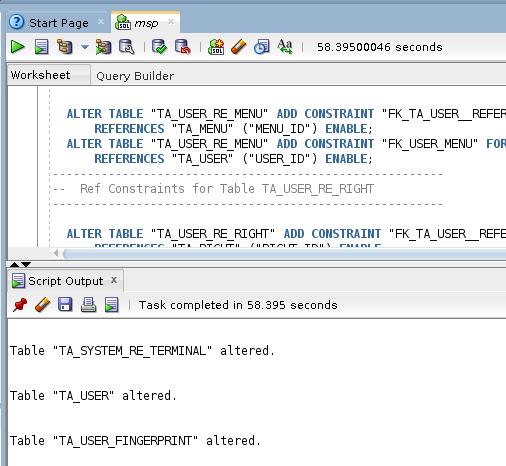
Execute the following script:
msp_XXX.sql(Including 2 scripts)
Tips for getting the db config:
 SQL> show parameter service_names;
.....
service_names			     string	 db1.private
Then your configuration should use the same service_names as described.
