
Tips on V-USB and Arduino(5)
Mar 7, 2016
Technology
这一节将添加一个LED到已有的方案中. 这个LED将使用11口, 通过./set-led new来设
置状态.
连线
新加一个LED如图:
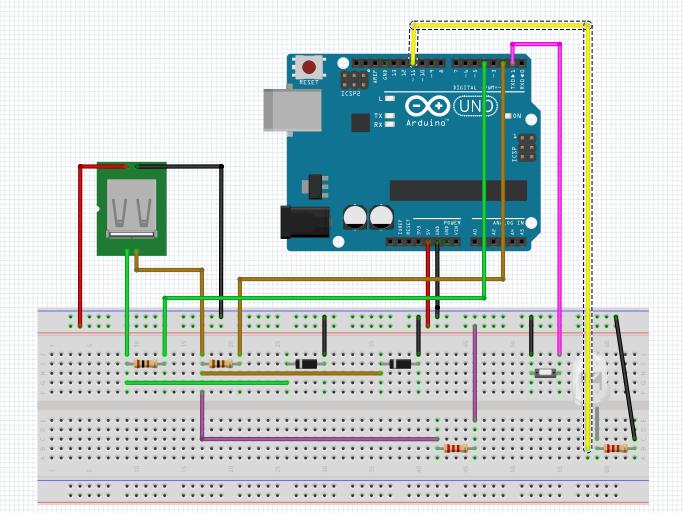
仅仅添加了一个LED + 220欧电阻.
代码修改
requests.h
添加新的request定义:
diff --git a/requests.h b/requests.h
index 90275f5..b354a73 100644
--- a/requests.h
+++ b/requests.h
@@ -32,4 +32,6 @@

 #define CUSTOM_RQ_BLINK    3

+#define CUSTOM_RQ_NEWLED    4
+
hid_custom_rq.h
添加新的管脚, 和对CUSTOM_RQ_NEWLED的处理代码:
diff --git a/hid_custom_rq.h b/hid_custom_rq.h
index f5509e4..b5411cf 100644
--- a/hid_custom_rq.h
+++ b/hid_custom_rq.h
@@ -13,6 +13,7 @@ class hid_custom_rqDevice {
   hid_custom_rqDevice () {
     usbInit();
     ledPin = 13;        // pin 13 as default ledPin
+    newledPin = 11;    // pin 11 as newledPin
   }

   void poll() {
@@ -20,6 +21,7 @@ class hid_custom_rqDevice {
   }

   unsigned int ledPin;
+  unsigned int newledPin;
 };

 hid_custom_rqDevice hid_custom_rq = hid_custom_rqDevice();
@@ -99,6 +101,14 @@ usbMsgLen_t usbFunctionSetup(uchar data[8])
             usbMsgPtr = dataBuffer;         /* tell the driver which data to
return */
             return 1;                       /* tell the driver to send 1 byte
*/
         }
+       /* Added for newly added LED */
+       else if(rq->bRequest == CUSTOM_RQ_NEWLED){
+            if(rq->wValue.bytes[0] & 1){    /* set new LED */
+                digitalWrite(hid_custom_rq.newledPin, HIGH);
+            }else{                          /* clear new LED */
+                digitalWrite(hid_custom_rq.newledPin, LOW);
+            }
+       }
     }
set-led.c
这个文件中,添加了两条新命令,分别为./set-led newledon和./set-led newledoff用于点亮/
熄灭新加的LED.
diff --git a/examples/hid_custom_rq_demo/commandline/set-led.c b/examples/hid_custom_rq_demo/commandline/set-led.c
index 44d39f9..a306eca 100644
--- a/examples/hid_custom_rq_demo/commandline/set-led.c
+++ b/examples/hid_custom_rq_demo/commandline/set-led.c
@@ -91,12 +91,19 @@ buffer[3] = 0;
         }else{
             printf("LED is %s\n", buffer[0] ? "on" : "off");
         }
-    }else if((isOn = (strcasecmp(argv[1], "on") == 0)) || strcasecmp(argv[1], "off") == 0){
+    }
+    else if((isOn = (strcasecmp(argv[1], "on") == 0)) || strcasecmp(argv[1], "off") == 0){
         cnt = usb_control_msg(handle, USB_TYPE_VENDOR | USB_RECIP_DEVICE | USB_ENDPOINT_OUT, CUSTOM_RQ_SET_STATUS, isOn, 0, buffer, 0, 5000);
         if(cnt < 0){
             fprintf(stderr, "USB error: %s\n", usb_strerror());
         }
     }
+    else if((isOn = (strcasecmp(argv[1], "newledon") == 0)) || strcasecmp(argv[1], "newledoff") == 0){
+        cnt = usb_control_msg(handle, USB_TYPE_VENDOR | USB_RECIP_DEVICE | USB_ENDPOINT_OUT, CUSTOM_RQ_NEWLED, isOn, 0, buffer, 0, 5000);
+        if(cnt < 0){
+            fprintf(stderr, "USB error: %s\n", usb_strerror());
+        }
+    }

 else if(strcasecmp(argv[1], "onoff") == 0){ /* Test custom on/off */
hid_custom_rq_demo.ped
因为新添加了硬件,ped文件同样需要更新.
diff --git a/examples/hid_custom_rq_demo/hid_custom_rq_demo.pde b/examples/hid_custom_rq_demo/hid_custom_rq_demo.pde
index 77e3912..6d98151 100644
--- a/examples/hid_custom_rq_demo/hid_custom_rq_demo.pde
+++ b/examples/hid_custom_rq_demo/hid_custom_rq_demo.pde
@@ -1,10 +1,13 @@
 #include <hid_custom_rq.h>

 const int ledPin = 13;
+const int newledPin = 11;

 void setup() {
   hid_custom_rq.ledPin = ledPin;
   pinMode(hid_custom_rq.ledPin, OUTPUT);
+  hid_custom_rq.newledPin = newledPin;
+  pinMode(hid_custom_rq.newledPin, OUTPUT);
 }

 void loop() {
验证
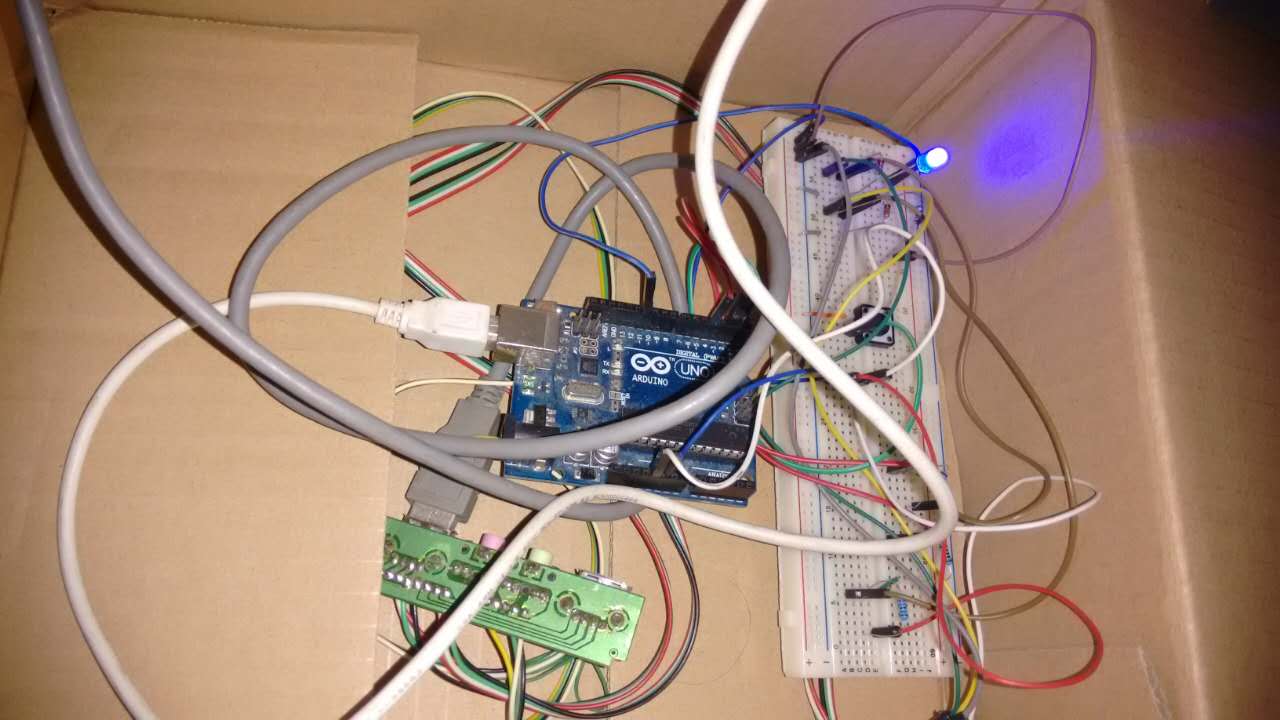
写入新编译的Arduino固件, 并新编译set-led程序, 即可看到新增的LED被点亮/熄灭.
效果如图:
延伸
既然点亮了LED, 其他各种设备就不在话下了. 引入一个舵机,或者步进电机, 就可以实现 e-buddy人偶的提醒功能.
当然我们可以想得更妙, 例如,用蓝牙或者WIFI来替代USB传输. 这样可以做到更远距离.