
三节点搭建OpenStack Juno(1)
May 24, 2015
Technology
目的
最近在研究解耦OpenStack,以及OpenStack的各种网络模型,下面是一个最简单的用于搭建OpenStack Juno的过程。
硬件及网络准备
物理服务器
物理服务器: i5-4460/32G 内存,128G SSD+3T IDE,事实上这个教程跑完你也用不到这么强悍的配置,理论上在8G的物理机器上就可以运行完本文。
物理服务器操作系统: Ubuntu14.04
虚拟机:
虚拟机1, Controller: 1 processor, 2 GB memory, and 5 GB storage.
虚拟机2, Network: 1 processor, 512 MB memory, and 5 GB storage.
虚拟机3, Compute: 1 processor, 2 GB memory, and 10 GB storage.
网络规划
Management: 10.55.55.0/24, 只用于管理的网络,公网无法访问。简单来说,这个网络用于OpenStack各个组件之间的相互通信。
Tunnel: 10.66.66.0/24, 用于计算节点和网络节点之间的通信。这个隧道使得虚拟机的实例可以和相互通信。
External: 192.168.1.0/24, 用于虚拟机实例的Internet访问。
当然我们可以添加额外的存储网络,这里为了简单起见我们不使用cinder服务,使用单纯的虚拟机镜像即可。
节点网络名规划
Controller节点: controller.openstack.local, 10.55.55.2(管理网络), N/A, N/A.
Network节点: Network.openstack.local, 10.55.55.3(管理网络), 10.66.66.3(隧道网络), 192.168.1.3(Internet公网).
Compute节点: Compute.openstack.local, 10.55.55.4(管理网络), 10.66.66.4(隧道网络).
一个参考的例图如下:
按照上述的描述我们创建三台虚拟机,并进行初始化配置。
虚拟机初始化配置
下面罗列的代码是我在本机上的创建过程,仅供参考:
$ pwd
/media/repo/Image/3NodeOpenStack
$ qemu-img create -f qcow2 -b /media/repo/Image/UbuntuBase.qcow2 OpenStackController.qcow2
Formatting 'OpenStackController.qcow2', fmt=qcow2 size=107374182400 backing_file='/media/repo/Image/UbuntuBase.qcow2' encryption=off cluster_size=65536 lazy_refcounts=off
$ qemu-img create -f qcow2 -b /media/repo/Image/UbuntuBase.qcow2 OpenStackNetwork.qcow2
Formatting 'OpenStackNetwork.qcow2', fmt=qcow2 size=107374182400 backing_file='/media/repo/Image/UbuntuBase.qcow2' encryption=off cluster_size=65536 lazy_refcounts=off
$ qemu-img create -f qcow2 -b /media/repo/Image/UbuntuBase.qcow2 OpenStackCompute.qcow2
Formatting 'OpenStackCompute.qcow2', fmt=qcow2 size=107374182400 backing_file='/media/repo/Image/UbuntuBase.qcow2' encryption=off cluster_size=65536 lazy_refcounts=off
创建虚拟机的时候, OpenStackCompute节点需要把CPU的参数带下去,如下图所示: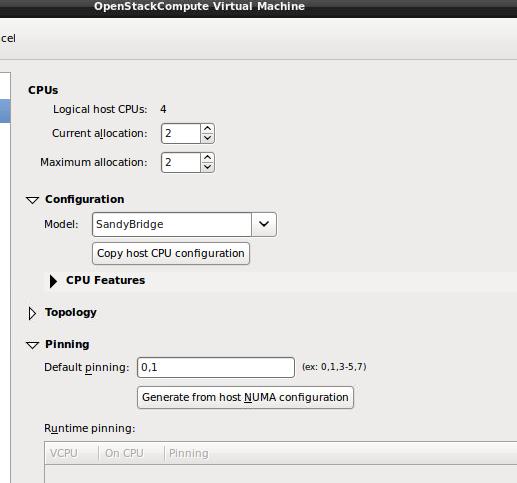
各个节点的network定义文件如下:
控制节点:
# The loopback network interface
auto lo
iface lo inet loopback

# The primary network interface
auto eth0
iface eth0 inet static
address 10.55.55.2
netmask 255.255.255.0
gateway 10.55.55.1
dns-nameservers 114.114.114.114
网络节点:
# The loopback network interface
auto lo
iface lo inet loopback

# The primary network interface
auto eth0
iface eth0 inet static
address 10.55.55.3
netmask 255.255.255.0
gateway 10.55.55.1
dns-nameservers 114.114.114.114


auto eth1
iface eth1 inet static
address 10.66.66.3
netmask 255.255.255.0

auto eth2
iface eth2 inet static
address 192.168.1.3
netmask 255.255.255.0
计算节点:
auto lo
iface lo inet loopback

# The primary network interface
auto eth0
iface eth0 inet static
address 10.55.55.4
netmask 255.255.255.0
gateway 10.55.55.1
dns-nameservers 114.114.114.114

auto eth1
iface eth1 inet static
address 10.66.66.4
netmask 255.255.255.0
每个节点分别更改其/etc/hostname为对应的名字,而每台机器上的/etc/hosts也做对应的修改,例如Controlle节点上的例子如下:
$ cat /etc/hosts
127.0.0.1       localhost
127.0.1.1       Controller
10.55.55.2      Controller
10.55.55.3      Network
10.55.55.4      Compute
......

$ cat /etc/hostname
Controller
网络配置完毕后,保证可以通过ping Controller等命令达到互通。
在进入到后续步骤前,更新所有节点到最新状态:
$ sudo apt-get update && sudo apt-get upgrade && sudo apt-get dist-upgrade && sudo reboot
NTP 服务器/客户端配置
使用NTP来保证各个节点之间的时间同步,对后续加入的各个节点,同样需要使用NTP来同步该节点时间。我们将Controller作为NTP服务器,在Controller上,安装和配置NTP服务器:
NTP服务器
# apt-get -y install ntp
# vim /etc/ntp.conf
    # 修改成大陆时间
    server 2.cn.pool.ntp.org
    server 1.asia.pool.ntp.org
    server 2.asia.pool.ntp.org
    # 修改 restrict 設定
    restrict -4 default kod notrap nomodify
    restrict -6 default kod notrap nomodify
# service ntp restart
NTP客户端
其他的节点上都需要安装NTP客户端并使用NTP服务器时间同步。
# apt-get -y install ntp
# vim /etc/ntp.conf
    # 設定 controller 為參照的 time server
    # 並將其他 server 開頭的設定進行註解
    server 10.55.55.2 iburst
# service ntp restart
检查结果是否正确:
root@JunoNetwork:~# ntpq -c peers
     remote           refid      st t when poll reach   delay   offset  jitter
==============================================================================
 Controller  59.106.180.168   3 u    1   64    1    0.239  447024.   0.049
接下来真正进入OpenStack的安装和配置过程。
源设定
Juno的源没有被包含在Ubuntu14.04的官方源中(官方源中版本为IceHouse),所以通过下列命令添加OpenStack Juno源:
所有节点上(Controller,Network,Compute):
$ sudo apt-get install ubuntu-cloud-keyring
$ sudo bash
# echo "deb http://ubuntu-cloud.archive.canonical.com/ubuntu" "trusty-updates/juno main" > /etc/apt/sources.list.d/cloudarchive-juno.list
# apt-get update && apt-get -y dist-upgrade
第一部分就先到这里。