
Recover My OpenWRT Configuration
Dec 12, 2014
Technology
Background
I tried to use 192.168.1 network for debugging, but after I change back from 10.0.0. to 192.168.1. the router got no interface for luci and http. So following is the steps for recovering from the fail router.
Solution
First I tried to recover the luci and uhttpd, but after a while I think maybe I could swith to a newer version.
The newest version currently is " ‘Barrier Breaker’ “, its version number is 14.07.
My router is Mercury 4530R, which have the following configuration:
CPU	Ram	Flash	Network	USB	Serial	JTag
Atheros	128MiB	8MiB	4LAN + 2WIFI	Yes	Yes	?
LUCI upgrade failed: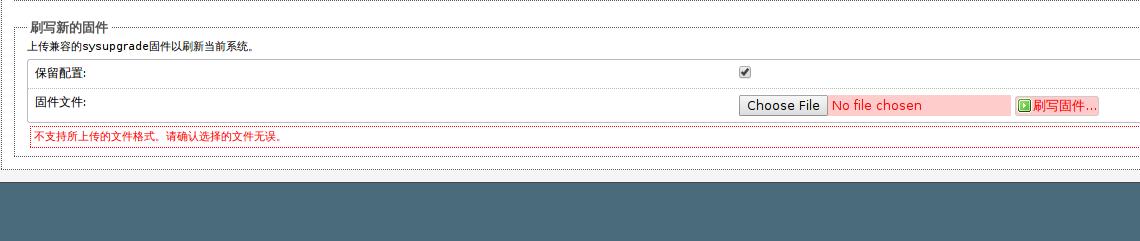
The reason: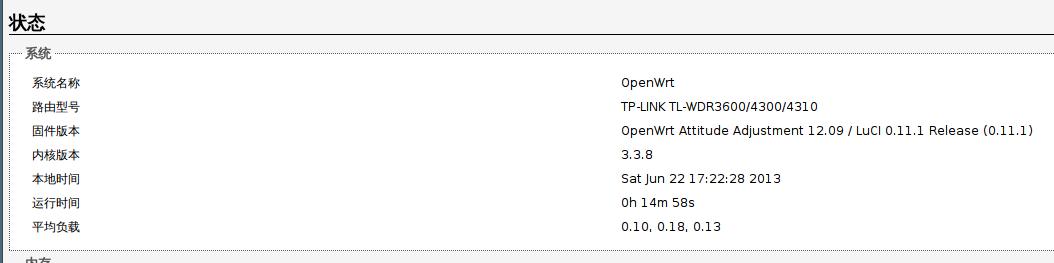
Because in early 2012 Autumn, the official supporting for 4530R is not release, so we modified the machineID, to let 4530R to use TP-Link’s patched images, this will display our system as for 4310, but not for 4530R.
Sysupgrade in CLI
First check the free memory:
root@OpenWrt:~# free
             total         used         free       shared      buffers
Mem:        126788        26636       100152            0         1780
-/+ buffers:              24856       101932
Swap:            0            0            0
Download the sysupgrade file:
# cd /tmp
# wget http://downloads.openwrt.org/barrier_breaker/14.07/ar71xx/generic/openwrt-ar71xx-generic-mw4530r-v1-squashfs-sysupgrade.bin
# ls -l openwrt-ar71xx-generic-mw4530r-v1-squashfs-sysupgrade.bin
-rw-r--r--    1 root     root       3342340 Jun 22 17:28 openwrt-ar71xx-generic-mw4530r-v1-squashfs-sysupgrade.bin
Problem when checking:
# sysupgrade -v openwrt-ar71xx-generic-mw4530r-v1-squashfs-sysupgrade.bin
Invalid image, hardware ID mismatch, hw:43100001 image:45300001.
Image check 'platform_check_image' failed.
Ignore the Image check:
root@OpenWrt:/tmp# sysupgrade -F openwrt-ar71xx-generic-mw4530r-v1-squashfs-sysupgrade.bin
Invalid image, hardware ID mismatch, hw:43100001 image:45300001.
Image check 'platform_check_image' failed but --force given - will update anyway!
Saving config files...
Sending TERM to remaining processes ... uhttpd dnsmasq smbd nmbd ntpd hotplug2 syslogd klogd hotplug2 ubusd netifd
Sending KILL to remaining processes ... uhttpd
Switching to ramdisk...
Performing system upgrade...
Unlocking firmware ...

Writing from <stdin> to firmware ...
Appending jffs2 data from /tmp/sysupgrade.tgz to firmware...TRX header not found
Error fixing up TRX header

Upgrade completed
Rebooting system...
After a while, your router is flashed to the new system.
More Happily Play with FlashDisk
Cause 8M Flash is not enough for playing lots of things, I plug-in a 2G FlashDisk into the usb port as the external disk.
$ ssh root@192.168.1.1
root@OpenWrt:~# export http_proxy=http://1xx.xx.xxx.xxx:2xxxx
root@OpenWrt:~# df -h
Filesystem                Size      Used Available Use% Mounted on
rootfs                    4.6M    292.0K      4.3M   6% /
/dev/root                 2.3M      2.3M         0 100% /rom
tmpfs                    61.7M    588.0K     61.1M   1% /tmp
/dev/mtdblock3            4.6M    292.0K      4.3M   6% /overlay
overlayfs:/overlay        4.6M    292.0K      4.3M   6% /
tmpfs                   512.0K         0    512.0K   0% /dev
root@OpenWrt:~# opkg update
......
root@OpenWrt:~# opkg install block-mount kmod-usb-storage fdisk kmod-fs-ext4 kmod-usb-storage-extras kmod-scsi-generic
......
root@OpenWrt:~# df -h
Filesystem                Size      Used Available Use% Mounted on
rootfs                    4.6M    836.0K      3.8M  18% /
Now format the flash-disk and plug it into the usb port. Reboot the router and now via fdisk -l you will see the plugged-in flashdisk:
Device    Boot Start       End  Blocks  Id System
/dev/sda1       2048   3948543 1973248  83 Linux
Transfer Filesystem to External Disk
The steps is listed as:
pivot overlay:
root@OpenWrt:~# mkdir /mnt/sda1
root@OpenWrt:~# mount /dev/sda1 /mnt/sda1/
root@OpenWrt:~# tar -C /overlay -cvf - . | tar -C /mnt/sda1 -xf -
root@OpenWrt:~# ls /mnt/sda1/
etc         lib         lost+found  mnt         sbin        usr
pivot root:
mkdir -p /tmp/cproot
mount --bind / /tmp/cproot
tar -C /tmp/cproot -cvf - . | tar -C /mnt/sda1 -xf -
umount /tmp/cproot
Configuration file:
$ block detect
config 'mount'
        option  target  '/mnt/sda1'
        option  uuid    'f6857dac-a12a-49c9-b567-f05a61100bd7'
        option  enabled '0'

$ cat /etc/config/fstab
config global
        option anon_swap '0'
        option anon_mount '0'
        option auto_swap '1'
        option auto_mount '1'
        option delay_root '5'
        option check_fs '0'

config mount
        option target '/overlay'
        option  uuid    'f6857dac-a12a-49c9-b567-f05a61100bd7'
        option enabled '1'
        option fstype 'ext4'
Now reboot the router and you got a 2G based storage router:
root@OpenWrt:~# df -h
Filesystem                Size      Used Available Use% Mounted on
rootfs                    1.8G     12.6M      1.7G   1% /
You could play happily in this router.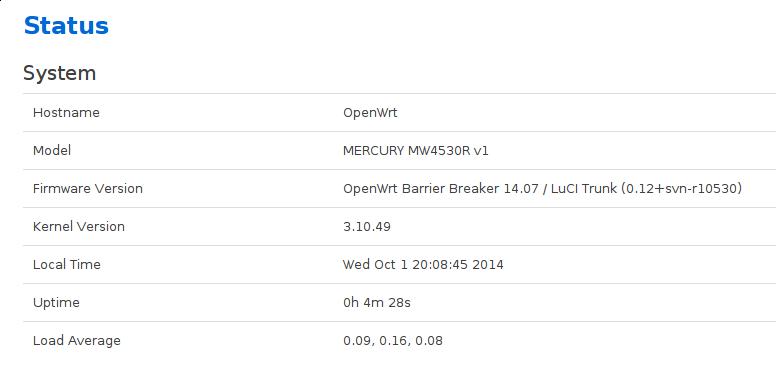
Further Optimization
Includes:
1. Fixed ip address configurations.
2. Port forwarding. Router-> Port Forwarding.
3. SSH Server Replacement, from dropbear to opensshd.
# opkg update
# opkg install openssh-server
# uci set dropbear.@dropbear[0].Port=2222
# uci commit dropbear
# /etc/init.d/dropbear restart
# /etc/init.d/sshd enable
# /etc/init.d/sshd start
# /etc/init.d/dropbear disable
# /etc/init.d/dropbear stop
# ssh-keygen
# opkg install openssh-client
4. Time sync.
With the previous installed sshd, you could add yourself to remote server’s trusted users. then add files of time.sh for syncing time.
Refers to local link /blog/2014/02/11/write-local-ntp-sync-server/
5. Sharing the mouse between Yosemite and ArchLinux, change the configuration files.
Finally we got all of these done:
root@OpenWrt:~/.ssh# uptime
 12:45:31 up 6 min,  load average: 0.22, 0.14, 0.06
root@OpenWrt:~/.ssh# date
Fri Dec 12 12:45:33 CST 2014
root@OpenWrt:~/.ssh# uname -a
Linux OpenWrt 3.10.49 #3 Wed Oct 1 14:00:51 CEST 2014 mips GNU/Linux
Enable ssh WAN access:
uci add firewall rule
uci set firewall.@rule[-1].src=wan
uci set firewall.@rule[-1].target=ACCEPT
uci set firewall.@rule[-1].proto=tcp
uci set firewall.@rule[-1].dest_port=22
uci commit firewall
/etc/init.d/firewall restart
Updated in 2022Aug13
Should add following:
root@eddie:~# cat /etc/rc.local
# Put your custom commands here that should be executed once
# the system init finished. By default this file does nothing.
export PREINIT=1
mount_root
exit 0
Also have to refers to
https://openwrt.org/docs/guide-user/additional-software/extroot_configuration
for reference.