
Tips on 30Days30Skills(2)
Nov 26, 2014
Technology
Day 5 - GruntJS
Install via:
$ sudo npm install grunt-cli -g
After running you could see grunt is avaiable:
$ which grunt
/usr/local/bin/grunt
Automatically create the package.json via npm init.
Yosemite:GruntJS Trusty$ mkdir blog
Yosemite:GruntJS Trusty$ cd blog
Yosemite:blog Trusty$ npm init
This utility will walk you through creating a package.json file.
It only covers the most common items, and tries to guess sane defaults.

See `npm help json` for definitive documentation on these fields
and exactly what they do.

Use `npm install <pkg> --save` afterwards to install a package and
save it as a dependency in the package.json file.

Press ^C at any time to quit.
name: (blog)
version: (1.0.0)
description: My awesome blog
entry point: (index.js)
test command:
git repository:
keywords:
author:
license: (ISC)
About to write to /Users/Trusty/Code/30Days/GruntJS/blog/package.json:

{
  "name": "blog",
  "version": "1.0.0",
  "description": "My awesome blog",
  "main": "index.js",
  "scripts": {
    "test": "echo \"Error: no test specified\" && exit 1"
  },
  "author": "",
  "license": "ISC"
}


Is this ok? (yes) yes
Yosemite:blog Trusty$ cat package.json
{
  "name": "blog",
  "version": "1.0.0",
  "description": "My awesome blog",
  "main": "index.js",
  "scripts": {
    "test": "echo \"Error: no test specified\" && exit 1"
  },
  "author": "",
  "license": "ISC"
}
Run following command will install grunt locally and also update the dependencies, also update the package.json:
Yosemite:blog Trusty$ sudo npm install grunt --save-dev
Yosemite:blog Trusty$ cat package.json
{
  "name": "blog",
  "version": "1.0.0",
  "description": "My awesome blog",
  "main": "index.js",
  "scripts": {
    "test": "echo \"Error: no test specified\" && exit 1"
  },
  "author": "",
  "license": "ISC",
  "devDependencies": {
    "grunt": "^0.4.5"
  }
}
`

Yosemite:blog Trusty$ cat package.json
{
  "name": "blog",
  "version": "1.0.0",
  "description": "My awesome blog",
  "main": "index.js",
  "scripts": {
    "test": "echo \"Error: no test specified\" && exit 1"
  },
  "author": "",
  "license": "ISC",
  "devDependencies": {
    "grunt": "^0.4.5"
  }
}
Yosemite:blog Trusty$ grunt
A valid Gruntfile could not be found. Please see the getting started guide for
more information on how to configure grunt: http://gruntjs.com/getting-started
Fatal error: Unable to find Gruntfile.
Yosemite:blog Trusty$ vim Gruntfile.js
Yosemite:blog Trusty$ mkdir js
Yosemite:blog Trusty$ cd js/
Yosemite:js Trusty$ touch app.js
Yosemite:js Trusty$ vim app.js
function hello(name) {
	return "Hello, " + name;
}
function bye(name) {
	return "Bye, " + name;
}
Yosemite:js Trusty$ vim ../
Gruntfile.js   Gruntfile.js~  js/            node_modules/  package.json
Yosemite:js Trusty$ vim ../Gruntfile.js
module.exports = function(grunt) {
	grunt.initConfig({
		uglify: {
				build: {
					       src: ['js/app.js'],
					       dest: 'js/app.min.js'
				       }
			}
	});

	grunt.loadNpmTasks('grunt-contrib-uglify');
	grunt.registerTask('default', ['uglify']);
};
Yosemite:js Trusty$ cd ..
Yosemite:blog Trusty$ ls
Gruntfile.js	Gruntfile.js~	js		node_modules	package.json
Yosemite:blog Trusty$ grunt
>> Local Npm module "grunt-contrib-uglify" not found. Is it installed?
Warning: Task "uglify" not found. Use --force to continue.

Aborted due to warnings.
Yosemite:blog Trusty$ sudo grunt
>> Local Npm module "grunt-contrib-uglify" not found. Is it installed?
Warning: Task "uglify" not found. Use --force to continue.

Aborted due to warnings.
Yosemite:blog Trusty$ sudo npm install grunt-contrib-uglify --save-dev
npm WARN package.json blog@1.0.0 No repository field.
npm WARN package.json blog@1.0.0 No README data
grunt-contrib-uglify@0.6.0 node_modules/grunt-contrib-uglify
├── uri-path@0.0.2
├── loTrusty@2.4.1
├── chalk@0.5.1 (escape-string-regexp@1.0.2, ansi-styles@1.1.0, supports-color@0.2.0, has-ansi@0.1.0, strip-ansi@0.3.0)
├── uglify-js@2.4.15 (uglify-to-browserify@1.0.2, async@0.2.10, optimist@0.3.7, source-map@0.1.34)
└── maxmin@1.0.0 (figures@1.3.5, pretty-bytes@1.0.1, gzip-size@1.0.0)
Yosemite:blog Trusty$ grunt
Running "uglify:build" (uglify) task
>> 1 file created.

Done, without errors.
Yosemite:blog Trusty$ cat js/app.min.js
function hello(a){return"Hello, "+a}function bye(a){return"Bye, "+a}Yosemite:blog Trusty$
See, grunt will doing the boring tasks for us without any errors.
Day 6 - Grails
ArchLinux Setting
Install grails under ArchLinux:
sudo pacman -S grails
Then in eclipse, search Help > Eclipse Marketplace for “Grails” , it will hint you for installing grails.
File -> New -> Project -> Grails Project. First time it will ask you for setting the grails home directory.
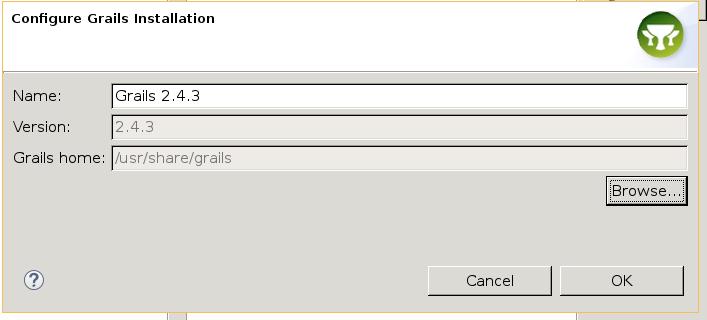
Set the project like:
Choose Grails perspective.
MAC Setting
Download the eclipse from:
https://eclipse.org/downloads/
Download the Java SE from:
http://support.apple.com/kb/DL1572
After installation, search the Marketplace for “Grails” install the grails for eclipse Luna.
Install Grails:
$ brew install grails
$ which grails
/usr/local/bin/grails
When configure the Grails project for the first time, the installation is /usr/local/Cellar/grails/2.4.4/libexec, then create a new project named “linkbin”.
Create new “domain class” named “User” and “Story”
Replace the class User via:
class User {
	String email
	String fullName
	static constraints = {
		email unique:true , blank : false , email:true
		fullName size:5..100  , blank : false
	}

}
Replace the class Story via:
package linkbin

class Story {
	String link
	String description
	Date submittedOn

	static constraints = {
		link url : true , blank : false ,unique : true
		description size : 10..1000 , blank : false
	}
}
Connect the User and Story Class, first modify the Story and User Class:
package linkbin
class Story {
    String link
    String description
    Date submittedOn
    static belongsTo = [user : User]
    static constraints = {
        link url : true , blank : false ,unique : true
        description size : 10..1000 , blank : false
    }
    static mapping = {
        table 'stories'
    }
}
User Class:
package linkbin
class User {
	String email
	String fullName
	static hasMany = [stories : Story]
	static constraints = {
		email unique:true , blank : false , email:true
		fullName size:5..100  , blank : false
	}
	static mapping = {
		table 'users'
	}
}
Then generate the Controller and view:
domain-> linkbin-> User.groovy-> Grails Tools -> Grails Command Wizard, input linkbin.User and click “Finish”. The same steps are the same for Story.
Now the CRUD controller and viewpoint will be generated.
Right-click the project and “Run as Grails App”, then you could
Now create the openshift app via following command:
$ rhc create -app linkbin tomcat-7 postgresql-9.2
This will automatically create the apps on openshift, and hit you like:
Your application 'linkbin' is now available.

  URL:        http://linkbin-kkkkkkktttt.rhcloud.com/
  SSH to:     xxxxxxxxxxxx@linkbin-kkkkkkktttt.rhcloud.com
  Git remote: ssh://xxxxxxxx@linkbin-kkkkkkktttt.rhcloud.com/~/git/linkbin.git/
  Cloned to:  /Users/Trusty/Documents/workspace/linkbin/linkbin

Run 'rhc show-app linkbin' for more details about your app.
And go to the linkbin folder:
git rm -rf src/ pom.xml
git commit -am "deleted default source code"
Modify the conf/Datasource.groovy file’s configuration:
		production {
			dataSource {
				dbCreate = "update"
				driverClassName = "org.postgresql.Driver"
				dialect = org.hibernate.dialect.PostgreSQLDialect
			uri = new URI(System.env.OPENSHIFT_POSTGRESQL_DB_URL)
			url = "jdbc:postgresql://"+uri.host+uri.path+"/"+System.env.OPENSHIFT_APP_NAME
				username = System.env.OPENSHIFT_POSTGRESQL_DB_USERNAME
				password = System.env.OPENSHIFT_POSTGRESQL_DB_PASSWORD
			}
		}
Generate the war file via:
“Grails Command Wizard”, use “war” command, the name of its generation is " target/ROOT.war”, then the ROOT.war will be generated, copy it to the webapps under linkbin:
$ git add .
$ git commit -am "linkbin app deployed to cloud"
$ git push
After push we could visit the above url for visiting the apps.