
WorkingTipsOnFreeRouter
Jul 1, 2021
Technology
1. 环境
物理机,全隔离环境,可通过隧道开通的proxy(10.xx.xx.xxx:8118)访问互联网.
终极目标:构建一个可自由连接互联网的网段用于虚拟机及虚拟网络方案的验证。
2. 配置步骤
2.1 准备Router虚拟机
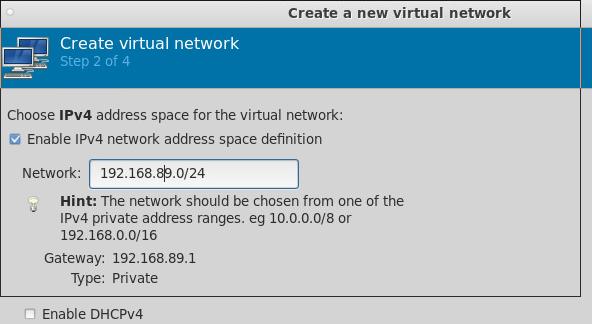
virt-manager内创建一个网段为192.168.89.0/24, dhcp关闭,转发模式。而后创建一台ubuntu20.04的虚拟机,配置为1核1G,使用该网络,启动。
启动后配置其网络地址为192.168.89.2/24:
$ cat /etc/netplan/01-netcfg.yaml
    # This file describes the network interfaces available on your system
    # For more information, see netplan(5).
    network:
      version: 2
      renderer: networkd
      ethernets:
        eth0:
          dhcp4: no
      bridges:
        br0:
          dhcp4: no
          addresses: [ 192.168.89.2/24 ]
          gateway4: 192.168.100.1
          interfaces:
             - eth0
$ sudo netplan apply
$ sudo hostnamectl set-hostname router
$ sudo vim /etc/hosts
....
127.0.1.1       router  router
....
因为192.168.89.0/24网段内无dncp服务器,dns服务器,因此我们希望Router这台机器用于接管整个网段的地址分配。这个网段我们预留前50个地址用于静态IP使用, 后面的192.168.89.51~192.168.89.254用于dhcp段地址分配。
dnsmasq安装及配置:
$ sudo apt-get install -y dnsmasq
$ sudo systemctl stop systemd-resolved.service
$ sudo systemctl disable systemd-resolved.service
$ sudo systemctl restart dnsmasq
$ sudo  vim /etc/dnsmasq.conf
dhcp-range=192.168.89.51,192.168.89.254,12h
dhcp-option=3,192.168.89.2
interface=br0
bind-interfaces
$ sudo systemctl restart dnsmasq
此时可以新建一台虚拟机接入该网段用于测试,可以看到该网段的dhcp确实由router承载,且分配了网关为192.168.89.2. 但是此时因为router上未开启流量转发,因而此虚拟机使用192.168.89.2作为网关时不能连接外部网络。
使能Ip转发:
$ cat /proc/sys/net/ipv4/ip_forward
0
$ sudo vim /etc/sysctl.conf
$ sudo sysctl -p
net.ipv4.ip_forward = 1
$ cat /proc/sys/net/ipv4/ip_forward
1
做到这里,我突然想到,如果一个局域网段有两个出口,有可能会带来隐患。不排除有的容器实例里某些诡异的操作会从192.168.89.1直接出也不一定。所以我决定彻底删除这个网段,将这个网段的forward属性也去掉,在libvirtd中,这就是一个完全隔离的网段,而Router这台机器我们将它配置成为一个双网卡的机器,而增加的eth1则连接到另一个网段(192.168.100.4)。
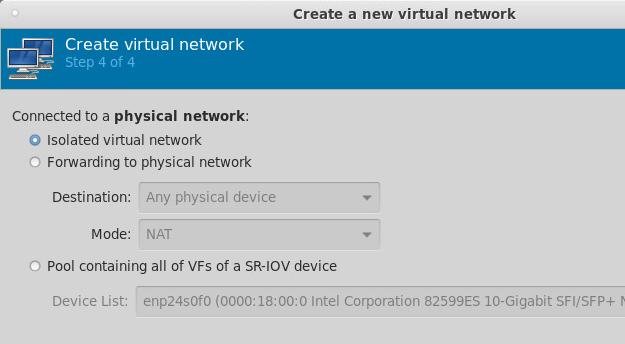
值得注意的是,在更改完isolated网络类型后,虚拟机的配置需要重新确认(libvirtd可能在增删网络配置的过程中将原有的网络回归到default)。
最终router上的网络及路由配置如下:
test@router:~$ cat /etc/netplan/01-netcfg.yaml
# This file describes the network interfaces available on your system
# For more information, see netplan(5).
network:
  version: 2
  renderer: networkd
  ethernets:
    eth0:
      dhcp4: no
      addresses: [ 192.168.89.2/24 ]
      #routes:
      #  - to: 192.168.89.0/24
      #    via: 192.168.89.1
test@router:~$ cat /etc/netplan/02-eth1.yaml
# This file describes the network interfaces available on your system
# For more information, see netplan(5).
network:
  version: 2
  renderer: networkd
  ethernets:
    eth1:
      dhcp4: no
      addresses: [ 192.168.100.4/24 ]
      gateway4: 192.168.100.1
test@router:~$ route -n
Kernel IP routing table
Destination     Gateway         Genmask         Flags Metric Ref    Use Iface
0.0.0.0         192.168.100.1   0.0.0.0         UG    0      0        0 eth1
192.168.89.0    0.0.0.0         255.255.255.0   U     0      0        0 eth0
192.168.100.0   0.0.0.0         255.255.255.0   U     0      0        0 eth1
重启过程中发现/etc/resolv.conf无效,执行以下操作:
test@router:/etc$ sudo rm -f resolv.conf
test@router:/etc$ sudo vim /etc/resolv.conf
nameserver 223.5.5.5
test@router:/etc$ sudo chattr +i /etc/resolv.conf
执行转发:
# sudo apt-get install -y iptables-persistent
# sudo iptables -t nat -A POSTROUTING -s 192.168.89.1/24 ! -d 192.168.89.0/24 -j SNAT --to-source 192.168.100.4
# apt-get install -y libevent-devel
##### get redsocks
# cd /opt/src/redsocks/
# make clean && make
# cd /opt/src/redsocks
配置
# ./redsocks.sh start
这里值得注意的是,redsocks需要配置为socks5代理才可以让本机访问到外面。
udp转发
外部机器建立ssh隧道用于转发:
# ssh -o GatewayPorts=true -f -N -T -R \*:18888:localhost:18888 docker@10.xx.xx.xxx
外部机器做udp到tcp的socat转发:
# sudo socat tcp-listen:18888,reuseaddr,fork udp:127.0.0.1:53
内部机器做tcp到udp的socat转发:
# socat -T15 udp4-recvfrom:53,bind=10.xx.xxx.xxx,fork tcp:localhost:18888