CustomizeRHEL74ISO
May 7, 2019
Technology
参考材料
https://www.golinuxhub.com/2017/05/how-to-create-customized-bootable-boot.html
目的
定制化rhel7.4安装ISO.
添加以下功能:
1.
准备
rhel7.4虚拟机一台,DVD安装光盘rhel-server-7.4-x86_64-dvd.iso已加载到/mnt目录:
root@server128:/media/sdd/raw/Rong_win/upgrade/Rong1905-redhat$ vagrant ssh
Last login: Tue May  7 09:23:02 2019 from 192.168.121.1
[vagrant@k8s2100upgrade-1 ~]$ cat /etc/redhat-release
Red Hat Enterprise Linux Server release 7.4 (Maipo)
[vagrant@k8s2100upgrade-1 ~]$ sudo mount /dev/sr0 /mnt
mount: /dev/sr0 is write-protected, mounting read-only
步骤
1. 准备编译服务器
准备工作目录,用于复制DVD中对应的目录结构以便于定制化:
# mkdir /root/geniso
# mount /dev/sr0 /mnt
# cp -rvf /mnt/* /root/geniso
2. 定制化kickstart文件
先用一个样例文件用于安装, 后面再根据需要修改:
# Kickstart configuration for RHEL7.4

#platform=x86, AMD64, or Intel EM64T
# System authorization information
auth  --enableshadow  --passalgo=sha512

# Clear the Master Boot Record
zerombr

# Partition clearing information
clearpart --drives=sda --all

# Use text mode install
#text
graphical

# Firewall configuration
firewall --disabled

# Run the Setup Agent on first boot
firstboot --reconfig --enable

# System keyboard
keyboard us

# System language
lang en_US.UTF-8

# Skipping input of key
#key --skip

# Installation logging level
logging --level=info

# Use NFS installation media
cdrom

# Network Information
network --bootproto=static --hostname=my-linux --device=eth0 --gateway=1.2.3.1 --ip=1.2.3.4 --netmask=255.255.255.0 --noipv6 --nodns --onboot=on --activate

# System bootloader configuration
bootloader --location=mbr --driveorder=sda

# The following is the partition information you requested
ignoredisk --only-use=sda

# Disk Partioning
clearpart --all --initlabel
autopart

#Root password
rootpw --iscrypted $6$KjCAXxUM2u5OcTtD$PcDbFkQCck97S6synqPIsxjHuOwQ1w5OENVE08l0gCG4fx3aW5DEl7Lw.1IjFflDT7iaESYUWKxO9877r7LAy0

# SELinux configuration
selinux --disabled
# Do not configure the X Window System
# Do not configure the X Window System
skipx

#Disabling kdump services, owing to few problems with current kexec package
services --disabled kdump

# System timezone
timezone --utc Asia/Shanghai

# Install OS instead of upgrade
install

# Reboot after installation
reboot

# list of packages to be installed
%packages
@ Core
@ Base --nodefaults
# packages deleted according to OS minimization
%end
其中密码可以通过以下命令来生成:
# python -c 'import crypt,getpass; print crypt.crypt(getpass.getpass())'
Password:
将上面的文件命名为ks.cfg并拷贝到/root/geniso目录。
3. 更改GRUB菜单
更换目录至isolinux目录并添加写权限给GRUB定义文件:
# pwd
/root/geniso/isolinux
# chmod a+w isolinux.cfg
在isolinux.cfg文件中查找到以下位置(约61行):
label linux
  menu label ^Install Red Hat Enterprise Linux 7.4
  kernel vmlinuz
  append initrd=initrd.img inst.stage2=hd:LABEL=RHEL-7.4\x20Server.x86_64 quiet
更改为:
label linux
  menu label ^Install Red Hat Enterprise Linux 7.4
  kernel vmlinuz
  append initrd=initrd.img inst.stage2=hd:LABEL=RHEL-7.4\x20Server.x86_64 quiet

label autolinux
  menu label ^Auto Install Red Hat Enterprise Linux 7.4
  kernel vmlinuz
  append initrd=initrd.img inst.repo=cdrom ks=cdrom:/ks.cfg net.ifnames=0 biosdevname=0
4. 生成ISO
安装genisoimage包,用于编译ISO:
[root@k8s2100upgrade-1 geniso]# cd Packages/
[root@k8s2100upgrade-1 Packages]# rpm -Uvh libusal-1.1.11-23.el7.x86_64.rpm genisoimage-1.1.11-23.el7.x86_64.rpm
warning: libusal-1.1.11-23.el7.x86_64.rpm: Header V3 RSA/SHA256 Signature, key ID fd431d51: NOKEY
Preparing...                          ################################# [100%]
Updating / installing...
   1:libusal-1.1.11-23.el7            ################################# [ 50%]
执行以下命令,将在/root下生成new.iso:
# cd /root/geniso
# mkisofs -o /root/new.iso  -b isolinux/isolinux.bin -c isolinux/boot.cat --no-emul-boot --boot-load-size 4 --boot-info-table -J -R -V "RHEL-7.4\x20Server.x86_64" .
细调kickstart
1. 主机名
更改网络信息:
network --bootproto=static --hostname=node ...............
2. 添加用户/密码
在ks.cfg最后添加以下,以便创建test和vagrant用户, test使用sudo时将免密码登录:
%post
groupadd vagrant -g 1001
useradd test -g vagrant -G wheel -u 1001
useradd vagrant -g vagrant -G wheel -u 1001
echo "test" | passwd --stdin xxxxx
echo "vagrant" | passwd --stdin vagrant
echo "test        ALL=(ALL)       NOPASSWD: ALL" >> /etc/sudoers.d/test
echo "vagrant        ALL=(ALL)       NOPASSWD: ALL" >> /etc/sudoers.d/test
sed -i "s/^.*requiretty/#Defaults requiretty/" /etc/sudoers
mkdir /home/vagrant/.ssh
echo "ssh-rsa AAAAB3NzaC1yc2EAAAABIwAAAQEA6NF8iallvQVp22WDkTkyrtvp9eWW6A8YVr+kz4TjGYe7gHzIw+niNltGEFHzD8+v1I2YJ6oXevct1YeS0o9HZyN1Q9qgCgzUFtdOKLv6IedplqoPkcmF0aYet2PkEDo3MlTBckFXPITAMzF8dJSIFo9D8HfdOV0IAdx4O7PtixWKn5y2hMNG0zQPyUecp4pzC6kivAIhyfHilFR61RGL+GPXQ2MWZWFYbAGjyiYJnAmCP3NOTd0jMZEnDkbUvxhMmBYSdETk1rRgm+R4LOzFUGaHqHDLKLX+FIPKcF96hrucXzcWyLbIbEgE98OHlnVYCzRdK8jlqm8tehUc9c9WhQ== vagrant insecure public key" > /home/vagrant/.ssh/authorized_keys
%end
3. 预注入key
接着注入key:
# Add user
user --name=test --groups=wheel --plaintext --password=xxxxx

# ssh key
sshpw --username=root --sshkey 'ssh-rsa AAAAB3x......'
4. 自动侦探第一块磁盘
需要更改%pre中的选项
5. 添加test/vagrant用户等
%post中需要有对应的更改
ks.cfg完整版
最终版本的ks.cfg如下:
# Kickstart configuration for RHEL7.4

#platform=x86, AMD64, or Intel EM64T
# System authorization information
auth  --enableshadow  --passalgo=sha512

# Use text mode install
text
#graphical

# Firewall configuration
firewall --disabled

# Run the Setup Agent on first boot
#firstboot --reconfig --enable
firstboot --disable

# System keyboard
keyboard us

# System language
lang en_US.UTF-8

# Skipping input of key
#key --skip

# Installation logging level
logging --level=info

# Use NFS installation media
cdrom

# Network Information
network --bootproto=static --hostname=node --device=eth0 --gateway=1.2.3.1 --ip=1.2.3.4 --netmask=255.255.255.0 --noipv6 --nodns --onboot=on --activate

# Include generated partition layout
%include /tmp/part-include

#Root password
rootpw --iscrypted $6$KjCAXxUM2u5OcTtD$PcDbFkQCck97S6synqPIsxjHuOwQ1w5OENVE08l0gCG4fx3aW5DEl7Lw.1IjFflDT7iaESYUWKxO9877r7LAy0

# SELinux configuration
selinux --disabled
# Do not configure the X Window System
# Do not configure the X Window System
skipx

#Disabling kdump services, owing to few problems with current kexec package
services --disabled kdump

# System timezone
timezone --utc Asia/Shanghai

# Install OS instead of upgrade
install

# Reboot after installation
reboot

# list of packages to be installed
%packages
@ Core
@ Base --nodefaults
# packages deleted according to OS minimization
%end

################################################################################
# Pre section
################################################################################
%pre
#!/bin/bash
# Set networking defaults.

# Parse the Kernel boot options for overrides. (Key=Value)
cmdline=($(cat /proc/cmdline))
for cmd in ${cmdline[@]}; do
  if [[ "$cmd" =~ '=' ]]; then
    eval "$cmd"
  fi
done

# Enumerate all disks.
disks=($(list-harddrives | awk '{ print $1 }'))
sizes=($(list-harddrives | awk '{ print $2 }'))
count=${#disks[@]}

if grep -q -w "noformat" /proc/cmdline; then
  # TODO: Do not format any attached disks.
  true
else
  # Format all attached disks.
  if grep -q -w "nolvm" /proc/cmdline; then
    # TODO: Do not use LVM.
    true
  else
    # Use LVM
    i=0
    pvs=
    parts=
    for disk in ${disks[@]}; do
      # Only part the first disk
      if (( $i == 1 )); then
        break
      fi
      # End of Only part the first disk
      parts="${parts}part pv.$i --grow --size=1 --ondisk=/dev/${disk}"
      pvs="$pvs pv.$i"
      let i=$i+1
    done
    pvs=(${pvs})
    cat > /tmp/part-include << EOF
# password
bootloader --location=mbr --driveorder=${disks[0]}
zerombr
clearpart --all
part /boot --label=boot --fsoptions=nodev,nosuid,noexec --size=512 --asprimary --ondisk=/dev/${disks[0]}
part pv.3 --size=100 --grow --ondisk=/dev/${disks[0]}
volgroup vg0 pv.3
#$parts
#volgroup vg0 ${pvs[@]}
# See CIS Benchmark / NSA SNAC guides for partitioning and fsoption explanations;
# https://www.nsa.gov/ia/_files/os/redhat/rhel5-guide-i731.pdf
# https://benchmarks.cisecurity.org/downloads/form/index.cfm?download=centos6.100
# Requires ~16GB HDD
logvol / --name=root --vgname=vg0 --size=15000 --grow
EOF
  fi
fi
%end
################################################################################
# Post section
################################################################################

%post
groupadd vagrant -g 1001
groupadd test -g 1002
useradd test -g test -G wheel -u 1002
useradd vagrant -g vagrant -G wheel -u 1001
echo "xxxxxxx" | passwd --stdin test
echo "vagrant" | passwd --stdin vagrant
echo "test        ALL=(ALL)       NOPASSWD: ALL" >> /etc/sudoers.d/test
echo "vagrant        ALL=(ALL)       NOPASSWD: ALL" >> /etc/sudoers.d/vagrant
sed -i "s/^.*requiretty/#Defaults requiretty/" /etc/sudoers
mkdir /home/vagrant/.ssh
echo "ssh-rsa AAAAB3NzaC1yc2EAAAABIwAAAQEA6NF8iallvQVp22WDkTkyrtvp9eWW6A8YVr+kz4TjGYe7gHzIw+niNltGEFHzD8+v1I2YJ6oXevct1YeS0o9HZyN1Q9qgCgzUFtdOKLv6IedplqoPkcmF0aYet2PkEDo3MlTBckFXPITAMzF8dJSIFo9D8HfdOV0IAdx4O7PtixWKn5y2hMNG0zQPyUecp4pzC6kivAIhyfHilFR61RGL+GPXQ2MWZWFYbAGjyiYJnAmCP3NOTd0jMZEnDkbUvxhMmBYSdETk1rRgm+R4LOzFUGaHqHDLKLX+FIPKcF96hrucXzcWyLbIbEgE98OHlnVYCzRdK8jlqm8tehUc9c9WhQ== vagrant insecure public key" > /home/vagrant/.ssh/authorized_keys
mkdir /root/.ssh
echo "ssh-rsa xagwoguwogu gwewg">/root/.ssh/authorized_keys
chmod 700 /root/.ssh
chmod 400 /root/.ssh/authorized_keys
%end
测试安装
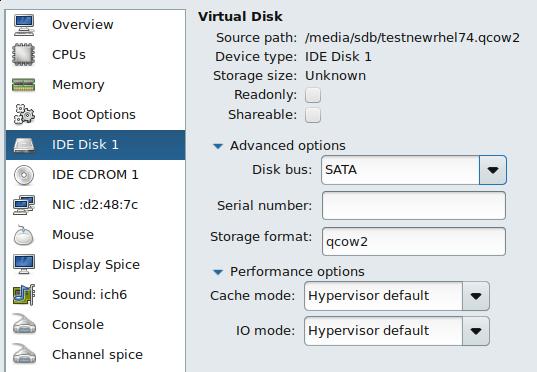
因为我们指定了sda,因而我们这里先用virt-manager中的SATA驱动:

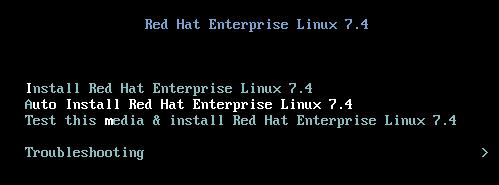
启动光盘,来到安装界面:

无需确认,一路安装直到安装完毕
