WorkingTipsOnNodeJSApp
Sep 5, 2018
Technology
Steps
最先是在VPS上用docker开发,遇到跨域问题,专用虚拟机开发。
# vagrant init bento/ubuntu-18.04
更改IP为192.168.33.128/24, 2 Core/ 2G
# vagrant up
# vagrant ssh
安装必要的开发环境。
# sudo apt-get install -y npm nodejs
# npm install -g express
# npm install -g express-generator
# which express
/usr/local/bin/express
创建一个名称为countdown的express项目:
# express -v ejs countdown
# cd countdown/
# ls
app.js  bin  package.json  public  routes  views
安装依赖:
# npm install -d
# npm install socket.io express --save
此时可以查看package.json的内容:
{
  "name": "countdown",
  "version": "0.0.0",
  "private": true,
  "scripts": {
    "start": "node ./bin/www"
  },
  "dependencies": {
    "cookie-parser": "~1.4.3",
    "debug": "~2.6.9",
    "ejs": "~2.5.7",
    "express": "^4.16.3",
    "http-errors": "~1.6.2",
    "morgan": "~1.9.0",
    "socket.io": "^2.1.1"
  }
}
我们需要使用layout(比较陈旧的用法),因而执行以下操作:
# npm install ejs-locals --save
代码更改
在// view engine setup前添加以下代码,作用是用于指定当前app的服务端口,并定义socket.io的模块引入:
var engine = require('ejs-locals');

var server = require('http').createServer(app);
var io = require('socket.io')(server);
//(server,{
//  transports  : [ 'xhr-polling' ]
//});

server.listen(5000);
// Todo: xhr-polling的意义?
在view engine setup中添加ejs-local的用法, 我们这里将指定layout.ejs为我们模板中的布局文件:
// view engine setup
app.set('views', path.join(__dirname, 'views'));
app.set('view options', { layout:'views/layout.ejs' });
app.engine('ejs', engine);
app.set('view engine', 'ejs');
接着我们引入状态变量及对io的用法:
// status indicator
var status = "All is well.";

io.sockets.on('connection', function (socket) {
  io.sockets.emit('status', { status: status }); // note the use of io.socket
s to emit but socket.on to listen
  socket.on('reset', function (data) {
    status = "War is imminent!";
    io.sockets.emit('status', { status: status });
  });
});

module.exports = app;
模板文件定义:
# cat views/layout.ejs
<!DOCTYPE html>
<html lang="en">
  <head>
    <meta charset="utf-8">
    <title>Title</title>
    <meta name="description" content="">
    <meta name="author" content="">

    <!-- HTML5 shim, for IE6-8 support of HTML elements -->
    <!--[if lt IE 9]>
      <script src="http://html5shim.googlecode.com/svn/trunk/html5.js"></script>
    <![endif]-->

    <!-- styles -->
    <link href="/stylesheets/main.css" rel="stylesheet">


  </head>
  <body>
    <%- body %>
    <script src="/socket.io/socket.io.js"></script>
    <script src="/javascripts/libs/jquery.js"></script>
    <script src="/javascripts/main.js"></script>
  </body>
</html>
以及index.ejs:
# cat views/index.ejs
<% layout('layout') -%>

<div id="status"></div>
<button id="reset">Reset!</button>
main.js的定义文件如下:
# vim public/javascripts/main.js
var socket = io.connect(window.location.hostname);

socket.on('status', function (data) {
    $('#status').html(data.status);
});

$('#reset').click(function() {
    socket.emit('reset');
});
jquery.js文件如下:
# cd public/javascripts/
# mkdir libs && cd libs
# wget https://code.jquery.com/jquery-3.3.1.js
# mv jquery-3.3.1.js  jquery.js
main.css文件同样也需要定义:
# vim public/stylesheets/main.css
内容略过
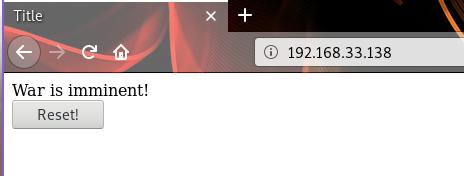
现在运行node app.js可以看到运行结果:

改进
timer的改进,具体的代码已经上传到github上。
Todo: 多个Timer的添加。
Todo: 跨域问题的解决。
