
WorkingTipsOnInternetSharing
Dec 18, 2017
Technology
AIM
To set up an free wireless solution working for WebDuino.
Because I located in china mainland, while our internet were forbidden by government(Fuck GFW!), so I have to find another way for accross the firewall and let WebDuino fetch back its updates.
Hardware Environment
Laptop.
Wireless dongle(Fast)
Bus 001 Device 002: ID 0bda:8179 Realtek Semiconductor Corp. RTL8188EUS 802.11n Wireless Network Adapter
VirtualMachine
I set a virtual machine which runs in virtualbox. First I thought configuration via gui would be easier, but later I found it’s even inpossible to use the gui configuration tools to let my usb wireless card acts as an ap.
Later I will use an ubuntu 32-bit server(i386) for setting up this wireless ap.
To specify usb wireless dongle to virtualbox’s vm(Ubuntu16.04), do following:
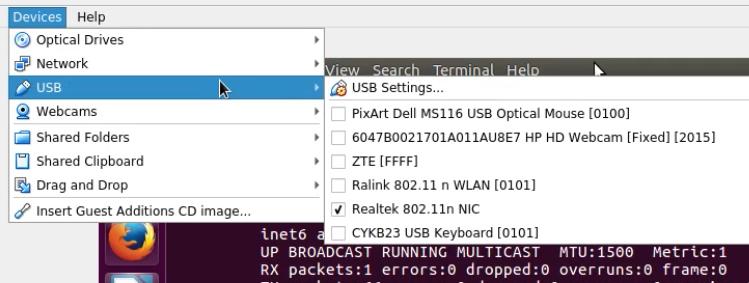
Then in your vm you will see the attached usb dongle.
System Configuration
Enable naming
If you didn’t specify the naming, Ubuntu16.04(or later than Ubuntu12.04) won’t recognize your ethernet card or wireless card as “eth0” or “wlan0”, so you have to changint then in grub parameters:
If you don’t do this step, your wireless card will be recognized as something like “wlx000e8e22xxxxxx”, this will makes your configuration a little bit confusing.
# vim /etc/default/grub
GRUB_CMDLINE_LINUX="net.ifnames=0 biosdevname=0"
# sudo update-grub
# sudo reboot
After rebooting, your wireless card will be recoginzed as “wlan0”.
Don’t forget to update your /etc/network/interface, change from “enp0s” to
“eth”.
8188eu hostapd
The system’s default hostapd won’t be used, we have to use 8188eu’s own hostapd for working, the steps are listed as following:
$ sudo apt-get autoremove hostapd
$ wget https://github.com/jenssegers/RTL8188-hostapd/archive/v2.0.tar.gz
$ tar -zxvf v2.0.tar.gz
$ cd RTL8188-hostapd-2.0/hostapd
$ sudo make
$ sudo make install
$ sudo systemctl enable hostapd
$ sudo service hostapd restart
If you didn’t see your hostapd working, simply reboot your machine, and check again.
8188eu hostapd configuration
Your hostapd configuration file is located in /etc/hostapd/hostapd.conf,
following are the configuration example:
interface=wlan0
ssid=sosowifi
channel=1
#bridge=br0

# WPA and WPA2 configuration

macaddr_acl=0
auth_algs=1
ignore_broadcast_ssid=0
wpa=3
wpa_passphrase=XXXXXXXXXXXXXXXXX
wpa_key_mgmt=WPA-PSK
wpa_pairwise=TKIP
rsn_pairwise=CCMP

# Hardware configuration

driver=rtl871xdrv
ieee80211n=1
hw_mode=g
device_name=RTL8192CU
manufacturer=Realtek
Check the status via:
$ sudo systemctl status hostapd
● hostapd.service - LSB: Advanced IEEE 802.11 management daemon
   Loaded: loaded (/etc/init.d/hostapd; bad; vendor preset: enabled)
   Active: active (running) since 一 2017-12-18 15:00:02 CST; 27min ago
     Docs: man:systemd-sysv-generator(8)
  Process: 1502 ExecStart=/etc/init.d/hostapd start (code=exited, status=0/SUCCESS)
    Tasks: 1 (limit: 512)
   CGroup: /system.slice/hostapd.service
           └─1525 /usr/local/bin/hostapd -B -P /var/run/hostapd.pid /etc/hostapd/hostapd.conf
ra2770 configuration
Edit the /etc/hostapd/hostapd.conf file listed as following:
# RT2770
interface=wlan0
driver=nl80211
ssid=my_ap
hw_mode=g
channel=6
macaddr_acl=0
auth_algs=1
ignore_broadcast_ssid=0
wpa=3
wpa_passphrase=xxxxxxxxxxxxxxxxxxxx
wpa_key_mgmt=WPA-PSK
wpa_pairwise=TKIP
rsn_pairwise=CCMP
wlan0 configuration
Setup the wlan0 ip address via following:
# vim /etc/network/interface
	# wireless wlan0
	allow-hotplug wlan0
	iface wlan0 inet static
	address 10.0.70.1
	netmask 255.255.255.0
We set wlan0’s ip address as the gateway for our wifi-network.
dhcpcd
We have to use dhcpd for assiging the ip address to connected.
$ sudo  apt-get install  isc-dhcp-server
$ sudo vim /etc/dhcp/dhcpd.conf
ddns-update-style none;
ignore client-updates;
authoritative;
option local-wpad code 252 = text;

subnet 10.0.70.0 netmask 255.255.255.0 {
# --- default gateway
option routers 10.0.70.1;
# --- Netmask
option subnet-mask 255.255.255.0;
# --- Broadcast Address
option broadcast-address 10.0.70.255;
# --- Domain name servers, tells the clients which DNS servers to use.
option domain-name-servers
10.0.70.1, 8.8.8.8, 8.8.4.4;
option time-offset 0;
range 10.0.70.3 10.0.70.13;
default-lease-time 1209600;
max-lease-time 1814400;
}
We won’t add dhcpd for auto-startup, because we don’t want person to connect to our ap at the very beginning time.
IP Forwarding
We enable the ip forwarding of the kernel and setup the postrouting for iptables:
$ sudo iptables -t nat -A POSTROUTING -s 10.0.70.0/24 ! -d 10.0.70.0/24  -j MASQUERADE
$ sudo dhcpd wlan0
$ sudo bash
# echo 1 > /proc/sys/net/ipv4/ip_forward
Now you should be able to access the network.
Trouble-Shooting
If you use virtualbox’s redirect usb. you will encounter several problems. Try to change from virtualbox to virt-manager:
# VBoxManage clonehd --format RAW UbuntuServer.vdi UbuntuServer.img
# qemu-img convert -f raw UbuntuServer.img -O qcow2 UbuntuServer.qcow2
Now create a new virtual machine in virt-manager, you will find your wifi sharing become stable.
Redirect the usb device via spice driver.
clean dns
Install dnsmasq:
$ sudo apt-get install -y dnsmasq
Configure dnsmasq to listen on 9053 port:
$ sudo service dnsmasq stop
$ sudo netstat -anp |grep 53
unix  2      [ ACC ]     STREAM     LISTENING     11653    1/init              /run/lvm/lvmpolld.socket
unix  3      [ ]         STREAM     CONNECTED     10534    441/lvmetad
unix  3      [ ]         STREAM     CONNECTED     14553    977/accounts-daemon
unix  2      [ ]         DGRAM                    29853    5893/sudo
$ sudo vim /etc/dnsmasq.conf
port=9053
$ sudo service dnsmasq restart
$ sudo netstat -anp |grep 53
tcp        0      0 0.0.0.0:9053            0.0.0.0:*               LISTEN      5943/dnsmasq
tcp6       0      0 :::9053                 :::*                    LISTEN      5943/dnsmasq
udp        0      0 0.0.0.0:9053            0.0.0.0:*                           5943/dnsmasq
udp6       0      0 :::9053                 :::*                                5943/dnsmasq
unix  2      [ ACC ]     STREAM     LISTENING     11653    1/init              /run/lvm/lvmpolld.socket
unix  3      [ ]         STREAM     CONNECTED     10534    441/lvmetad
unix  3      [ ]         STREAM     CONNECTED     14553    977/accounts-daemon
Configure resolv.conf to nameserver 223.5.5.5 then install pdnsd:
$ sudo apt-get install -y pdnsd
Configure as manual:
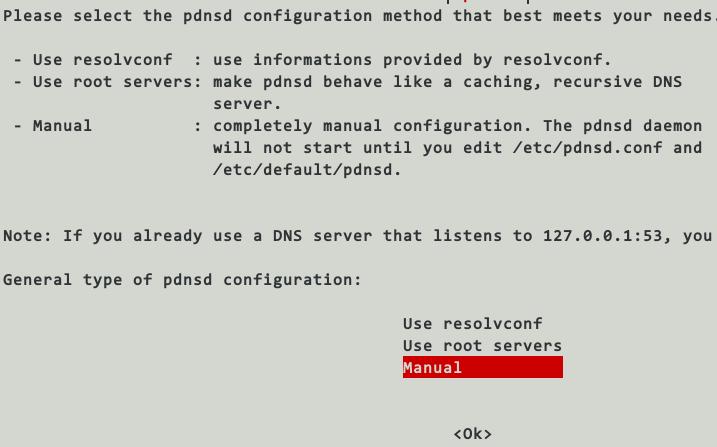
Configure the pdnsd configuration as following:
// Read the pdnsd.conf(5) manpage for an explanation of the options.

/* Note: this file is overriden by automatic config files when
  /etc/default/pdnsd AUTO_MODE is set and that
  /usr/share/pdnsd/pdnsd-$AUTO_MODE.conf exists
*/

global {
    perm_cache=4096;
    cache_dir="/var/cache/pdnsd";
    run_as="pdnsd";
    server_ip = 127.0.0.1;
    server_port=53;
    status_ctl = on;
    query_method=tcp_only;
    neg_domain_pol = off;
    paranoid = on;
    par_queries = 1;
    min_ttl = 6h;
    max_ttl = 12h;
    timeout = 10;
}

/* with status_ctl=on and resolvconf installed, this will work out from the box
  this is the recommended setup for mobile machines */
server {
   label = "routine";
   ip = 223.5.5.5;
   timeout = 5;
   reject = 74.125.127.102,
       74.125.155.102,
       74.125.39.102,
       74.125.39.113,
       209.85.229.138,
       128.121.126.139,
       159.106.121.75,
       169.132.13.103,
       192.67.198.6,
       202.106.1.2,
       202.181.7.85,
       203.161.230.171,
       203.98.7.65,
       207.12.88.98,
       208.56.31.43,
       209.145.54.50,
       209.220.30.174,
       209.36.73.33,
       211.94.66.147,
       213.169.251.35,
       216.221.188.182,
       216.234.179.13,
       243.185.187.39,
       37.61.54.158,
       4.36.66.178,
       46.82.174.68,
       59.24.3.173,
       64.33.88.161,
       64.33.99.47,
       64.66.163.251,
       65.104.202.252,
       65.160.219.113,
       66.45.252.237,
       69.55.52.253,
       72.14.205.104,
       72.14.205.99,
       78.16.49.15,
       8.7.198.45,
       93.46.8.89,
       37.61.54.158,
       243.185.187.39,
       190.93.247.4,
       190.93.246.4,
       190.93.245.4,
       190.93.244.4,
       65.49.2.178,
       189.163.17.5,
       23.89.5.60,
       49.2.123.56,
       54.76.135.1,
       77.4.7.92,
       118.5.49.6,
       159.24.3.173,
       188.5.4.96,
       197.4.4.12,
       220.250.64.24,
       243.185.187.30,
       249.129.46.48,
       253.157.14.165;
   reject_policy = fail;
   exclude = ".google.com",
       ".cn",
       ".baidu.com",
       ".qq.com",
       ".gstatic.com",
       ".googleusercontent.com",
       ".googlepages.com",
       ".googlevideo.com",
       ".googlecode.com",
       ".googleapis.com",
       ".googlesource.com",
       ".googledrive.com",
       ".ggpht.com",
       ".youtube.com",
       ".youtu.be",
       ".ytimg.com",
       ".twitter.com",
       ".facebook.com",
       ".fastly.net",
       ".akamai.net",
       ".akamaiedge.net",
       ".akamaihd.net",
       ".edgesuite.net",
       ".edgekey.net";
}

server {
   # Better setup dns server(DON'T USE PORT 53) on your own vps for faster proxying
   label = "special";
   ip = 208.67.222.222,208.67.220.220;
   port = 5353;
   proxy_only = on;
   timeout = 5;
}
Configure the daemon:
$  sudo vim /etc/default/pdnsd
.....
START_DAEMON=yes
.....
$ sudo /etc/init.d/pdnsd restart
Examine the result of our pdnsd:
# dig @127.0.0.1 -p 53 www.youtube.com

; <<>> DiG 9.10.3-P4-Ubuntu <<>> @127.0.0.1 -p 53 www.youtube.com
; (1 server found)
;; global options: +cmd
;; Got answer:
;; ->>HEADER<<- opcode: QUERY, status: NOERROR, id: 33429
;; flags: qr rd ra; QUERY: 1, ANSWER: 8, AUTHORITY: 0, ADDITIONAL: 1

;; OPT PSEUDOSECTION:
; EDNS: version: 0, flags:; udp: 1024
;; QUESTION SECTION:
;www.youtube.com.		IN	A

;; ANSWER SECTION:
www.youtube.com.	43200	IN	CNAME	youtube-ui.l.google.com.
youtube-ui.l.google.com. 21600	IN	CNAME	youtube-ui-china.l.google.com.
youtube-ui-china.l.google.com. 21600 IN	A	74.125.203.101
youtube-ui-china.l.google.com. 21600 IN	A	74.125.203.102
youtube-ui-china.l.google.com. 21600 IN	A	74.125.203.100
youtube-ui-china.l.google.com. 21600 IN	A	74.125.203.139
youtube-ui-china.l.google.com. 21600 IN	A	74.125.203.113
youtube-ui-china.l.google.com. 21600 IN	A	74.125.203.138

;; Query time: 280 msec
;; SERVER: 127.0.0.1#53(127.0.0.1)
;; WHEN: Mon Dec 18 22:10:02 CST 2017
;; MSG SIZE  rcvd: 205
shadowsocks
Install and configure shadowsocks via following command:
$ sudo apt-get install -y python-pip
$ sudo pip install shadowsocks
$ sudo pip install --upgrade pip
$ sudo vim /etc/shadowsocks/config.json
xxxxxxxxxxxxxxxx
$ sslocal -c /etc/shadowsocks/config.json
redsocks
Get the source code via:
$ git clone https://github.com/semigodking/redsocks
$ sudo apt-get -y install libevent-dev libssl-dev
$ cd redsocks
$ make
After make, you will find the executable file named redsocks2 under the folder.
Configure the redsocks(diff file listed as following):
dash@ubuntu:~/redsocks$ cp redsocks.conf.example  redsocks.conf
dash@ubuntu:~/redsocks$ vim redsocks.conf
dash@ubuntu:~/redsocks$ diff redsocks.conf redsocks.conf.example
18c18
< 	daemon = on;
---
> 	daemon = off;
53c53
< 	local_ip = 0.0.0.0;
---
> 	local_ip = 127.0.0.1;
58c58
< 	listenq = 128; // SOMAXCONN equals 128 on my Linux box.
---
> 	// listenq = 128; // SOMAXCONN equals 128 on my Linux box.
72c72
< 	ip = 127.0.0.1;
---
> 	ip = example.org;
101,147c101,147
< //redudp {
< //	// `local_ip' should not be 0.0.0.0 as it's also used for outgoing
< //	// packets that are sent as replies - and it should be fixed
< //	// if we want NAT to work properly.
< //	local_ip = 127.0.0.1;
< //	local_port = 10053;
< //
< //	// `ip' and `port' of socks5 proxy server.
< //	ip = 10.0.0.1;
< //	port = 1080;
< //	login = username;// field 'login' is reused as encryption
< //					   // method of shadowsocks
< //	password = pazzw0rd;
< //
< //	// know types: socks5, shadowsocks
< //	type = socks5;
< //
< //	// redsocks knows about two options while redirecting UDP packets at
< //	// linux: TPROXY and REDIRECT.  TPROXY requires more complex routing
< //	// configuration and fresh kernel (>= 2.6.37 according to squid
< //	// developers[1]) but has hack-free way to get original destination
< //	// address, REDIRECT is easier to configure, but requires `dest_ip` and
< //	// `dest_port` to be set, limiting packet redirection to single
< //	// destination.
< //	// [1] http://wiki.squid-cache.org/Features/Tproxy4
< //	dest_ip = 8.8.8.8;
< //	dest_port = 53;
< //
< //	// Do not set it large if this section is for DNS requests. Otherwise,
< //	// you may encounter out of file descriptor problem. For DNS requests,
< //	// 10s is adequate.
< //	udp_timeout = 30;
< //	// udp_timeout_stream = 180;
< //}
< //
< //tcpdns {
< //	// Transform UDP DNS requests into TCP DNS requests.
< //	// You can also redirect connections to external TCP DNS server to
< //	// REDSOCKS transparent proxy via iptables.
< //	local_ip = 192.168.1.1; // Local server to act as DNS server
< //	local_port = 1053;      // UDP port to receive UDP DNS requests
< //	tcpdns1 = 8.8.4.4;      // DNS server that supports TCP DNS requests
< //	tcpdns1_port = 53;      // DNS server port, default 53
< //	tcpdns2 = 8.8.8.8;      // DNS server that supports TCP DNS requests
< //	tcpdns2_port = 53;      // DNS server port, default 53
< //	timeout = 4;            // Timeout value for TCP DNS requests
< //}
---
> redudp {
> 	// `local_ip' should not be 0.0.0.0 as it's also used for outgoing
> 	// packets that are sent as replies - and it should be fixed
> 	// if we want NAT to work properly.
> 	local_ip = 127.0.0.1;
> 	local_port = 10053;
>
> 	// `ip' and `port' of socks5 proxy server.
> 	ip = 10.0.0.1;
> 	port = 1080;
> 	login = username;// field 'login' is reused as encryption
> 					   // method of shadowsocks
> 	password = pazzw0rd;
>
> 	// know types: socks5, shadowsocks
> 	type = socks5;
>
> 	// redsocks knows about two options while redirecting UDP packets at
> 	// linux: TPROXY and REDIRECT.  TPROXY requires more complex routing
> 	// configuration and fresh kernel (>= 2.6.37 according to squid
> 	// developers[1]) but has hack-free way to get original destination
> 	// address, REDIRECT is easier to configure, but requires `dest_ip` and
> 	// `dest_port` to be set, limiting packet redirection to single
> 	// destination.
> 	// [1] http://wiki.squid-cache.org/Features/Tproxy4
> 	dest_ip = 8.8.8.8;
> 	dest_port = 53;
>
> 	// Do not set it large if this section is for DNS requests. Otherwise,
> 	// you may encounter out of file descriptor problem. For DNS requests,
> 	// 10s is adequate.
> 	udp_timeout = 30;
> 	// udp_timeout_stream = 180;
> }
>
> tcpdns {
> 	// Transform UDP DNS requests into TCP DNS requests.
> 	// You can also redirect connections to external TCP DNS server to
> 	// REDSOCKS transparent proxy via iptables.
> 	local_ip = 192.168.1.1; // Local server to act as DNS server
> 	local_port = 1053;      // UDP port to receive UDP DNS requests
> 	tcpdns1 = 8.8.4.4;      // DNS server that supports TCP DNS requests
> 	tcpdns1_port = 53;      // DNS server port, default 53
> 	tcpdns2 = 8.8.8.8;      // DNS server that supports TCP DNS requests
> 	tcpdns2_port = 53;      // DNS server port, default 53
> 	timeout = 4;            // Timeout value for TCP DNS requests
> }
usb network sharing
ZTE cellphone for sharing its connection:
auto usb0-
allow-hotplug usb0
iface usb0 inet static
address 192.168.42.75
netmask 255.255.255.0
up route add default gw 192.168.42.129 dev usb0
down route del default gw 192.168.42.129 dev usb0