
UseMesosForCI
Dec 15, 2016
Technology
参考了http://container-solutions.com/continuous-delivery-with-docker-on-mesos-in-less-than-a-minute/
Nodejs程序
app.js程序如下:
// Load the http module to create an http server.
var http = require('http');

// Configure our HTTP server to respond with Hello World to all requests.
var server = http.createServer(function (request, response) {
  response.writeHead(200, {"Content-Type": "text/plain"});
  response.end("Hello World");
});

// Listen on port 8000, IP defaults to "0.0.0.0"
server.listen(8000);

// Put a friendly message on the terminal
console.log("Server running at http://127.0.0.1:8000/");
配置文件package.json如下:
{
  "name": "hello-world",
  "description": "hello world",
  "version": "0.0.1",
  "private": true,
  "dependencies": {
    "express": "3.x"
  },
  "scripts": {"start": "node app.js"}
}
创建容器的Dockerfile定义如下:
FROM google/nodejs

WORKDIR /app
ADD package.json /app/
RUN npm install
ADD . /app

EXPOSE 8000
CMD []
ENTRYPOINT ["/nodejs/bin/npm", "start"]
于是我们可以编译出自定义的容器镜像:
$ docker build -t my_nodejs_image .
$ docker run -p 8000:8000 my_nodejs_image
这时候访问http://localhost:8000即可看到APP有hello world的输出。
引入Jenkins
获取docker的group id:
# cat /etc/group | grep -i docker
docker:x:998:vagrant
定义Dockerfile, 注意我们这里有998的替代:
FROM jenkins

MAINTAINER ContainerSolutions

USER root
#TODO the group ID for docker group on my Ubuntu is 125, therefore I can only
# run docker commands if I have same group id inside.
# Otherwise the socket file is not accessible.
RUN groupadd -g 998 docker; usermod -a -G docker jenkins
USER jenkins
编译docke镜像:
# docker build -t dash/jenkins_with_docker .
# docker images | grep dash
dash/jenkins_with_docker                 latest              6dc4c6263f78
25 seconds ago      712 MB
创建docker-compose.yml文件:
jenkins:
  image: dash/jenkins_with_docker
  volumes:
    - jenkins-stuff:/var/jenkins_home
    - .:/var/jenkins_data
    - /var/run/docker.sock:/var/run/docker.sock
    - /usr/bin/docker:/usr/bin/docker
  ports:
    - "8081:8080"
registry:
  image: registry
  environment:
    - STORAGE_PATH=/registry
  volumes:
    - registry-stuff:/registry
  ports:
    - "5000:5000"
现在运行docker-compose up,并检查服务状态,
如果之前已经运行过,则需要删除以前的卷,docker volume rm jenkins-stuff
root@ci:~# netstat -anp | grep 5000
tcp6       0      0 :::5000                 :::*                    LISTEN
1983/docker-proxy
root@ci:~# netstat -anp | grep 8081
tcp6       0      0 :::8081                 :::*                    LISTEN
1917/docker-proxy
可以通过访问http://localhost:8081来查看jenkins界面。

获取密码的步骤如下:
# docker ps | grep -i dash
CONTAINER ID        IMAGE                      COMMAND
CREATED              STATUS              PORTS
NAMES
dashcompose_registry_1
74aeca2d56c5        dash/jenkins_with_docker   "/bin/tini -- /usr/lo"   About
a minute ago   Up About a minute   50000/tcp, 0.0.0.0:8081->8080/tcp
dashcompose_jenkins_1
# docker exec -it 74aeca2d56c5 /bin/bash
jenkins@74aeca2d56c5:/$ cat /var/jenkins_home/secrets/initialAdminPassword
e8902ae0e7d84cc6848fb79cf7e64538
选择不添加任何插件,直接进入到jenkins.
查看已经添加的卷的详细信息:
# docker volume ls
DRIVER              VOLUME NAME
local
049c2b4d14069f74ded6ed1286694a7a43b391aac5345f63fdb23b6c0a453d32
local
8ad894e25c1fd64b229bd4cb777ea37895b15acfeeee9e4de1cb07ef7e1e1649
local
9033c8aa23972d703e54aed1647516577866aff738929f09e4070106b24a5edf
local
f8c0327e154ceb284e9444fba4dfa53b7d92651c9fce44611d98873adb1e5051
local               jenkins-stuff
local               registry-stuff
# docker volume inspect jenkins-stuff
[
    {
        "Name": "jenkins-stuff",
        "Driver": "local",
        "Mountpoint": "/var/lib/docker/volumes/jenkins-stuff/_data",
        "Labels": null,
        "Scope": "local"
    }
]
可以看到我们添加的卷挂载的目录, 那么建立以下的目录:
$ sudo mkdir /var/lib/docker/volumes/jenkins-stuff/_data/workspace/dockerbuild
创建两个脚本,一个用来编译,一个用来推送已经编译好的docker镜像:
# cat build.sh
#!/bin/bash

if [ -z "${1}" ]; then
   version="latest"
else
   version="${1}"
fi

cd nodejs_app
docker build -t localhost:5000/containersol/nodejs_app:${version} .
cd ..
# cat push.sh
#!/bin/bash

if [ -z "${1}" ]; then
   version="latest"
else
   version="${1}"
fi

docker push localhost:5000/containersol/nodejs_app:"${version}"
同样将我们的app拷贝到这个目录下,目录树如下:
# tree
.
├── build.sh
├── nodejs_app
│   ├── app.js
│   ├── Dockerfile
│   └── package.json
└── push.sh

1 directory, 5 files
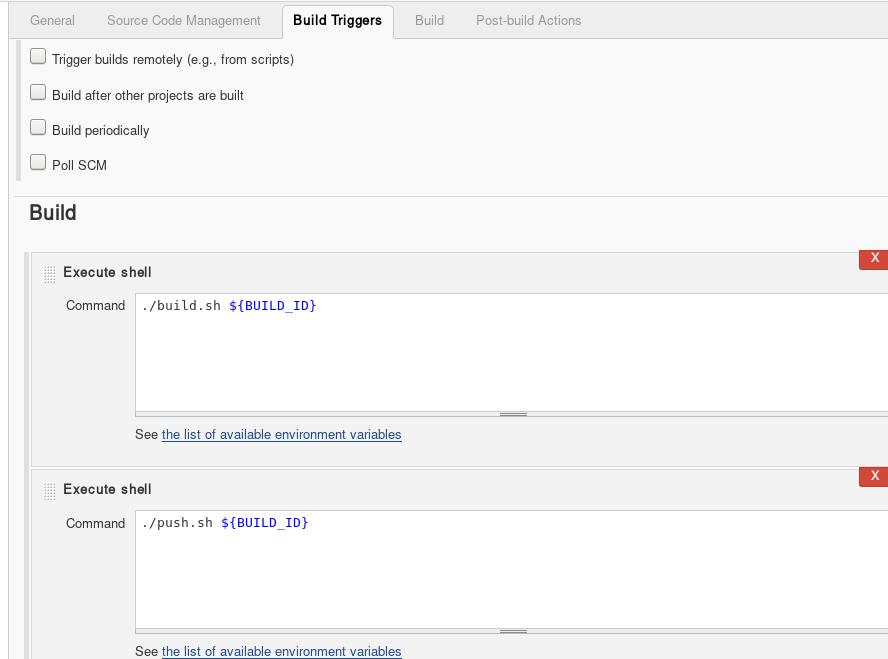
Jenkins里新建的project中,build选项如下:
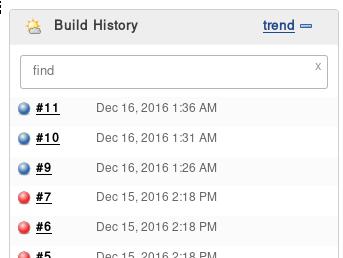
现在触发编译,直接点击build now,则可以看到每一次执行的build中的console out.
编译完毕后,可以看到docker镜像库中新添加的镜像:
# docker images
REPOSITORY                               TAG                 IMAGE ID            CREATED             SIZE
localhost:5000/containersol/nodejs_app   10                  18462939f95d        11 minutes ago      502 MB
localhost:5000/containersol/nodejs_app   11                  18462939f95d        11 minutes ago      502 MB
localhost:5000/containersol/nodejs_app   9                   c163d485bce3        13 minutes ago      502 MB
验证方法则是手动执行该镜像的实例,例如我们修改app.js:
# vim app.js
// Load the http module to create an http server.
var http = require('http');

// Configure our HTTP server to respond with Hello World to all requests.
var server = http.createServer(function (request, response) {
  response.writeHead(200, {"Content-Type": "text/plain"});
  response.end("Hello World , build me now!");
});
触发build并验证后,可以看到输出为:
# curl http://127.0.0.1:8000
Hello World , build me now!
TBD
可以映射jenkins默认编译目录为某个本地目录,或者在Jenkins容器配置文件中 指定好其编译目录。
可以将jenkins与git结合。
如果需要用mesos来自动deploy app,可以参考: