
RunWordPressOnMinikube
Nov 28, 2016
Technology
Installation
On Ubuntu16.04, first download the deb package from
https://github.com/kubernetes/minikube/releases
Install virtualbox:
$ sudo apt-get install -y virtualbox
$ sudo dpkg -i minikube_0.12-2.deb
$ which minikube-linux-amd64
/usr/bin/minikube-linux-amd64
Start Cluster
First install kubectl:
$ curl -Lo kubectl \
https://storage.googleapis.com/kubernetes-release/release/v1.3.0/bin/linux/amd64/kubectl \
&& chmod +x kubectl && sudo mv kubectl /usr/local/bin/
Start kubernetes cluster via:
$ minikube-linux-amd64 start
Starting local Kubernetes cluster...
Downloading Minikube ISO
 36.00 MB / 36.00 MB [==============================================] 100.00%
0s
Kubectl is now configured to use the cluster.
Examine the result:
$ kubectl get pods --all-namespaces
NAMESPACE     NAME                          READY     STATUS RESTARTS   AGE
kube-system   kube-addon-manager-minikube   0/1       ContainerCreating   0	1m
Examine the status:
$ minikube-linux-amd64 status
minikubeVM: Running
localkube: Running
View add-on lists:
$ minikube addons list
- heapster: disabled
- ingress: disabled
- registry-creds: disabled
- addon-manager: enabled
- dashboard: enabled
- kube-dns: enabled
Trouble-Shooting:
When getting following error msgs, delete ~/.minikube and run minikube start again solves the problem.
~$ minikube start
Starting local Kubernetes cluster...
E0224 15:08:58.755236    7977 start.go:107] Error starting host: Error getting state for host: machine does not exist.
minikube upgrade
Upgrade minikube in ubuntu by installing the newest deb package.
Upgrade minikube in ArchLinux by yaourt -S minikube, then minikube start
will use the newest version.
Trouble-Shooting In Dashboard
When startup the dashboard, the minikube will complains could not find the endpoint:
$ minikube-linux-amd64 dashboard
Could not find finalized endpoint being pointed to by kubernetes-dashboard: Temporary Error: endpoints "kubernetes-dashboard" not found
Temporary Error: endpoints "kubernetes-dashboard" not found
Temporary Error: endpoints "kubernetes-dashboard" not found
Temporary Error: endpoints "kubernetes-dashboard" not found
Solved:
Get all of the pods in all namespaces:
$ kubectl get pods --all-namespaces
NAMESPACE     NAME                          READY     STATUS              RESTARTS   AGE
default       nginx-3449338310-vna7q        0/1       ContainerCreating   0          2h
kube-system   kube-addon-manager-minikube   0/1       ContainerCreating   0          3h
Get the description of the pod kube-addon-manager-minikube:
$ kubectl describe --namespace=kube-system po kube-addon-manager-minikube
Name:		kube-addon-manager-minikube
Namespace:	kube-system
Node:		minikube/192.168.99.100
Start Time:	Mon, 28 Nov 2016 12:17:40 +0800
Labels:		component=kube-addon-manager
		version=v5.1
Status:		Pending
IP:		192.168.99.100
Controllers:	<none>
Containers:
  kube-addon-manager:
    Container ID:
    Image:		gcr.io/google-containers/kube-addon-manager:v5.1
    Image ID:
    Port:
    Requests:
      cpu:			5m
      memory:			50Mi
    State:			Waiting
      Reason:			ContainerCreating
    Ready:			False
    Restart Count:		0
    Environment Variables:	<none>
Conditions:
  Type		Status
  Initialized 	True
  Ready 	False
  PodScheduled 	True
Volumes:
  addons:
    Type:	HostPath (bare host directory volume)
    Path:	/etc/kubernetes/
QoS Tier:	Burstable
No events.
Then manually download the docker images of
gcr.io/google-containers/kube-addon-manager:v5.1, load it via following command:
$ eval $(minikube-linux-amd64 docker-env)
$ docker load<kubeaddonmanagerv51.tar.bz2
Also the default nginx-3449338310-vna7q is failed, use the same method for manually download the pause image and load it into the docker system:
$ eval $(minikube-linux-amd64 docker-env)
$ docker load<kubepause30.tar.bz2
Also load the dns:
$ eval $(minikube-linux-amd64 docker-env)
$ docker load<kubedns18.tar.bz2
Wordpress Installation
Refers to :
https://www.linux-toys.com/?p=887
Download yaml file:
$ wget https://gist.githubusercontent.com/rusher81572/ddf2e1487b609f294b21a2463a8be104/raw/1ba33c7a2dfbef9118c6043030b76babb0a80c7b/wordpress-k8s -O wordpress.yaml
$ sudo docker pull rusher81572/phpfpm
$ sudo docker pull rusher81572/mysql
$ sudo docker pull rusher81572/nginx
Create the services from yaml file:
$ kubectl create -f wordpress.yaml
$ minikube-linux-amd64 service nginx --url
http://192.168.99.100:32400
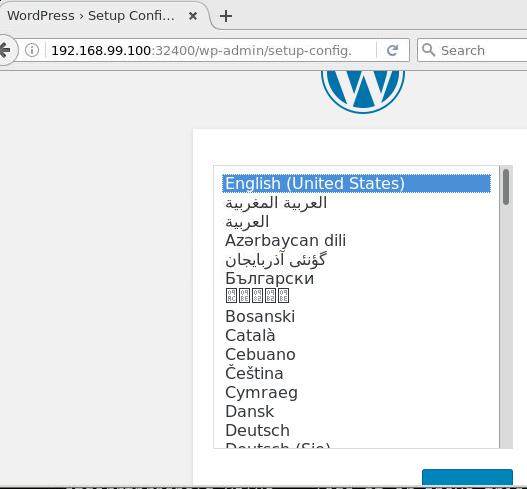
Open the url in your browser:
Manually create the database named wordpress:
$ kubectl get pods (To find the Mysql pod name)
$ kubectl exec -it mysql-qe900 bash
$ mysql
$ create database wordpress;
Insert the following items in webpage:
Username: root
Password: sql
Database Name: wordpress
Database Host: mysql
After installation, now refresh the webpage you will see the installed wordpress.
Echo Server
First download the image and load it into the minikube VM:
$ docker pull gcr.io/google_containers/echoserver:1.4
$ kubectl run hello-minikube --image=gcr.io/google_containers/echoserver:1.4 \
--hostport=8000 --port=8080
$ kubectl get pod
NAME                              READY     STATUS    RESTARTS   AGE
hello-minikube-3383150820-x72om   1/1       Running   0          1m
You could use kubectl describe pod hellxxxx for displaying the detailed
info.
Test echo server:
# curl $(minikube service hello-minikube --url) --data "param1=value1"
CLIENT VALUES:
client_address=172.17.0.1
command=POST
real path=/
query=nil
request_version=1.1
request_uri=http://192.168.99.101:8080/

SERVER VALUES:
server_version=nginx: 1.10.0 - lua: 10001

HEADERS RECEIVED:
accept=*/*
content-length=13
content-type=application/x-www-form-urlencoded
host=192.168.99.101:32520
user-agent=curl/7.51.0
BODY:
param1=value1%
Or use nmap for scan all of the ports:
$ nmap 192.168.99.101

Starting Nmap 7.31 ( https://nmap.org ) at 2016-11-28 22:09 CST
Nmap scan report for 192.168.99.101
Host is up (0.0043s latency).
Not shown: 996 closed ports
PORT      STATE SERVICE
22/tcp    open  ssh
8000/tcp  open  http-alt
8443/tcp  open  https-alt
30000/tcp open  ndmps
8000 port is the port listening for, testing this port:
$  curl http://192.168.99.101:8000 --data "param1=value1"
CLIENT VALUES:
client_address=192.168.99.1
command=POST
real path=/
query=nil
request_version=1.1
request_uri=http://192.168.99.101:8080/

SERVER VALUES:
server_version=nginx: 1.10.0 - lua: 10001

HEADERS RECEIVED:
accept=*/*
content-length=13
content-type=application/x-www-form-urlencoded
host=192.168.99.101:8000
user-agent=curl/7.51.0
BODY:
param1=value1%
Deployment Using dashboard
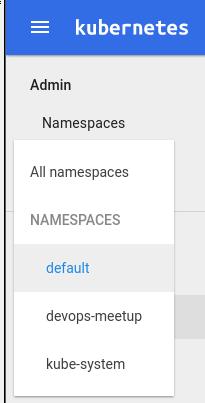
Specify the namespace:
Create app name:
App name: hello-yang
Container Image: gcr.io/google_containers/echoserver:1.4
Number of pods: 5
Service: External
Port: 8080  Target port: 8080  Protocol: TCP
After deployment, examine the result via:
➜  ~ kubectl get namespace
NAME            STATUS    AGE
default         Active    14h
devops-meetup   Active    13h
kube-system     Active    14h
➜  ~ kubectl get deployment --namespace="devops-meetup"
NAME         DESIRED   CURRENT   UP-TO-DATE   AVAILABLE   AGE
hello-yang   5         5         5            5           24m
Delete the deployment via:
# kubectl delete deployment hello-yang --namespace="devops-meetup"
deployment "hello-yang" deleted
Deployment Using yaml
Download the yaml file:
$  wget
https://raw.githubusercontent.com/kubernetes/kubernetes/master/examples/guestbook/all-in-one/guestbook-all-in-one.yaml
$ vim guestbook-all-in-one.yaml
  # type: LoadBalancer
  type: LoadBalancer
Create the service via:
$ kubectl create -f guestbook-all-in-one.yaml
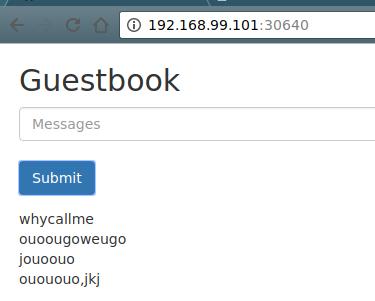
Get the service and view the result:
➜  ~ kubectl get services
NAME           CLUSTER-IP   EXTERNAL-IP   PORT(S)    AGE
frontend       10.0.0.164   <pending>     80/TCP     15m
kubernetes     10.0.0.1     <none>        443/TCP    15h
redis-master   10.0.0.100   <none>        6379/TCP   15m
redis-slave    10.0.0.14    <none>        6379/TCP   15m
➜  ~ minikube service frontend --url
http://192.168.99.101:30640
Then open the browser and view the result.
Tips
Login to minikube VM:
$ minikube-linux-amd64 ssh
View minikube dashboard URL:
$ minikube-linux-amd64 dashboard --url
http://192.168.99.100:30000
View minikube service URL:
$ minikube-linux-amd64 service nginx --url
http://192.168.99.100:32400
Delete pod in terminating status in force:
# kubectl delete pod mypod --grace-period=0
Using kubectl proxy:
$ kubectl proxy --port=8001
Starting to serve on localhost:8001
Now visit: http://localhost:8001/ui for accessing the dashboard.
wide output:
$ kubectl get pods -o wide
NAME       READY     STATUS    RESTARTS   AGE       IP           NODE
hugoblog   1/1       Running   2          22h       172.17.0.4   minikube
$ kubectl get pods
NAME       READY     STATUS    RESTARTS   AGE
hugoblog   1/1       Running   2          22h
Create deployment command:
# kubectl run my-nginx --image=nginx --replicas=2 --port=808 --expose
so if you want to delete all of the pods, simply delete:
# kubectl delete deployments my-nginx
Prevent image pull in json definition files(take zookeeper.json for example):
$ cat zookeeper.json
{
  "kind": "Pod",
  "apiVersion": "v1",
  "metadata": {
    "name": "zookeeper",
    "labels": {
      "name": "zookeeper"
    }
  },
  "spec": {
    "containers": [
      {
        "name": "zookeeper",
        "image": "mattf/zookeeper:latest",
	"imagePullPolicy": "IfNotPresent",