
用Travis CI发布Hugo博客
Jul 7, 2016
Technology
背景
在前面的文章 Using hugo中我已经完成了从 Octopress到Hugo博客构建引擎的迁移,这篇文章将讲述如何进一步简化博客从撰写到发布的流程。 主要使用了Travis CI和Github Page.
如果没有Travis帐号的,可以到Travis-ci注册一个,也可以使用 github帐号连接使用。
github pages
Github的pages遵循的命名原则非常简单,如果github在用户的账户下发现一个名字为
<username>.github.io的仓库,那它会将这个仓库的master分支里的内容映射到
http://<username>.github.io.
以下创建出了一个名字为purplepalmdash.github.io的github仓库, 并将hugo生成的public/目
录下的所有内容(即整个静态网站)上传到了github。
$ git clone git@github.com:purplepalmdash/purplepalmdash.github.io.git
$ cp -r public/* purplepalmdash.github.io/
$ cd purplepalmdash.github.io
$ git add --all
$ git commit -m "First commit under hugo"
$ git push
这时打开浏览器,访问http://purplepalmdash.github.io就可以看到上传后的静态网站。
github pages代码分支
仅仅拥有master分支用来存储静态网站是不够的,我们还需要创建一个用于存放网站源代码的
source分支。以下命令创建出source分支,并上传了hugo源代码内容.
$ cd purplepalmdash.github.io
$ git checkout -b source
$ rm -rf *
$ cp -r ~/blog_source/* ./
$ git add --all
$ git commit -m "First commit for source code"
$ git push --set-upstream origin source
现在我们已经把源代码和生成的网站放在同一个仓库的不同分支了。
使用travis自动生成网站
仓库设置
如果每次都需要执行上述的操作来更新网站的话,那就显得太笨拙且太费时了。手动来执行的话我 们不得不在不同的分支之间切换。幸运的是travis可以自动化上述的操作。
我们的目的是,任何提交给source分支的改动,将触发出travis-ci里对网站的重新生成过程,并
把生成后的新的静态网站提交到github page上的master分支。
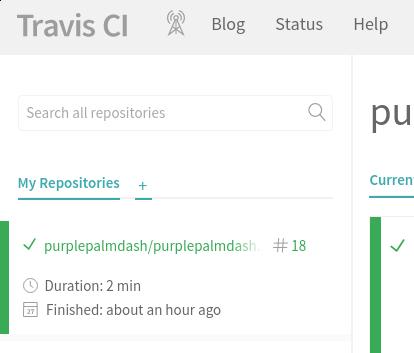
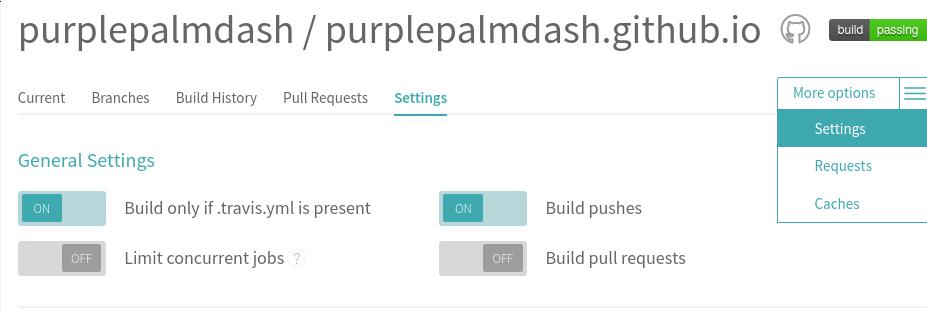
在travis-ci中,将purplepalmdash.github.io仓库加到travis-ci:
加入该仓库后,在Settings选项下,激活Build only if .travis.yml is present和Build pushes选项:
.travis.yml文件设置
接下来我们需要在source分支创建.travis.yml文件,在这个文件中,我们将给予travis权限用
于推送仓库。使用ssh-keygen可以创建出新的ssh key, 为了简单起见,我使用本机上已经有的
ssh key, 位置在~/.ssh/下,文件名分别为id_rsa和id_rsa.pub。我们将使用id_rsa文件
作为travis的认证, 以下是步骤.
首先安装travis(ruby需要事先安装):
$ gem install travis
在仓库中生成.travis.yml文件, 这里是使用id_rsa生成加密后的id_rsa.enc文件:
$ git checkout source
$ touch .travis.yml
$ travis login --org
$ cp ~/.ssh/id_rsa ./
$ travis encrypt-file id_rsa --add
$ rm -f ./id_rsa
$ ls -l id_rsa.enc
-rw-r--r-- 1 dash root 1680 Jul  7 11:18 id_rsa.enc
因为id_rsa.pub已经被添加到github的无密码认证中,又因为我的travis-ci和github共享用户名
,所以无需对id_rsa.pub做其他动作。
如果是travis-ci的私有仓库,则需要手动添加id_rsa.pub。
到这里,travis已经有了对master分支推送的权限,这种推送动作将被提交给source的任何改
动所触发。这里我们需要告诉travis如何编译出网站。以下是我的.travis.yml例子,供参考.
.travis.yml例子
以下是本站的.travis.yml例子:
language: go

go:
    - 1.6

env:
    global:
        - SSH_KEY="id_rsa"
        - GIT_NAME="purplepalmdash"
        - GIT_EMAIL="purplepalm@gmail.com"
        - SOURCE_DIR="public"
        - DEPLOY_BRANCH="source"
git:
    submodules: false

before_install:
    - openssl aes-256-cbc -K $encrypted_b37d26c66aa0_key -iv $encrypted_b37d26c66aa0_iv -in id_rsa.enc -out id_rsa -d

install:
    - go get -u -v github.com/spf13/hugo

script:
    - git https://github.com/rcoedo/hugo-steam-theme ./themes/hugo-steam-theme
    - hugo

after_success:
    - echo "purplepalmdash.github.io" > ./public/CNAME
    - ./scripts/deploy.sh
scripts/deploy.sh
这个代码是直接拷贝别人的。
#!/bin/bash
set -e

# Deploy built docs to this branch
TARGET_BRANCH=master

if [ ! -d "$SOURCE_DIR" ]; then
  echo "SOURCE_DIR ($SOURCE_DIR) does not exist, build the source directory before deploying"
  exit 1
fi

REPO=$(git config remote.origin.url)

if [ -n "$TRAVIS_BUILD_ID" ]; then
  # When running on Travis we need to use SSH to deploy to GitHub
  #
  # The following converts the repo URL to an SSH location,
  # decrypts the SSH key and sets up the Git config with
  # the correct user name and email (globally as this is a
  # temporary travis environment)
  #
  # Set the following environment variables in the travis configuration (.travis.yml)
  #
  #   DEPLOY_BRANCH    - The only branch that Travis should deploy from
  #   ENCRYPTION_LABEL - The label assigned when encrypting the SSH key using travis encrypt-file
  #   GIT_NAME         - The Git user name
  #   GIT_EMAIL        - The Git user email
  #
  echo DEPLOY_BRANCH: $DEPLOY_BRANCH
  echo ENCRYPTION_LABEL: $ENCRYPTION_LABEL
  echo GIT_NAME: $GIT_NAME
  echo GIT_EMAIL: $GIT_EMAIL
  if [ "$TRAVIS_BRANCH" != "$DEPLOY_BRANCH" ]; then
    echo "Travis should only deploy from the DEPLOY_BRANCH ($DEPLOY_BRANCH) branch"
    exit 0
  else
    if [ "$TRAVIS_PULL_REQUEST" != "false" ]; then
      echo "Travis should not deploy from pull requests"
      exit 0
    else
      # switch both git and https protocols as we don't know which travis
      # is using today (it changed!)
      REPO=${REPO/git:\/\/github.com\//git@github.com:}
      REPO=${REPO/https:\/\/github.com\//git@github.com:}

      chmod 600 $SSH_KEY
      eval `ssh-agent -s`
      ssh-add $SSH_KEY
      git config --global user.name "$GIT_NAME"
      git config --global user.email "$GIT_EMAIL"
    fi
  fi
fi

REPO_NAME=$(basename $REPO)
TARGET_DIR=$(mktemp -d /tmp/$REPO_NAME.XXXX)
REV=$(git rev-parse HEAD)
git clone --branch ${TARGET_BRANCH} ${REPO} ${TARGET_DIR}
rsync -rt --delete --exclude=".git" --exclude=".travis.yml" $SOURCE_DIR/ $TARGET_DIR/
cd $TARGET_DIR
git add -A .
git commit --allow-empty -m "Built from commit $REV"
git push $REPO $TARGET_BRANCH

git config --global user.name "$GIT_NAME"
git config --global user.email "$GIT_EMAIL"
现在万事就绪了,每一次对source的提交都将触发travis-ci对整个网站的重构,并推送改动到
master分支后,更新完成以后,purplepalmdash.github.io看到的就是更新后的内容。
Enjoy it!!!