site-to-site VPN
Jun 29, 2016
Technology
Reference
Refers to:
https://clauseriksen.net/2011/02/02/ipsec-on-debianubuntu/
And
http://xmodulo.com/create-site-to-site-ipsec-vpn-tunnel-openswan-linux.html
Network Topology
The topology is listed as following:
Host1 – LAN1 – Router1 –[BIG, BAD INTERNET]– Router2 – LAN2 – Host2
Router1 and Router2 are Ubuntu14.04 machine, which runs in virt-manager,thus you have to create 2 new networks, each in one physical machine.
Physical Machine 1: 192.168.1.79
Router1:
eth0: bridge to physical machine’s networking. 192.168.10.100
eth1: 10.47.70.2.
DHCP on eth1.
Physical Machine 2: 192.168.1.69
Router2:
eth0: bridge to physical machine’s networking. 192.168.10.200
eth1: 10.47.67.2.
DHCP on eth1.
Router Network Configuration
Router1’s networking configuration:
$ vim /etc/network/interfaces
    # The loopback network interface
    auto lo
    iface lo inet loopback

    # The primary network interface
    auto eth0
    iface eth0 inet static
    address 192.168.10.100
    netmask 255.255.0.0
    gateway 192.168.0.176
    dns-nameservers 223.5.5.5

    auto eth1
    iface eth1 inet static
    address 10.47.70.2
    netmask 255.255.255.0
Router2’s networking configuration:
$ vim /etc/network/interfaces
    # The loopback network interface
    auto lo
    iface lo inet loopback

    # The primary network interface
    auto eth0
    iface eth0 inet static
    address 192.168.10.200
    netmask 255.255.0.0
    gateway 192.168.0.176
    dns-nameservers 223.5.5.5
    auto eth1
    iface eth1 inet static
    address 10.47.67.2
    netmask 255.255.255.0
After configuration , restart the Router1 and Router2.
IPSEC Configuration
Router1
Install following package:
$ sudo apt-get install -y openswan
Append following lines at the end of /etc/sysctl.conf,then run sysctl -p /etc/sysctl.conf to take effects.
$ vim /etc/sysctl.conf
net.ipv4.ip_forward=1
net.ipv4.conf.all.accept_redirects = 0
net.ipv4.conf.all.send_redirects = 0
net.ipv4.conf.default.send_redirects = 0
net.ipv4.conf.eth0.send_redirects = 0
net.ipv4.conf.default.accept_redirects = 0
net.ipv4.conf.eth0.accept_redirects = 0
Also you have to disable the redirects via following commands:
for vpn in /proc/sys/net/ipv4/conf/*;
do echo 0 > $vpn/accept_redirects;
echo 0 > $vpn/send_redirects;
done
iptables rules should be done via following:
iptables -A INPUT -p udp --dport 500 -j ACCEPT
iptables -A INPUT -p tcp --dport 4500 -j ACCEPT
iptables -A INPUT -p udp --dport 4500 -j ACCEPT
iptables -t nat -A POSTROUTING -s 10.47.70.0/24 -d 10.47.67.0/24 -j SNAT --to 192.168.10.100
#iptables -t nat -A POSTROUTING -s site-A-private-subnet -d site-B-private-subnet -j SNAT --to site-A-Public-IP
iptables -A POSTROUTING -t nat -d 10.47.70.0/24 -o eth1 -m policy --dir out --pol ipsec -j ACCEPT
iptables -A INPUT -m policy --dir in --pol ipsec -j ACCEPT
iptables -A INPUT -p udp -m multiport --dports 500,4500 -j ACCEPT
iptables -A INPUT -p esp -j ACCEPT
iptables -A FORWARD -m policy --dir in --pol ipsec -j ACCEPT
Now continue to configure the ipsec:
$ sudo vim /etc/ipsec.conf
    ## general configuration parameters ##

    config setup
            plutodebug=all
            plutostderrlog=/var/log/pluto.log
            protostack=netkey
            nat_traversal=yes
            virtual_private=%v4:10.0.0.0/8,%v4:192.168.0.0/16,%v4:172.16.0.0/12
            ## disable opportunistic encryption in Red Hat ##
            oe=off

    ## disable opportunistic encryption in Debian ##
    ## Note: this is a separate declaration statement ##
    #include /etc/ipsec.d/examples/no_oe.conf

    ## connection definition in Debian ##
    conn demo-connection-debian
            authby=secret
            auto=start
            ## phase 1 ##
            keyexchange=ike
            ## phase 2 ##
            esp=3des-md5
            pfs=yes
            type=tunnel
            left=192.168.10.100
            leftsourceip=192.168.10.100
            leftsubnet=10.47.70.0/24
            ## for direct routing ##
            #leftsubnet=192.168.10.100/32
            #leftnexthop=%defaultroute
            leftnexthop=192.168.10.200
            right=192.168.10.200
            rightsubnet=10.47.67.0/24
Notice the left/right configuration, should corresponding the our definition of the networking.
Now generate the pre-shared keys via:
$ dd if=/dev/random count=24 bs=1 | xxd -ps
24+0 records in
24+0 records out
24 bytes copied, 4.5529e-05 s, 527 kB/s
cece1b0ffe27f82c27efc94339f08c418abb9e5f5c0d5bf5
the cece1b0ffe27f82c27efc94339f08c418abb9e5f5c0d5bf5 is the keys we want to
fill into the secrets:
$ sudo cat /etc/ipsec.secrets
    # This file holds shared secrets or RSA private keys for inter-Pluto
    # authentication.  See ipsec_pluto(8) manpage, and HTML documentation.

    # RSA private key for this host, authenticating it to any other host
    # which knows the public part.  Suitable public keys, for ipsec.conf, DNS,
    # or configuration of other implementations, can be extracted conveniently
    # with "ipsec showhostkey".

    # this file is managed with debconf and will contain the automatically created RSA keys
    include /var/lib/openswan/ipsec.secrets.inc
    192.168.10.100  192.168.10.200:  PSK  "cece1b0ffe27f82c27efc94339f08c418abb9e5f5c0d5bf5"
Now Router1 is configured, we continue to configure Router2.
Router2
Ipsec and sysctl are the same as in Router1, the iptables scripts is listed as:
iptables -A INPUT -p udp --dport 500 -j ACCEPT
iptables -A INPUT -p tcp --dport 4500 -j ACCEPT
iptables -A INPUT -p udp --dport 4500 -j ACCEPT
iptables -t nat -A POSTROUTING -s 10.47.67.0/24 -d 10.47.70.0/24 -j SNAT --to 192.168.10.200

#iptables -A POSTROUTING -t nat -d 192.168.1.0/24 -o eth0 -m policy --dir out --pol ipsec -j ACCEPT
iptables -A POSTROUTING -t nat -d 10.47.67.0/24 -o eth1 -m policy --dir out --pol ipsec -j ACCEPT
iptables -A INPUT -m policy --dir in --pol ipsec -j ACCEPT
iptables -A INPUT -p udp -m multiport --dports 500,4500 -j ACCEPT
iptables -A INPUT -p esp -j ACCEPT
iptables -A FORWARD -m policy --dir in --pol ipsec -j ACCEPT
Now configure the ipsec.conf like following:
$ sudo vim /etc/ipsec.conf
## general configuration parameters ##

config setup
        plutodebug=all
        plutostderrlog=/var/log/pluto.log
        protostack=netkey
        nat_traversal=yes
        virtual_private=%v4:10.0.0.0/8,%v4:192.168.0.0/16,%v4:172.16.0.0/12
        ## disable opportunistic encryption in Red Hat ##
        oe=off

## disable opportunistic encryption in Debian ##
## Note: this is a separate declaration statement ##
#include /etc/ipsec.d/examples/no_oe.conf

## connection definition in Debian ##
conn demo-connection-debian
        authby=secret
        auto=start
        ## phase 1 ##
        keyexchange=ike
        ## phase 2 ##
        esp=3des-md5
        pfs=yes
        type=tunnel
        left=192.168.10.200
        leftsourceip=192.168.10.200
        leftsubnet=10.47.67.0/24
        ## for direct routing ##
        #leftsubnet=192.168.10.200/32
        #leftnexthop=%defaultroute
        leftnexthop=192.168.10.100
        right=192.168.10.100
        rightsubnet=10.47.70.0/24
Notice the definition’s differences comparing to Router1.
The ipsec.secrets is the same as Router1, but you have to change like following:
$ sudo vim /etc/ipsec.secrets
192.168.10.200  192.168.10.100:  PSK  "3030804556207bde9fc5c9a043c6ac13fce136ce41eb98a6"
Examine
Restart the ipsec services on both Router.
$ sudo /etc/init.d/ipsec restart
Examine the route via:
adminubuntu@vpn1:~$ ip route
default via 192.168.0.176 dev eth0
10.47.67.0/24 dev eth0  scope link  src 192.168.10.100
10.47.70.0/24 dev eth1  proto kernel  scope link  src 10.47.70.2
192.168.0.0/16 dev eth0  proto kernel  scope link  src 192.168.10.100
adminubuntu@vpn2:~$ ip route
default via 192.168.0.176 dev eth0
10.47.67.0/24 dev eth1  proto kernel  scope link  src 10.47.67.2
10.47.70.0/24 dev eth0  scope link  src 192.168.10.200
192.168.0.0/16 dev eth0  proto kernel  scope link  src 192.168.10.200
So we can see the route shows the connection of the vpn.
Now examine the ipsec status:
$ sudo service ipsec status
IPsec running  - pluto pid: 930
pluto pid 930
1 tunnels up
some eroutes exist
More detailed infos could be examine via: sudo ipsec auto --status.
DHCP Server
Install dhcpd and configure it via following command:
$ sudo apt-get install -y isc-dhcp-server
$ sudo vim /etc/default/isc-dhcp-server
INTERFACES="eth1"
Append following lines to /etc/dhcp/dhcpd.conf:
Router1:
subnet
10.47.70.0 netmask 255.255.255.0 {
# --- default gateway
option routers
10.47.70.2;
# --- Netmask
option subnet-mask
255.255.255.0;
# --- Broadcast Address
option broadcast-address
10.47.70.255;
# --- Domain name servers, tells the clients which DNS servers to use.
option domain-name-servers
223.5.5.5,180.76.76.76;
option time-offset 0;
range 10.47.70.3 10.47.70.254;
default-lease-time 1209600;
max-lease-time 1814400;
}
Router2:
subnet
10.47.67.0 netmask 255.255.255.0 {
# --- default gateway
option routers
10.47.67.2;
# --- Netmask
option subnet-mask
255.255.255.0;
# --- Broadcast Address
option broadcast-address
10.47.67.255;
# --- Domain name servers, tells the clients which DNS servers to use.
option domain-name-servers
223.5.5.5,180.76.76.76;
option time-offset 0;
range 10.47.67.3 10.47.67.254;
default-lease-time 1209600;
max-lease-time 1814400;
}
Now your subnet is ready, restart the Router1 and Router2, next step we will verify our site-to-site VPN.
Verification
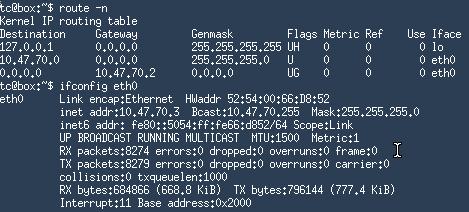
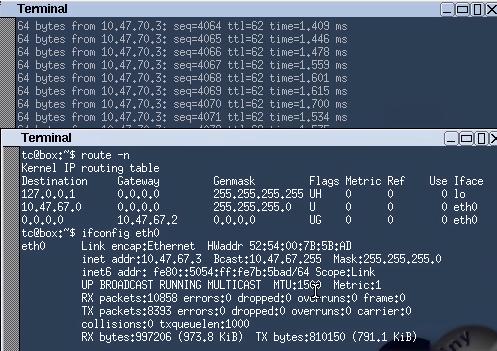
Create 2 new vm on 2 physical machine, each of them attached to our Router’s eth1 networking. I use tinycore for experiment.
Tinycore Attaches to Router1:
Tinycore Attaches to Router2:
The picture also shows the ping each other without any problem.
