
Use RackHD For Deploying Systems
Jun 1, 2016
Technology
Following are the steps for using the RackHD for deploying systems. Mainly refers to http://dojoblog.emc.com/rackhd-cpi/setting-up-rackhd/
But the tutorial from emc includes lots of mistakes, so I listed all of the steps in following chapters.
Vagrant Env Preparation
Initialize the vagrant env via(ubuntu1404 is my box name):
$ vagrant init ubuntu1404
A `Vagrantfile` has been placed in this directory.
$ vim Vagrantfile
  config.vm.provider "virtualbox" do |vb|
  #   # Display the VirtualBox GUI when booting the machine
  #   vb.gui = true
  #
  #   # Customize the amount of memory on the VM:
    vb.memory = "4096"
    vb.cpus = 4
    vb.customize ["modifyvm", :id, "--nicpromisc2", "allow-all", "--ioapic", "on"]
  end
$ vagrant up
Prerequisites
Use following scripts for installing the prerequisites for RackHD(pre_rackhd.sh):
#!/bin/bash
set -e
sudo apt-get -y update
sudo apt-get -y dist-upgrade
sudo apt-get autoremove
sudo apt-get install -y nodejs nodejs-legacy npm
# Runtime Dependencies
sudo apt-get install -y rabbitmq-server mongodb isc-dhcp-server
sudo apt-get install -y snmp ipmitool ansible amtterm apt-mirror unzip libkrb5-dev
# upstart will be installed after Ubuntu15.04.
# sudo apt-get -y install upstartsysv
sudo update-initramfs -u
# amttool
wget http://downloads.sourceforge.net/project/amttooltng/1.7/amttool
sudo chmod 777 amttool
sudo mv amttool /usr/bin/amttooltng
# Compile Dependencies
sudo apt-get install -y git openssh-server pbuilder dh-make devscripts ubuntu-dev-tools
# Git clone all of the repositories
RACKHD_INSTALL_DIR=~;cd $RACKHD_INSTALL_DIR
git clone https://github.com/RackHD/RackHD
RACKHD_PROJECT_DIR=${RACKHD_INSTALL_DIR}/RackHD
cd $RACKHD_PROJECT_DIR
git submodule update --init --recursive
git submodule foreach git pull origin master
# Configuration files
sudo touch /etc/default/on-http
sudo touch /etc/default/on-dhcp-proxy
sudo touch /etc/default/on-taskgraph
sudo touch /etc/default/on-syslog
sudo touch /etc/default/on-tftp
# Build And Install
cd ${RACKHD_PROJECT_DIR}/on-http
./HWIMO-BUILD
sudo dpkg -i on-http_*.deb
cd ${RACKHD_PROJECT_DIR}/on-dhcp-proxy
./HWIMO-BUILD
sudo dpkg -i on-dhcp-proxy_*.deb
cd ${RACKHD_PROJECT_DIR}/on-taskgraph
./HWIMO-BUILD
sudo dpkg -i on-taskgraph_*.deb
cd ${RACKHD_PROJECT_DIR}/on-syslog
./HWIMO-BUILD
sudo dpkg -i on-syslog_*.deb
cd ${RACKHD_PROJECT_DIR}/on-tftp
./HWIMO-BUILD
sudo dpkg -i on-tftp_*.deb
Now shutdown the vm, add one networking interface, because we want to add PXE in this network apdater.
$ vim Vagrantfile
config.vm.network "private_network", ip: "172.31.128.1", virtualbox__intnet: "closednet"
Now startup the vagrant vm again. continue to configure the PXE.
Configuration
Examine the eth1 IP Configuration:
vagrant@ubuntu-1404:~$ ifconfig eth1
eth1      Link encap:Ethernet  HWaddr 08:00:27:c2:cf:3e
          inet addr:172.31.128.1  Bcast:172.31.128.255  Mask:255.255.255.0
Configure the isc-dhcp:
$ sudo vim /etc/default/isc-dhcp-server
INTERFACES="eth1"
Add the following configuration into /etc/dhcp/dhcp.conf:
# RackHD Added Lines
deny duplicates;

ignore-client-uids true;

subnet 172.31.128.0 netmask 255.255.252.0 {
    range 172.31.128.2 172.31.131.254;
    # Use this option to signal to the PXE client that we are doing proxy DHCP
    option vendor-class-identifier "PXEClient";
}
Download the config.json for monorail usage, and modify its tftpRoot Configuration:
$ cd /opt/monorail/
$ sudo wget https://raw.githubusercontent.com/RackHD/RackHD/master/packer/ansible/roles/monorail/files/config.json
$ sudo vim config.json
    "tftpRoot": "/opt/monorail/static/tftp",
Prepare the http and tftp folder:
$ sudo mkdir -p /opt/monorail/static/http/common/
$ sudo mkdir -p /opt/monorail/static/tftp/
Download the tftp and http static files:
$ cd /opt/monorail/static/tftp
$ sudo wget https://bintray.com/artifact/download/rackhd/binary/ipxe/monorail.ipxe
$ sudo wget https://bintray.com/artifact/download/rackhd/binary/ipxe/monorail-undionly.kpxe
$ sudo wget https://bintray.com/artifact/download/rackhd/binary/ipxe/monorail-efi32-snponly.efi
$ sudo wget https://bintray.com/artifact/download/rackhd/binary/ipxe/monorail-efi64-snponly.efi
$ cd /opt/monorail/static/http/common/
$ sudo wget https://bintray.com/artifact/download/rackhd/binary/builds/discovery.overlay.cpio.gz
$ sudo wget https://bintray.com/artifact/download/rackhd/binary/builds/base.trusty.3.16.0-25-generic.squashfs.img
$ sudo wget https://bintray.com/artifact/download/rackhd/binary/builds/initrd.img-3.16.0-25-generic
$ sudo wget https://bintray.com/artifact/download/rackhd/binary/builds/vmlinuz-3.16.0-25-generic
Now reboot the vm again, next step we will test the PXE boot.
PXE Clients
The PXE will be avaiable and after it finishes, the vm will look like:
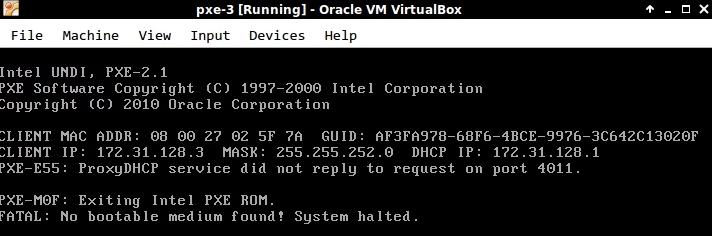
Now you could get the node info via following RESTFUL api call:
$ curl http://localhost:8080/api/1.1/nodes | python -m json.tool
        "createdAt": "2016-06-01T03:44:09.064Z",
        "id": "574e5a0944ff724a05284005",
        "identifiers": [
            "08:00:27:02:5f:7a"
        ],
        "name": "08:00:27:02:5f:7a",
Examine the mac correponding node ID 574e5a0944ff724a05284005, later we wil use this id for deploying CentOS.
Add CentOS7 Deployment
Add CentOS7 DVD into the deployment:
$ sudo python ~/RackHD/on-tools/scripts/setup_iso.py /mnt/CentOS-7-x86_64-Everything-1511.iso /opt/monorail/static/http --link=/home/vagrant/RackHD
This will takes around 10 mins for importing the iso into the RackHD.
Configure the node:
$ curl -H "Content-Type: application/json" -X POST --data @samples/noop_body.json http://localhost:8080/api/1.1/nodes/574e5a0944ff724a05284005/obm | python -m json.tool
$ curl -H "Content-Type: application/json" -X POST --data @samples/centos_iso_boot.json http://localhost:8080/api/1.1/nodes/574e5a517c6c03440553dd0f/workflows | python -m json.tool
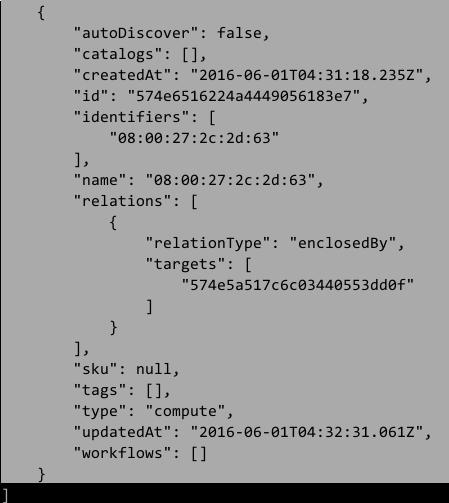
Then added the configuration for deploying CentOS7 via:
$ cd ~/RackHD/example/
$ curl -H "Content-Type: application/json" -X POST --data @samples/noop_body.json http://localhost:8080/api/1.1/nodes/574e6516224a4449056183e7/obm | python -m json.tool
$ curl -H "Content-Type: application/json" -X POST --data @samples/centos_iso_boot.json http://localhost:8080/api/1.1/nodes/574e6516224a4449056183e7/workflows | python -m json.tool
PXE the node, thus you will get a CentOS7 installed.