MAAS Deploy(3)
Mar 12, 2015
Technology
Following is the steps for creating virtual nodes and let it be administrated by MAAS Cluster.
Node Creation
First create a null iso via touch none.iso, later we will use this iso for booting the node.
Create a new virtual machine -> select “Local installation media(ISO images or CDROM) -> Use Local Iso image(/home/Trusty/none.iso) -> Memory 512MB, CPU 1 Core -> Disk 20 GB -> name: MASSTestNode0 -> Customize configuration before install -> Finish.
Customization:
Boot Option, select NIC and Disk1.
Disk1 Option, select advanced -> virtio.
NIC Option, select “virtualization network maasisotest NAT”, virtio.
Click “Begin Installation”, start installation, and quickly shut it off.
Clone it to 3 nodes. Then click start and let it startup via ipxe. After a while they will be powered off.
MAAS Network Configuration
We want to make MAAS controller be the pxe server in this isolated network, so we visit following webpage and do configuration:
“Edit Cluster Controller” -> Edit Interface eth0 -> Mangement(DNS and DHCP)
Router IP: 10.17.17.1
DHCP dynamic IP range low value: 10.17.17.101
DHCP dynamic IP range high value: 10.17.17.199
Then “Save Interface” and let this MASS controller serves all of the created nodes.
MAAS Node Configuration
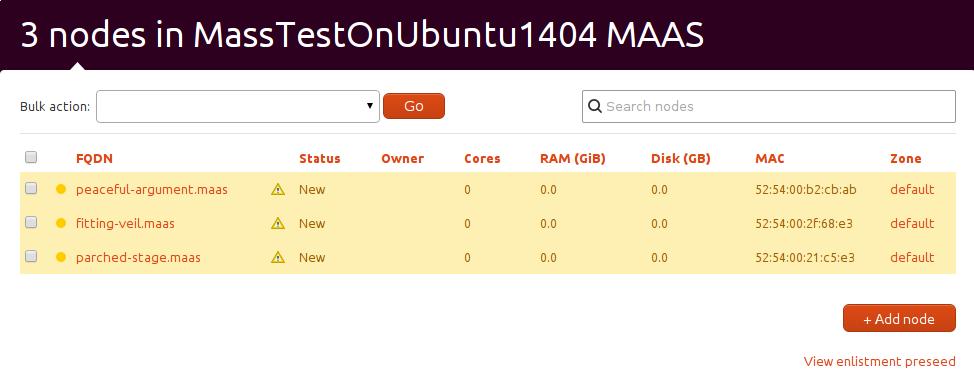
Now after bootup the newly created nodes, your nodes page will be looks like following:
Click them and edit like following steps:
First in your host machine run sudo virsh list --all to get the corresponding virtual machines.
Then use sudo virsh dumpxml xxxx | grep mac to get the corresponding mac address, then fill the contents.
For example:
$ sudo virsh dumpxml MASSTestNode0 | grep mac
    <type arch='x86_64' machine='pc-i440fx-2.2'>hvm</type>
      <mac address='52:54:00:2f:68:e3'/>
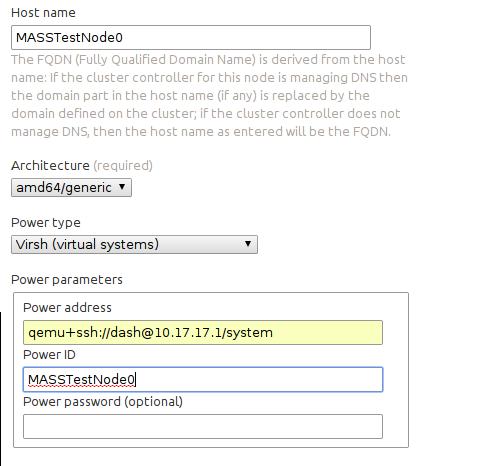
Then the configuration images is like following:
Also you should login as user maas and do following command to let you access remote’s qemu:
$ sudo apt-get install libvirt-bin
$ ssh-copy-id Trusty@10.17.17.1
$ virsh -c qemu+ssh://Trusty@10.17.17.1/system list --all
Then save node, and select it, in bulk actions, select “Commision Selected Nodes”, it will start commision, and after its successful, it will be looked like “ready” state. Remember its previous state is “New”.
Also comission the other 2 nodes.
The next step we will let Juju runs on MAAS, and build more fantanstic applications.
