How to setup STM32 Project in eclipse
Nov 25, 2013
Technology
###Preparation
####STM Standard Peripheral Lib
Download Link for STSW-STM32054STM32F10x standard peripheral library :
http://www.st.com/web/catalog/tools/FM147/CL1794/SC961/SS1743/PF257890
Unsip the downloaded library and you will get several folders, the Libraries folder is the pure libs.
####Cross-Compiler for STM32
Download the cross-compiler from CodeSourcery ARM EABI toolchain - Mentor Graphics:
https://sourcery.mentor.com/sgpp/lite/arm/portal/subscription?@template=lite
You have to choose EABI version. Download and install it, you will get “arm-none-eabi-” prefixed cross-compiler.
####Eclipse plugins
Help-> Install New Software, Add the URL for gnuarm:
http://gnuarmeclipse.sourceforge.net/updates
Then Install CDT GNU Cross Development Tools , after install the plugin, you will asked to reboot, just reboot. Now your preparation is OK.
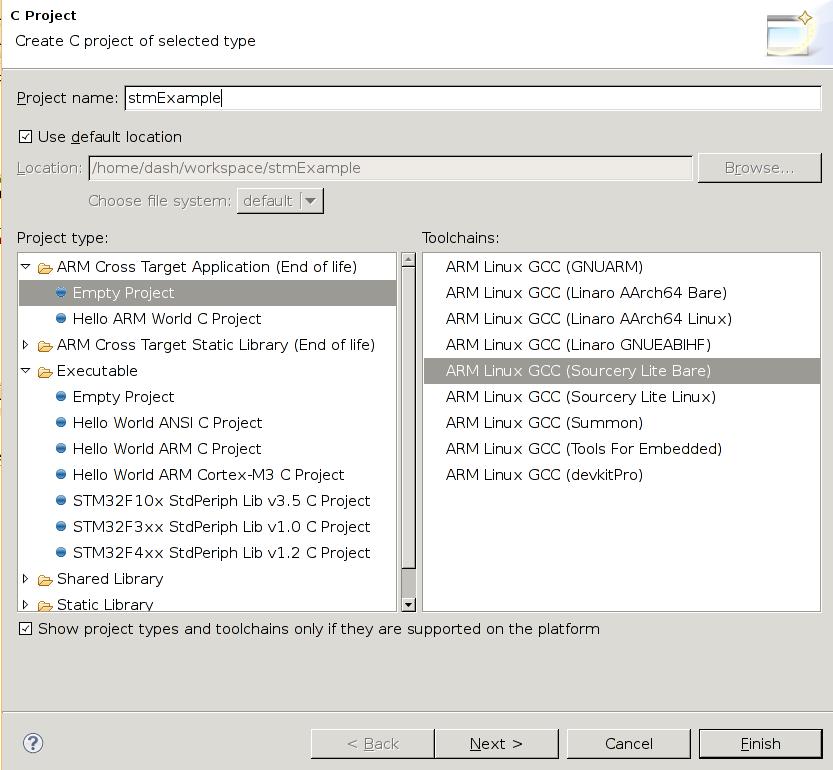
###Create a new project In Eclipse, Click File->New->C project, choose “ARM Cross Target Applcation (End of life)", choose “Empty Project” “ARM Linux GCC(Sourcery Lite Bare), give the Project name and click Next Button, then click Finish. you will see the newly created project in the Project Explorer.

Copy the Library files into your own project, take “stmExample” project for example:
	[Trusty@DashArch STM32F10x_StdPeriph_Lib_V3.5.0]$ pwd
	/media/y/embedded/stm32/dev/lib/STM32F10x_StdPeriph_Lib_V3.5.0
	[Trusty@DashArch STM32F10x_StdPeriph_Lib_V3.5.0]$ cp -r  Libraries/ ~/workspace/stmExample/
Your project should seem like this:

Now you have to prepare your startup file, notice you have to use “S” suffixed file name, and you have to remove the remaining directory except the .S file:
	[Trusty@DashArch startup]$ pwd
	/home/Trusty/workspace/stmExample/Libraries/CMSIS/CM3/DeviceSupport/ST/STM32F10x/startup
	[Trusty@DashArch startup]$ ls
	arm  gcc_ride7  iar  TrueSTUDIO
	[Trusty@DashArch startup]$ cp TrueSTUDIO/startup_stm32f10x_hd.s ./startup_stm32f10x_hd.S
	[Trusty@DashArch startup]$ ls
	arm  gcc_ride7  iar  startup_stm32f10x_hd.S  TrueSTUDIO
	[Trusty@DashArch startup]$ rm -rf TrueSTUDIO/ iar/ gcc_ride7/ arm/
	[Trusty@DashArch startup]$ ls
	startup_stm32f10x_hd.S
Create a directory named src to contains your own project files.
	[Trusty@DashArch stmExample]$ mkdir src
	[Trusty@DashArch stmExample]$ pwd
	/home/Trusty/workspace/stmExample
	[Trusty@DashArch stmExample]$ ls
	Libraries  src
Copy the project files into “src” directory:
	[Trusty@DashArch STM32F10x_StdPeriph_Template]$ ls
	EWARM  HiTOP  main.c  MDK-ARM  Release_Notes.html  RIDE  stm32f10x_conf.h  stm32f10x_it.c  stm32f10x_it.h  system_stm32f10x.c  TrueSTUDIO
	[Trusty@DashArch STM32F10x_StdPeriph_Template]$ cp stm32f10x_* ~/workspace/stmExample/src/
	[Trusty@DashArch STM32F10x_StdPeriph_Template]$ pwd
	/media/y/embedded/stm32/dev/lib/STM32F10x_StdPeriph_Lib_V3.5.0/Project/STM32F10x_StdPeriph_Template
Copy the link script to root directory of your project:
	[Trusty@DashArch STM32100B-EVAL]$ pwd
	/media/y/embedded/stm32/dev/lib/STM32F10x_StdPeriph_Lib_V3.5.0/Project/STM32F10x_StdPeriph_Template/TrueSTUDIO/STM32100B-EVAL
	[Trusty@DashArch STM32100B-EVAL]$ cp stm32_flash.ld  ~/workspace/stmExample/
You have to modify the link script according to your own flash layout and memory layout, My CPU is STM32F103VC, which has 48K RAM and 256K Flash, so the configuration is listed as:
/*
Linker subscript for STM32F051 definitions with 64K Flash and 8K RAM
Copyright RAISONANCE 2007
!!! This file is automatically generated by RIDE !!!
Do not modify it, as it will be erased at every link.
You can use, copy and distribute this file freely, but without any warranty.
*/

/* Memory Spaces Definitions */

ENTRY(Reset_Handler)

MEMORY
{
  FLASH (rx) : ORIGIN = 0x08000000, LENGTH = 256K
  RAM  (xrw) : ORIGIN = 0x20000000, LENGTH = 48K
}

/* highest address of the user mode stack */
_estack = 0x2000c000;


/*
Common part of the linker scripts for STR71x devices in FLASH mode
(that is, the FLASH is seen at 0)
Copyright RAISONANCE 2005
You can use, modify and distribute this file freely, but without any warranty.
*/

/* Sections Definitions */

SECTIONS
{
    /* for Cortex devices, the beginning of the startup code is stored in the .isr_vector section, which goes to FLASH */
    .isr_vector :
    {
	. = ALIGN(4);
        KEEP(*(.isr_vector))            /* Startup code */
	. = ALIGN(4);
    } >FLASH

    /* the program code is stored in the .text section, which goes to Flash */
    .text :
    {
	    . = ALIGN(4);

        *(.text)                   /* normal code */
        *(.text.*)                 /* -ffunction-sections code */
        *(.rodata)                 /* read-only data (constants) */
        *(.rodata*)                /* -fdata-sections read only data */
        *(.glue_7)                 /* TBD - needed ? */
        *(.glue_7t)                /* TBD - needed ? */

	/* Necessary KEEP sections (see http://sourceware.org/ml/newlib/2005/msg00255.html) */
	KEEP (*(.init))
	KEEP (*(.fini))

	    . = ALIGN(4);
        _etext = .;
	    /* This is used by the startup in order to initialize the .data section */
        _sidata = _etext;
    } >FLASH

    /* This is the initialized data section
    The program executes knowing that the data is in the RAM
    but the loader puts the initial values in the FLASH (inidata).
    It is one task of the startup to copy the initial values from FLASH to RAM. */
    .data  : AT ( _sidata )
    {
	    . = ALIGN(4);
        /* This is used by the startup in order to initialize the .data secion */
        _sdata = . ;
        _data = . ;

        *(.data)
        *(.data.*)
        *(.RAMtext)

	    . = ALIGN(4);
	    /* This is used by the startup in order to initialize the .data secion */
   	    _edata = . ;
    } >RAM

    /* This is the uninitialized data section */
    .bss :
    {
	    . = ALIGN(4);
        /* This is used by the startup in order to initialize the .bss secion */
        _sbss = .;
        _bss = .;

        *(.bss)
        *(.bss.*) /* patched by elias - allows the use of -fdata-sections */
        *(COMMON)

	    . = ALIGN(4);
	    /* This is used by the startup in order to initialize the .bss secion */
   	 _ebss = . ;
    } >RAM

    PROVIDE ( end = _ebss );
    PROVIDE ( _end = _ebss );

    __exidx_start = .;
    __exidx_end = .;

    /* after that it's only debugging information. */

    /* remove the debugging information from the standard libraries */
    /DISCARD/ :
    {
     libc.a ( * )
     libm.a ( * )
     libgcc.a ( * )
     }

    /* Stabs debugging sections.  */
    .stab          0 : { *(.stab) }
    .stabstr       0 : { *(.stabstr) }
    .stab.excl     0 : { *(.stab.excl) }
    .stab.exclstr  0 : { *(.stab.exclstr) }
    .stab.index    0 : { *(.stab.index) }
    .stab.indexstr 0 : { *(.stab.indexstr) }
    .comment       0 : { *(.comment) }
    /* DWARF debug sections.
       Symbols in the DWARF debugging sections are relative to the beginning
       of the section so we begin them at 0.  */
    /* DWARF 1 */
    .debug          0 : { *(.debug) }
    .line           0 : { *(.line) }
    /* GNU DWARF 1 extensions */
    .debug_srcinfo  0 : { *(.debug_srcinfo) }
    .debug_sfnames  0 : { *(.debug_sfnames) }
    /* DWARF 1.1 and DWARF 2 */
    .debug_aranges  0 : { *(.debug_aranges) }
    .debug_pubnames 0 : { *(.debug_pubnames) }
    /* DWARF 2 */
    .debug_info     0 : { *(.debug_info .gnu.linkonce.wi.*) }
    .debug_abbrev   0 : { *(.debug_abbrev) }
    .debug_line     0 : { *(.debug_line) }
    .debug_frame    0 : { *(.debug_frame) }
    .debug_str      0 : { *(.debug_str) }
    .debug_loc      0 : { *(.debug_loc) }
    .debug_macinfo  0 : { *(.debug_macinfo) }
    /* SGI/MIPS DWARF 2 extensions */
    .debug_weaknames 0 : { *(.debug_weaknames) }
    .debug_funcnames 0 : { *(.debug_funcnames) }
    .debug_typenames 0 : { *(.debug_typenames) }
    .debug_varnames  0 : { *(.debug_varnames) }
}
Now create a sample main.c under the src directory and input your source code.
###Configure the project Right click your project, select Properties, C/C++ Build -> Settings, ARM Linux GCC Assembler(Sourcery Lite Bare)/Preprocessor, add a Defined symbols(-D), also you have to add this into ARM Linux GCC Compiler(Sourcery Lite Bare):
	STM32F10X_HD
	USE_STDPERIPH_DRIVER
In ARM Linux GCC C Compiler(Sourcery Lite Bare)-> Directories, add Include paths(-i) add following:

Specify the link script:
ARM Linux GCC CLinker(Sourcery Lite Bare) -> General, Script file(-T)
/home/Trusty/workspace/stm32archlinux/stm32_flash.ld
###Build and Debug
Right click the project and click “Build project”, then you got your project compiling and linking, finally you got your Binary named stmExample.elf.
Now we can use OpenOCD for writing the image into the flash and debugging it.
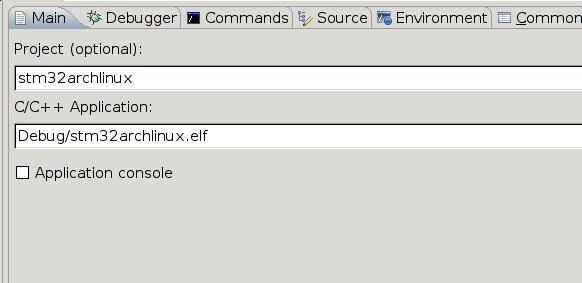
Run->Debug Configuration, you will see Zylin Embedded debug(Native) is available, right click and choose “Create new”, create a new debug item.
Choose the Main:

Choose the Debugger:

Choose Commands:

The configuration file is :
	target remote localhost:3333
	monitor reset
	monitor halt
	monitor flash protect 0 0 11 off
	monitor flash write_image erase /home/Trusty/workspace/stm32archlinux/Debug/stm32archlinux.hex 0 ihex
	disconnect
	target remote localhost:3333
	monitor reset
	monitor halt
Open your own openocd, and then using eclipse to connect the gdb. Remember “toggle breakpoint” and you will get a hardware breakpoint. Enjoy the debugging.
